E-Verify User Manual For Corporate Administrators
![]()
E-Verify User Manual For Corporate Administrators | Current as of May 2025

1.0 Introduction
E-Verify helps employers ensure a legal workforce by comparing information entered on the Form I-9, Employment Eligibility Verification, against authoritative sources available to the U.S. Department of Homeland Security.
When employers – and the employees they hire – complete Form I-9, they are playing an important role in verifying identity and legal authorization to work in the U.S. E-Verify complements Form I-9 by taking employment verification to the next level, helping employers stay compliant with federal immigration law, prevent unauthorized employment, and protecting American Jobs.
This manual provides guidance on E-Verify processes and outlines the rules and responsibilities for Corporate Administrators enrolled in E-Verify. Users must follow the guidelines set forth in the E-Verify Terms and Conditions of the Memorandum of Understanding, E-Verify+ Terms of Service, and rules and responsibilities outlined in this manual.
E-Verify+ is a service of E-Verify that allows a participant to electronically initiate the employment verification process for their recently hired employees, prompting the employee to create and log in to their E-Verify+ account, enter their Form I-9 information, and have that information electronically confirmed by E-Verify. The result is transmitted to the E-Verify+ participating employer for creation and retention of a Form I-9 after physical examination or by using the DHS-authorized alternative procedure for remote examination of documentation.
For purposes of this manual, the term “employer” means a person, company, or other entity that is required to complete Form I-9, Employment Eligibility Verification, including any individual with an E-Verify user account. The term “Corporate Administrator” means any individual designated by an employer to oversee the use of E-Verify at multiple sites through an administrative account; there is no association to an employer’s legal status as a corporation. Corporate Administrator is simply the name for the type of E-Verify account that some companies use to oversee E-Verify at multiple locations.
A Corporate Administrator account is an optional tool that is useful to an employer that plans to create E-Verify cases from multiple locations and wants to link those sites to a single central account for management and reporting. If an employer has only one location where they will create E-Verify cases that employer may simply enroll in E-Verify with the employer access method, see Section 1.2.1.
This section provides a background and overview and an introduction to participation, user roles, basic website navigation, rules and responsibilities, and the privacy and security guidelines of E-Verify.
1.1 Background And Overview
In 1996, Congress passed the Illegal Immigration Reform and Immigrant Responsibility Act (IIRIRA), which required the Social Security Administration (SSA) and U.S. Citizenship and Immigration Services (USCIS), formerly the Immigration and Naturalization Service, to conduct an employment verification pilot program. Under the U.S. Department of Homeland Security (DHS), USCIS operates the E-Verify program, previously referred to as the Basic Pilot program. E-Verify is an internet-based system that implements the requirements of IIRIRA by allowing any U.S. employer to electronically verify the employment eligibility of its newly hired employees.
E-Verify is a voluntary program. However, employers with federal contracts or subcontracts that contain the Federal Acquisition Regulation (FAR) E-Verify clause are required to enroll in and use E-Verify as a condition of federal contracting. Employers with employees in states with legislation that require participation in E Verify, for example, as a condition of business licensing, may also be required to participate in E Verify. In addition, an employer may be required to participate in E-Verify pursuant to a court order.
E-Verify does not provide guidance on state or local E-Verify laws. For help, contact the appropriate state officials, a local Chamber of Commerce, or other legal advisors.
Apart from any state or local law that requires participation in E-Verify, employers are fully responsible for complying with sections 274A (which addresses the requirements of the Form I-9 process) and 274B (which addresses unfair immigration-related employment practices) of the Immigration and Nationality Act. Employers who fail to comply with either section may be subject to penalties.
E-Verify works by electronically comparing the information from an employee’s Form I-9 with records available to SSA and/or DHS to verify the identity and employment eligibility of each newly hired employee and/or employee assigned to a covered federal contract.
Employers can verify the employment eligibility of only one person at a time within E-Verify. All cases must be created individually.
E-Verify is free and it is the best means available to confirm the employment eligibility of new hires. E-Verify is currently available in all 50 states, the District of Columbia, Puerto Rico, Guam the U.S. Virgin Islands and Commonwealth of the Northern Mariana Islands.
1.2 E-Verify Participation: Enrollment Vs. Registration
Significant differences between enrollment and registration which are outlined in the Enrollment vs. Registration Overview. For additional information on enrollment, visit https://www.E-Verify.gov/employers/enrolling-in-E-Verify.
Employers who wish to check their enrollment status or access method should contact:
E-Verify Contact Center Monday through Friday from 8 a.m. – 8 p.m. Eastern time
Telephone: 888-464-4218; Email: E-Verify@uscis.dhs.gov
Employers who have enrolled and you need information about registering additional users, should see Section 2.4.
Enrollment vs. Registration Overview
| PROCESS | ENROLLMENT | REGISTRATION |
|---|---|---|
| Who | Enrollment Point of Contact enrolls companies in E-Verify to participate in the program | A corporate administrator registers new users for the employer’s verification locations in E-Verify who are then able to create cases. A program administrator may also register new users for his or her location. For more information on user roles, see Section 1.3. |
| How | Visit the E-Verify enrollment website at https://EVerify.uscis.gov/enroll. An employer that has enrolled in E-Verify as a corporate administrator may enroll the verification locations with the corporate administrator account | Corporate administrators may register program administrators, general users and other corporate administrators at any time after completing the corporate administrator tutorial and passing the knowledge test. For more information on adding new users, see Section 2.4. |
To participate in E-Verify, employers must enroll. You can find information about the system requirements on the E-Verify website under Enrolling in E-Verify.
To enroll in E-Verify, corporate administrators should visit the enrollment website which guides employers through the enrollment process. Additional information regarding enrollment is found at www.E-Verify.gov.
1.2.1 Access Methods
When employers enroll in E-Verify, they choose an access method. Access methods are types of E-Verify accounts that determine who creates and manages the employer’s E-Verify cases. The four access methods include: employer, E-Verify employer agent, corporate administrator, and web services.
The access methods are explained in the Access Method Overview. For more information, visit the Enrolling in E-Verify section at www.E-Verify.gov.
Access Method Overview
| ACCESS METHOD | EXPLANATION |
|---|---|
| Employer Access | Employer plans to use E-Verify to verify its employees This access method allows employers to create and manage their own cases directly in E-Verify. Most E-Verify participants, regardless of their business size or structure, are enrolled under the employer access method. |
| E-Verify Employer Agent Access | Employer agent plans to use E-Verify on behalf of its clients to verify the clients’ employees. The E-Verify employer agent access method allows an individual or company to act on behalf of other employers to create and manage the E-Verify cases of the other employers. The E-Verify employer agent may also create cases for its own employees. |
| Corporate Administrator Access | Employer has a central office that needs to manage E-Verify use for all of its locations that access E-Verify Corporate administrator access is used only to manage multiple employer accounts. Corporate administrators cannot create or manage individual E-Verify cases. |
Web Services Access for Employers -or- Web Services Access for E‑Verify Employer Agents | Employer plans to develop its own software to access E-Verify The web services access method requires an employer to develop software that interfaces with E-Verify to create and manage cases. The employer’s software should extract data from its existing system or an electronic Form I-9 and transmit the information to E-Verify. Employers who choose this option receive a web services Interface Control Agreement (ICA) which contains the information used to develop and test the software interface. Both employers and E Verify employer agents can use this access method. |
1.2.2 Link An Existing Employer Account To A Corporate Administrator Account
An employer that has chosen to enroll in E-Verify as a corporate administrator may enroll new verification locations (employer accounts) (see Section 2.2). Existing E-Verify employer accounts must be linked to the corporate account by a program administrator under the existing account. (see Appendix A: Link Employer Account to Corporate Administrator). Linking an employer account means that a corporate administrator may gain administrative access to an existing employer account.
Once an employer account is linked, the corporate administrator account serves as the “umbrella” account; the corporate administrator(s) can manage the verification location and its users and create reports for that location.
1.3 Overview Of User Roles
Enrolled employers can assign their users with different permissions and functions, depending upon the user’s role. Corporate administrators are the only user role with access to the corporate administrator account. Every verification location (employer account) must have at least one program administrator who provides support for general users and manages the location’s profile. A verification location can choose to have general users in addition to program administrators who will only be able to create and manage all cases. Corporate administrators oversee E-Verify use and provide support to all enrolled verification locations and users at these locations. As a corporate administrator your primary functions are to enroll the employer’s verification locations in E-Verify and to manage the information and users that are linked to your corporate administrator account. The corporate administrator account on its own does not allow you to create, view, or manage cases in E-Verify.
Corporate administrators must successfully complete the online corporate administrator tutorial and pass the knowledge test before privileges to add and manage the employer’s verification locations are granted. The user will be prompted to take the tutorial when he or she logs in to E-Verify for the first time. If a corporate administrator has the need to create or manage E-Verify cases in addition to his or her administrative responsibilities, he or she may also create a program administrator account for his or her use.
Program administrators and general users must successfully complete the online E-Verify tutorial and pass the knowledge test before they can create or manage cases. Users will be prompted to take the tutorial when they log into E-Verify for the first time.
For more detailed instructions on creating and managing cases, refer to the E-Verify User Manual.
Review the permissions of each user role in the User Role Overview below.
User Role Overview
| User Role | Permissions |
|---|---|
| Program Administrator (at least one required) | Every E-Verify account must have at least one program administrator. The program administrator is responsible for following all E Verify program rules and staying informed of changes to E Verify policies and procedures. Permissions include:
|
| General User (optional) | Employers can have as many or no general users as they desire. The general user is responsible for following all E Verify program rules and staying informed of changes to E Verify policies and procedures. Permissions include:
|
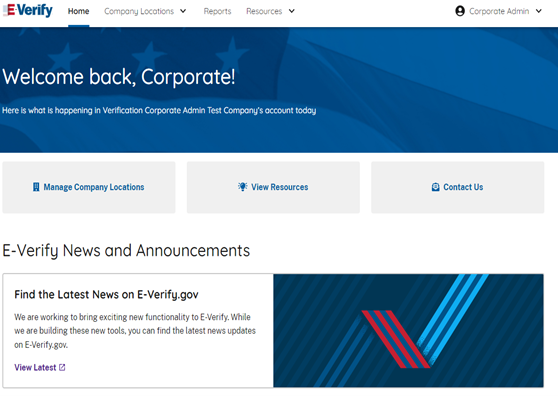
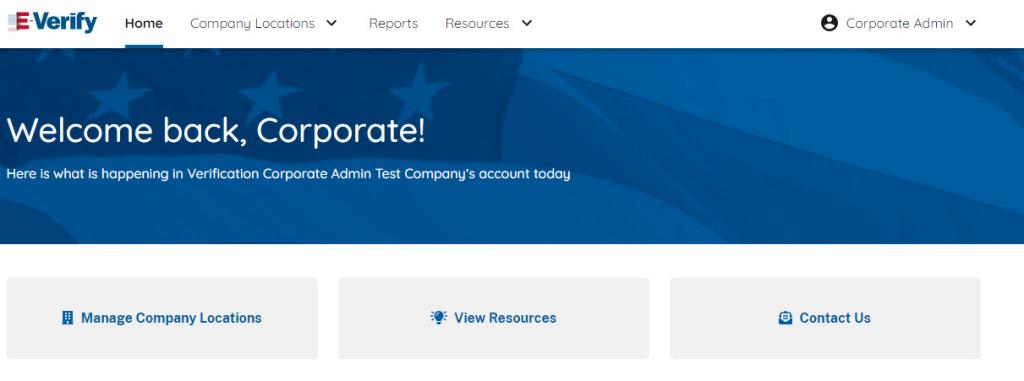
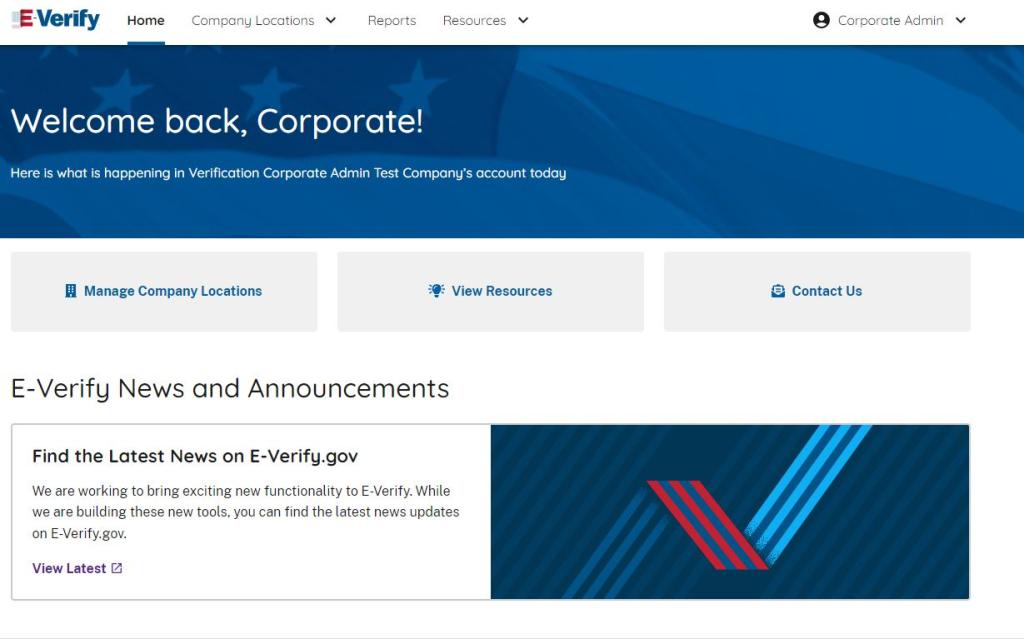
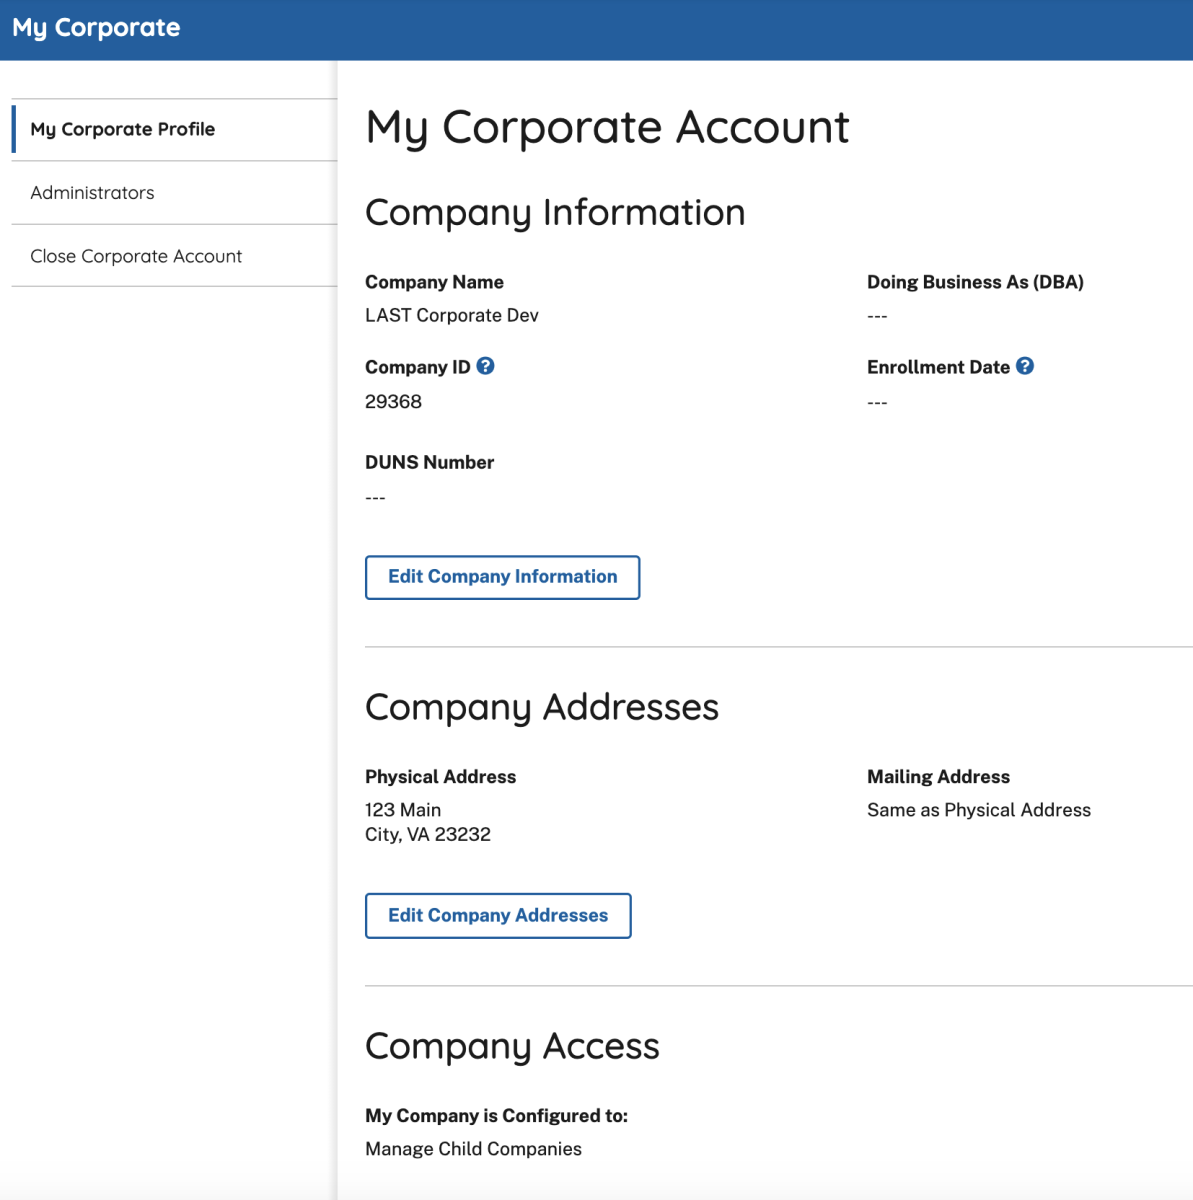
1.4 Corporate Administrator Website Navigation
All E-Verify users need to be familiar with the website navigation links. The figure below provides a screen shot of the corporate administrator user web page.
E-Verify Menu Overview
| MENU OPTION | FUNCTIONS |
|---|---|
| Company Locations |
|
| Reports |
|
| Resources |
|
| Profile |
|
1.4.1 Essential Resources
View Essential Resources under Resources contains links to important documents and tools for employers who participate in E-Verify. The Essential Resources Overview provides specific information on the resources available to users.
Essential Resources Overview
| LINK | INFORMATION |
|---|---|
| E-Verify Posters |
|
| Manuals and Guides |
|
| E-Verify Further Action Notices |
|
| Document Reference Library |
|
| Form I-9 Resources |
|
| Memorandums of Understanding (MOU) |
|
| Other Resources |
|
1.5 User Rules And Responsibilities
E-Verify users are bound by the guidelines in the MOU and the rules and responsibilities outlined in this manual.
To ensure proper use of E-Verify and protection of employee workplace rights, you should periodically review all the program rules and employer responsibilities with their users.
For information on E-Verify rules and responsibilities for federal contractors with the FAR E-Verify clause, refer to the E-Verify Supplemental Guide for Federal Contractors.
Rules and Responsibilities Overview
Employers who participate in E-Verify must:
- Follow E-Verify procedures for each employee for whom an E-Verify case is created.
- Notify prospective employees and all employees, including those hired to work in a remote setting of E-Verify participation by clearly displaying the E-Verify Participation and the Right to Work posters in English and Spanish. This can include displaying the posters digitally, online, in hard copy at physical locations, and providing a copy of the posters with job application materials. You may also display the posters in other languages provided by DHS.
- Complete Form I-9 for each newly hired employee before creating a case in E-Verify.
- Obtain a Social Security number from each newly hired employee on Form I-9.
- Ensure that Form I-9 List B identity documents have a photo.
- Create a case for each newly hired employee no later than the third business day after he or she starts work for pay. Enter the employee’s email address in E-Verify if it was provided on Form I-9.
- Provide each employee with notice of and the opportunity to take action on a Tentative Nonconfirmation (Mismatch).
- Download the Further Action Notice before referring the case.
- Ensure that all personally identifiable information is safeguarded.
Employers participating in E-Verify must not:
- Use E-Verify to pre-screen an applicant for employment. Specify or request which Form I-9 documentation an employee must use, except to specify that any Form I-9 List B document the employee chooses to present must contain a photo.
- Use E-Verify to discriminate against any job applicant or employee on the basis of his or her national origin, citizenship, or immigration status.
- Create an E-Verify case for an employee who was hired before the employer signed the E-Verify MOU, except in certain instances such as employees of federal contractors with the FAR E-Verify clause.
- Take adverse action against or terminate an employee because he or she received a mismatch result, unless E- Verify issues a case result of Final Nonconfirmation.
- Share any user ID and/or password.
Upon enrollment, employers are required to clearly display the E-Verify Participation and Right to Work posters in English and Spanish, both of which appear below. Employers may also display the posters in other languages provided by DHS. After logging in to E-Verify, the posters are found under View Essential Resources.
E-Verify Participation Enrollment Notifications
Notice of E-Verify Participation
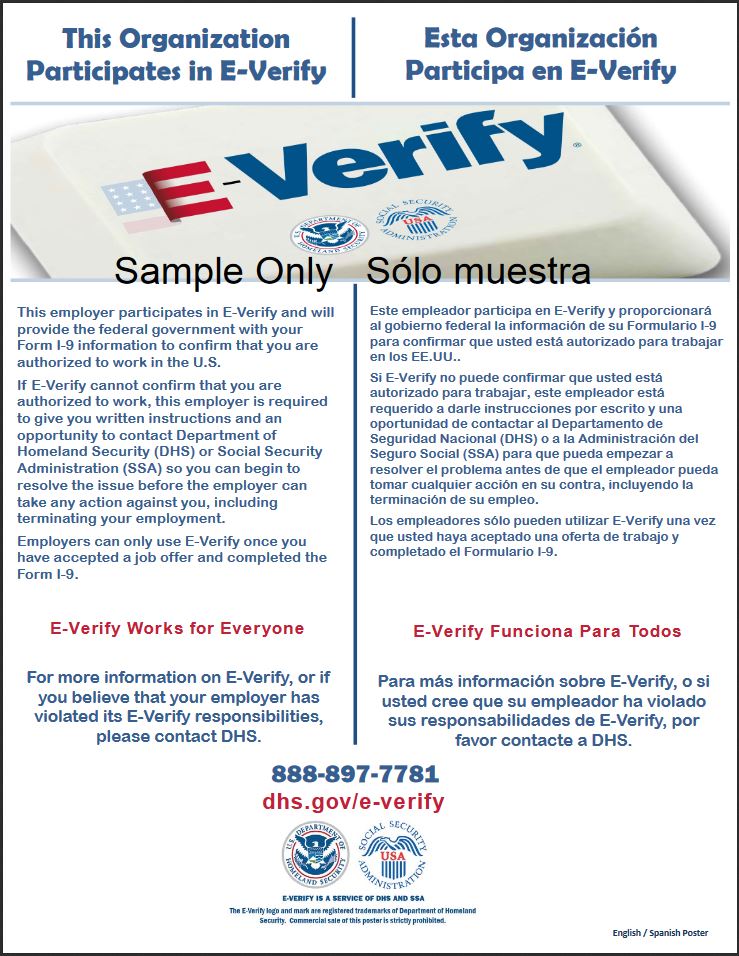
Provided by DHS
Right to Work Poster
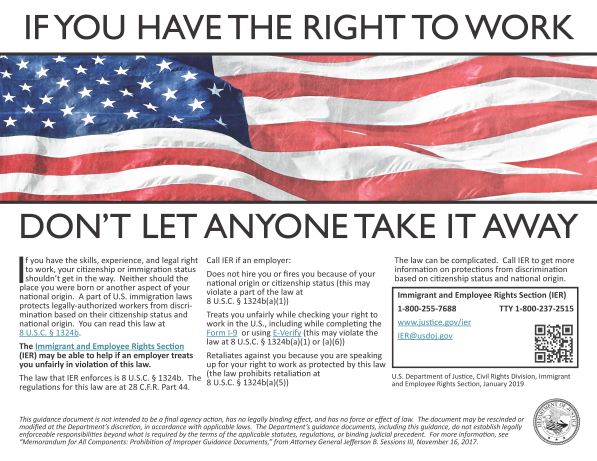
Issued by Department of Justice, Immigrant and Employee Rights Section
1.6 Privacy And Security Statement
The use of E-Verify requires the collection of personally identifiable information (PII). Employers must protect the privacy of employees who submit information to be processed through E-Verify. It is your responsibility to ensure that all personal information collected is safeguarded and used only for the purposes outlined in the MOU between E-Verify and the employer/user.
E-Verify protects PII in accordance with the National Archives and Records Administration (NARA) records retention and disposal schedule (N 1-566-08-7) by annually disposing of E-Verify records that are over 10 years old. This minimizes security and privacy risks associated with U.S. government retention of PII.
Failure to properly protect employee information can result in identity theft or fraud and can cause considerable inconvenience, harm or embarrassment to the employees or employer affected.
At a minimum, follow the steps in the Privacy Guidelines Overview to protect personal information and comply with the appropriate requirements.
Privacy Guidelines Overview
- Allow only authorized users to use E-Verify.
Ensure that only appropriate users handle information and create cases. - Secure access to E-Verify.
Protect passwords used to access E-Verify and ensure that unauthorized persons do not gain access to E-Verify. - Protect and store individuals’ information properly.
Ensure that employee information is stored in a safe and secure location and that only authorized users have access to this information. - Discuss E-Verify results in private.
Ensure that all case results, including Tentative Nonconfirmations (Mismatches) and Final Nonconfirmations, are discussed privately with the employee.
You must ensure that all personally identifiable information is safeguarded.
2.0 Company Location Administration
An employer enrolled in E-Verify as a corporate administrator benefits from oversight functions only available to corporate administrators. A corporate administrator account serves to link together the employer’s multiple employer accounts. An employer account is the same as a verification location in E-Verify; this is where the employer’s users create E-Verify cases. The corporate administrator account alone does not allow you to create E-Verify cases.
Once a verification location is enrolled, program administrators at the verification location can add general users and other program administrators to create E-Verify cases. Program administrators can also update the verification location profile and create reports for that location. Additional information on program administrator and general user functions is available in the E-Verify User Manual for Employers.
This section covers important information for corporate administrators and describes the functions to enroll, manage and update verification locations and users.
2.1 Verification Locations vs. Hiring Sites
There are two types of company locations in E-Verify: verification locations and hiring sites. It is important to recognize the difference between verification locations and hiring sites to determine how to organize the employer’s E-Verify accounts. It is possible for a verification location and a hiring site to be the same. Verification locations and hiring sites are described below.
IMPORTANT: A corporate administrator account does not permit you to create E-Verify cases so you must enroll at least one verification location in E-Verify.
Verification Locations
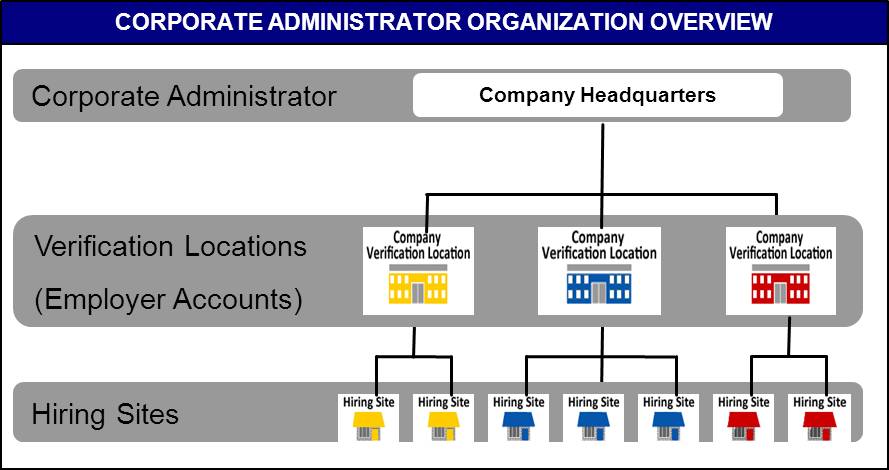
A verification location is where the employer’s staff takes the information from an employee’s Form I-9 and creates a case in E-Verify. Generally, each verification location has its own employer account (see the Corporate Administrator Organization Overview).
If the employer has staff at each location that uses E-Verify, then each location is considered a verification location. If the employer centralizes the use of E-Verify to certain locations, then only those locations are considered verification locations.
2.1.1 Hiring Sites
A hiring site is the location where the employer hires employees and they complete Form I-9. If your company creates cases in E-Verify at the same location, it is a verification location and a hiring site.
Employers select which sites participate in E-Verify on a hiring site by hiring site basis. This means that if you decide to have a hiring site participate in E-Verify, you must verify all newly hired employees for that hiring site. If you decide not to have a hiring site participate, you are not permitted to verify any employees at that location.
Corporate Administrators can modify the number of hiring sites that participate in E-Verify in each state, see Section 2.3. A participating hiring site means that the company will create an E-Verify case for every newly hired employee who is hired and completes their Form I-9 at that site. A program administrator at the verification location may also update the hiring site information.
The ‘Corporate Administrator Organization Overview’ provides an example of the organization for an employer with multiple verification locations and hiring sites enrolled in E-Verify with a corporate administrator account.
Corporate Administrator Organization Overview
2.2 Enroll Verification Locations
Corporate Administrators can enroll the employer’s verification locations in E-Verify through the Corporate Administrator account.
To enroll a verification location, the Corporate Administrator must provide the information for that location in E-Verify. Although, a Corporate Administrator account does not require Terms and Conditions, Terms and Conditions must be electronically signed for each verification location that is enrolled in E-Verify.
If a verification location no longer needs an E-Verify account, a Corporate Administrator or Program Administrator must terminate that account. To terminate a verification location’s account, see Terminate Company Participation – Process Overview in Section 2.6
To enroll a new verification location in E-Verify, follow the steps in Enroll Verification Location-Process Overview.
Enroll Verification Location – Process Overview
Enter Company Information
- From Company Locations, select Manage Company Locations.

- The Search Company function may automatically populate some of the company’s information for the new company location.
To search for the company’s information:
- From the Company Information screen, enter the Company Name, Company ID, Street Address, City, and ZIP Code.
- Select the appropriate company and click View Company Profile.
- If the company information is auto-populated, review the information for accuracy and enter the information for any fields that could not be populated.
- To enter the company information manually click Add New Company.
- Enter the information including company name, Employer Identification Number, total number of employees, physical address and mailing address.
1. Select Employer Category
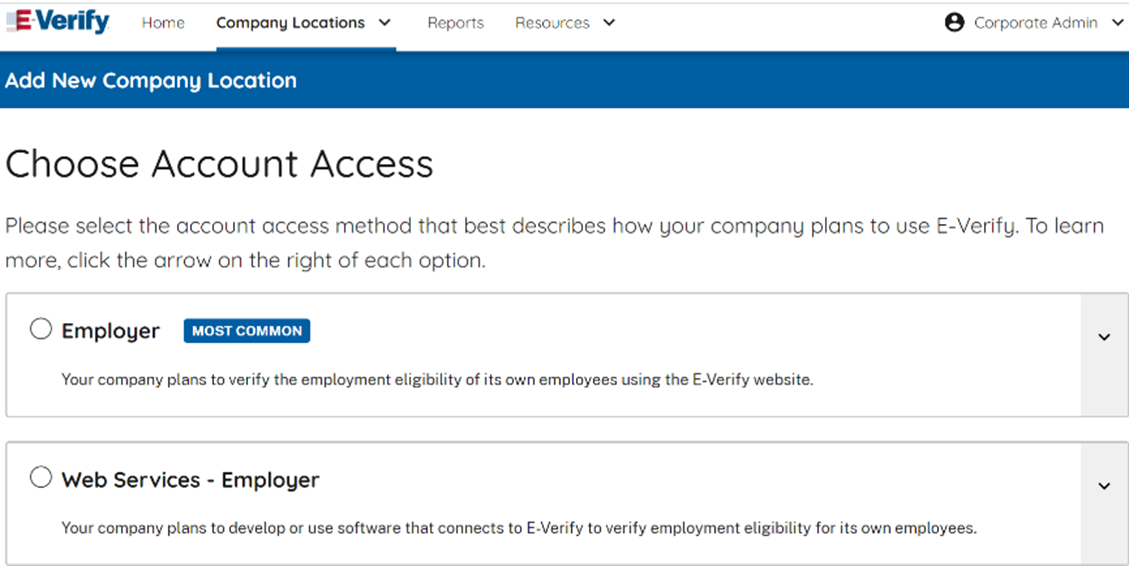
Choose Account Access
- Select the account access method that best describes how your company plans to use E-Verify.
- From the Add New Company Location screen, select the account access method that best describes how your company or entity plans to use E-Verify and click Next.
Employer Category
- To ensure we provide you with the right information you need to use E-Verify, please select the employer category that best describes your organization. Click on Next.
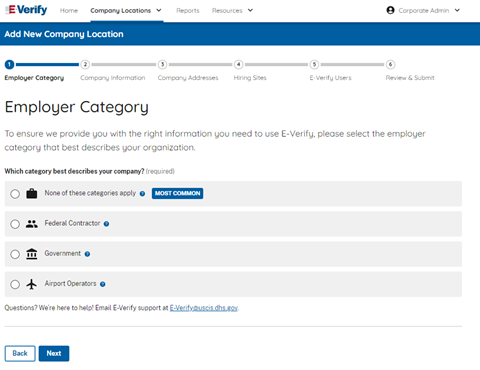
IMPORTANT: If you indicate Federal Contractor with FAR E-Verify Clause, you will be required to select the federal contractor category that best describes the organization and indicate who will be verified. For additional information, refer to the E-Verify Supplemental Guide for Federal Contractors.
2. Company Information
From the Company Information screen, enter the company information including the company name, doing business as (DBA), employer identification number (EIN), unique entity identifier (UEI), data universal numbering system (DUNS), total number of employees, North American Industry Classification System (NAICS) code, and click Next.
To determine the NAICS code, select the appropriate sector and subsector by clicking the look up a code. The resulting NAICS code will appear.
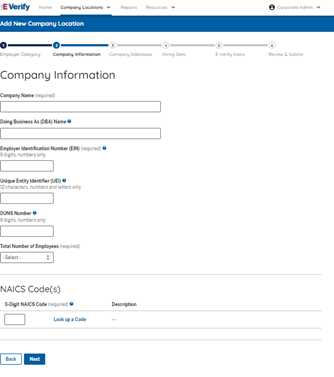

- Click Next
3. Enter Company Address
Enter the company’s physical address and mailing address information.
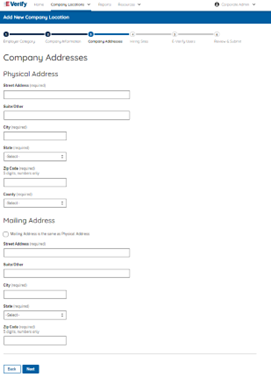
- Click Next
4. Hiring Sites
A hiring site is the location where employees are hired and complete Forms I-9. Employers select which hiring sites participate in E-Verify and must verify all newly hired employees for that hiring site. If you decide not to have a hiring site participate, you are not permitted to create E-Verify cases for your employees at that location.
Click Bulk Upload or Add Hiring Site.
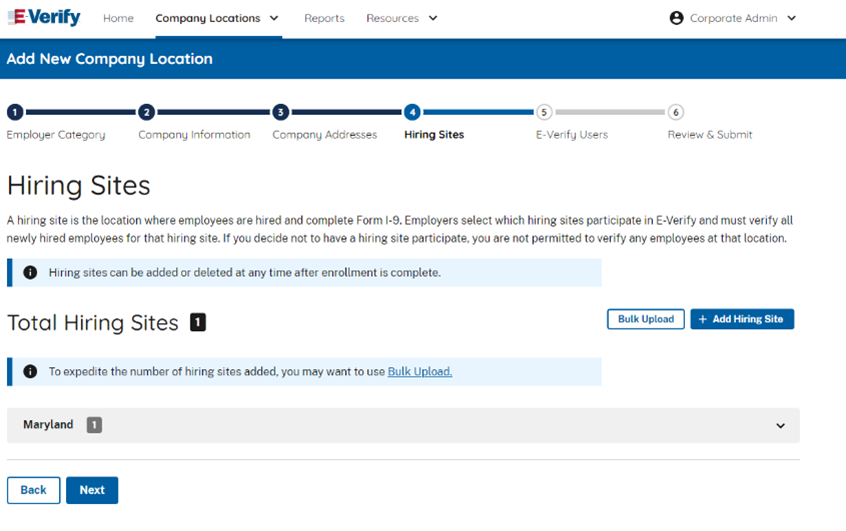
From the hiring sites screen, select Add Hiring Site and enter the street address, city, state, and ZIP code and click Add Hiring Site to add your hiring sites one at a time.
To add multiple hiring sites, follow the steps outlined in the following Bulk Upload of Hiring Sites – Process Overview.
Bulk Upload of Hiring Sites
The bulk upload function allows you to add multiple hiring sites by uploading a file. To use the bulk upload function, you must create a comma separated value (.csv) file with the hiring site addresses.
BULK UPLOAD OF HIRING SITES – PROCESS OVERVIEW
From the Hiring Site tab, select Bulk Upload.
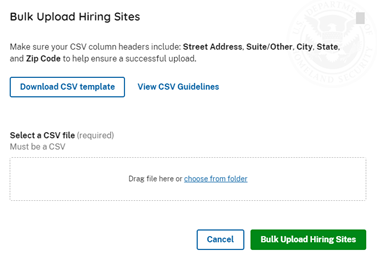
To help you prepare a spreadsheet to bulk upload large amounts of hiring sites’ data into E-Verify, click View CSV Guidelines.
- If you encounter errors, click Export Errors from the highlighted error banner displayed under Total Hiring Sites.
- Correct export errors, save the file, and click Bulk Upload to upload the document again.
- Click Bulk Upload Hiring Sites to complete the bulk upload process for hiring sites.
5. E-Verify Users
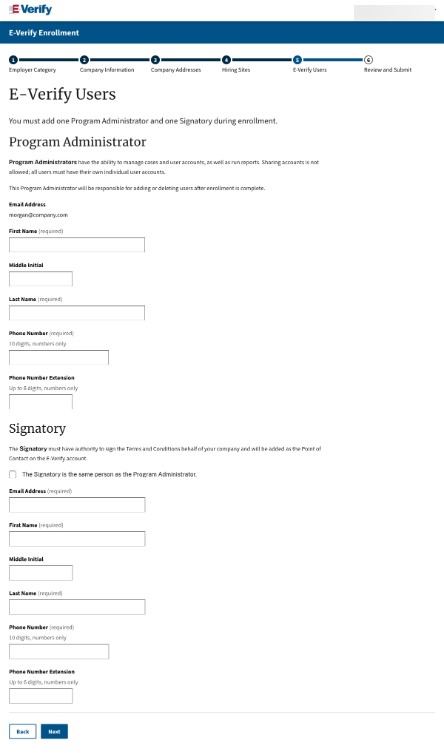
Click Next
6. Review and Submit Enrollment
Review the enrollment agreement. Click on I Agree to Term of Use box.
Click the Submit Enrollment button.
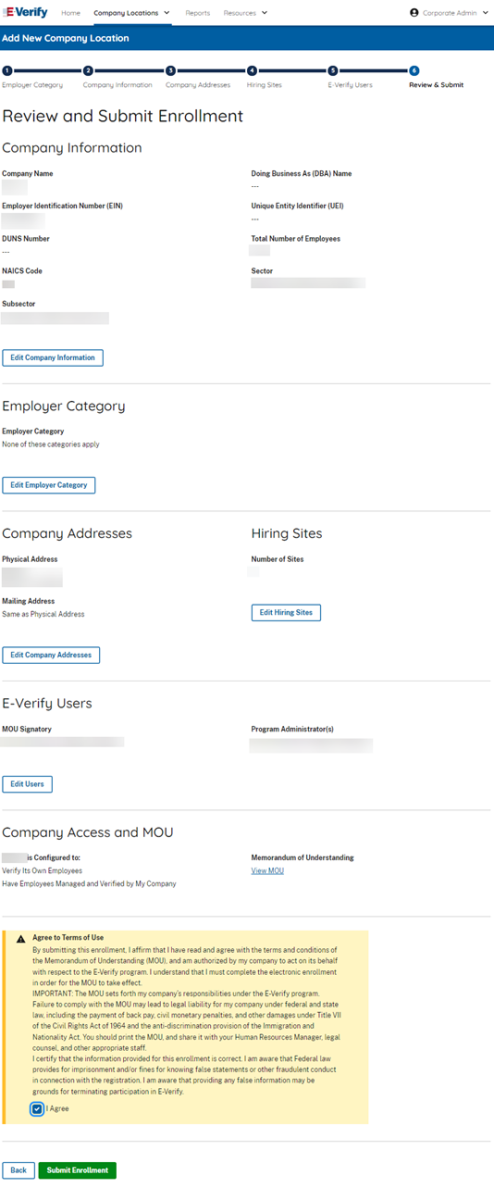
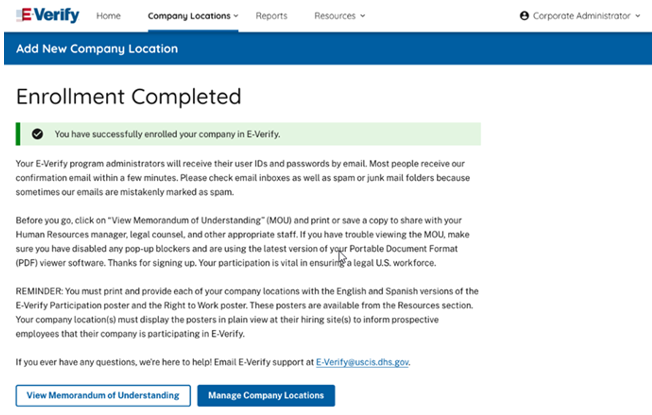
From the Enrollment Completed screen click View Memorandum of Understanding to view the MOU or click Manage Company Locations to return to your search page.
2.3 Manage Company Locations
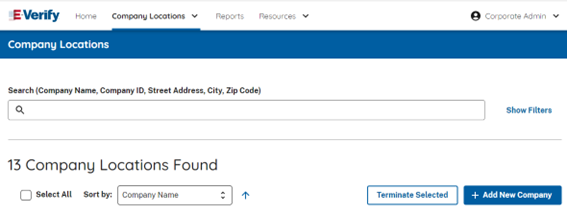
Corporate administrators can view all locations linked to their E-Verify corporate administrator account. Manage Company Locations allows you to view, search and maintain the locations assigned to your E-Verify corporate administrator account. When you need to complete this action follow the steps in the Manage Company Locations – Process Overview.
Manage Company Locations – Process Overview
- From Company Locations, select Manage Company Locations.
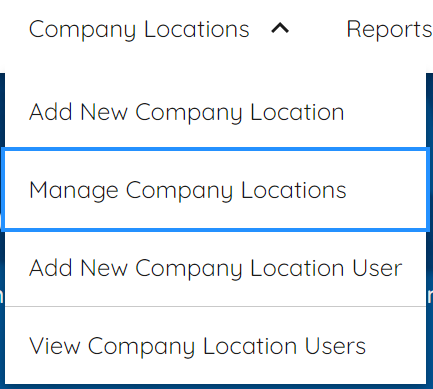
- The list of locations will appear on the ‘Company Locations Found’ page.
- From the ‘Search’ box, you can narrow the results by entering the Company Name, Company ID, Street Address, City, and/or Zip Code.
- From ‘Sort by’ you can click the drop-down arrow and select the category you wish to sort.
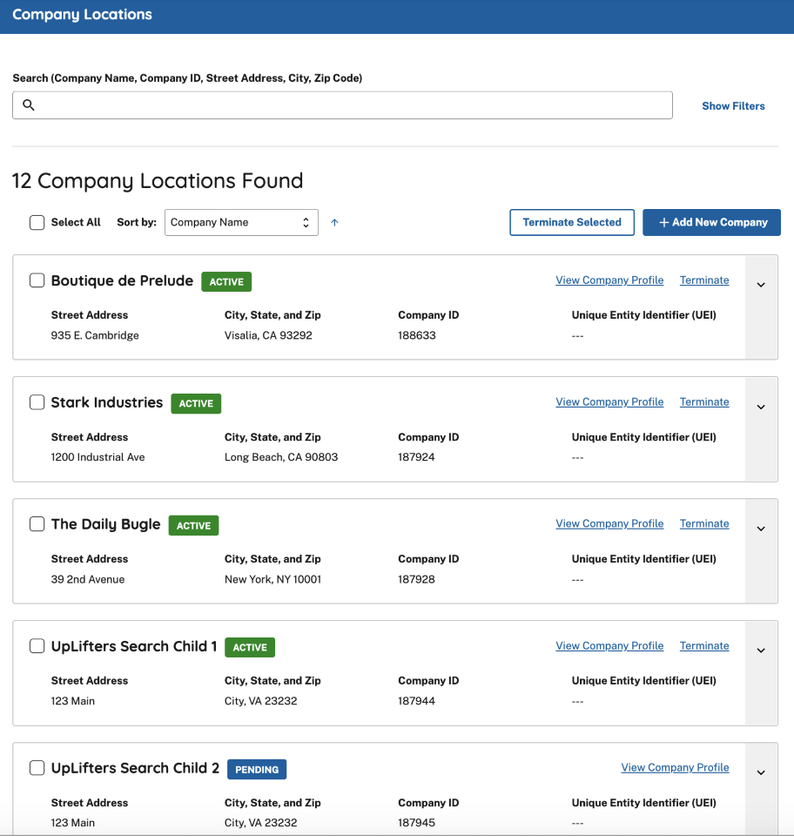
- From the list of displayed accounts, you can view or modify an account by selecting View Company Profile.
- The E-Verify company ID number for the verification location is located at the top of the Company Information page.
- For more information on updating company profile information, visit Section 5.1 EDIT CORPORATE ADMINISTRATOR ACCOUNT PROFILE.
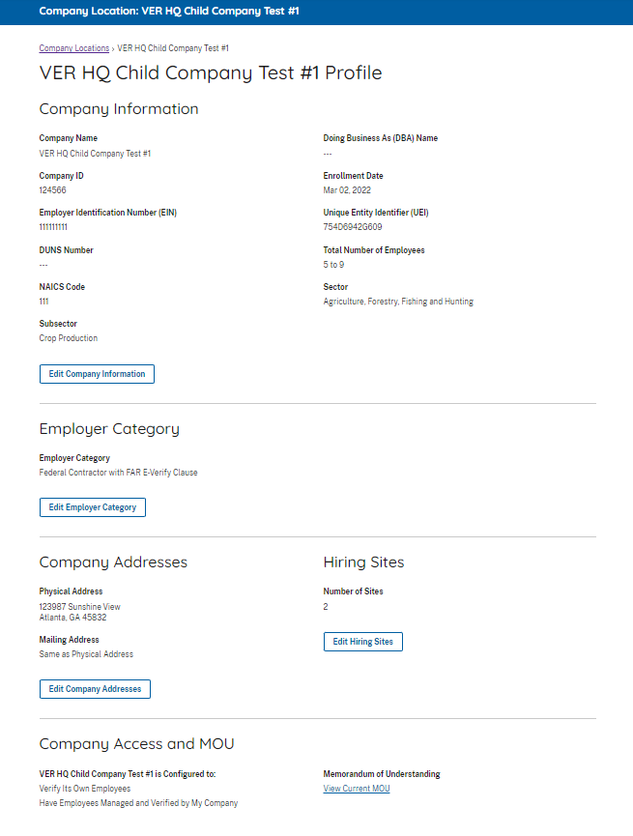
Company Profile Fields
A corporate administrator may update Company Profile pages. For additional information on each field, see Company Information – Overview.
To modify any section of the Company Profile page, click View Company Profile in the section you want to modify (for example, company name and physical location, points of contact, NAICS code, total hiring sites and total points of contact).
NOTE: The location information can also be modified by a program administrator at the verification location.
Any information you update will not change the original electronically signed MOU.
Company Profile - Overview
| Field Name | Description |
|---|---|
| Company Name | Name of employer enrolled in E-Verify. |
| Doing Business As (DBA) | The DBA name is the name under which an organization operates. The DBA is visible to the public, but is not the legal, registered name of that organization. |
| Employer Identification Number (EIN) | An EIN is also known as the Federal Tax Identification Number, and is assigned by the Internal Revenue Service (IRS) to identify the tax accounts of employers. An EIN is required for an employer to enroll in E-Verify. Employers who do not have an EIN can apply online with the IRS to receive an EIN immediately. |
| Data Universal Numbering System (DUNS) number | A DUNS number is a unique, 9-digit identifier issued and maintained by Dun & Bradstreet that can help verify the existence of a business entity. |
| Unique Entity Identifier (UEI) | A UEI is a 12-digit alphanumeric identifier that is provided by SAM.gov to all entities who register to do business with the federal government. |
| Total Number of Employees | Total number of employees. |
| North American Industry Classification System (NAICS) | The NAICS classifies businesses by industry to collect, analyze, and publish statistical data related to the U.S. business economy. A three-digit NAICS code is required for an employer to enroll in E-Verify. If you do not know your client company's three-digit NAICS code, you can select a sector and subsector to determine the NAICS code. |
| Employer Category | The category that identifies the employer as a federal, state, or local government organization or a federal contractor with the FAR E-Verify clause in their federal contract, if applicable. |
| Physical Address | Physical Address is where the employer creates E-Verify cases. |
| Mailing Address | Employer’s mailing address (if this address is different from the physical address). |
| Hiring Sites | Locations where your employees are hired. Typically, a hiring site is where an employee completes Form I-9. |
View Memorandum of Understanding (MOU)
Corporate administrators may view the MOU between E-Verify and the employer for each location. To view the MOU for a location, follow the steps outlined in the View MOU - Process Overview.
View MOU – Process Overview
- Follow the steps in Manage Company Locations – Process Overview to find the location for which you need to view the MOU. From the list of displayed accounts, you can view an account by selecting View Company Profile.
- From the Company Information page, click View MOU at the bottom of the screen.

- The MOU that was electronically signed for that location will appear in a new window. If the MOU does not load, ensure that your pop-up blocker is disabled.
IMPORTANT: Once the MOU is submitted during enrollment, the information that appears on the MOU cannot be changed. However, you can update information in E-Verify to reflect any changes. If you need to provide proof of the employer’s enrollment in E-Verify, you may print a copy of the employer’s information page which will also reflect any changes and updates to their information.
2.4 Add New Company Location Users
Corporate administrators can add E-Verify users at multiple verification locations. To add an additional user, the corporate administrator must provide the user’s email address, name and phone number. A program administrator at the verification location may also add new users.
If a user leaves the employer or no longer needs access to E-Verify, a corporate administrator or program administrator must delete the user’s account. To delete a user account, see Delete User Account – Process Overview in Section 2.5.2.
To add a new E-Verify user, follow the Add New Company Location User - Process Overview.
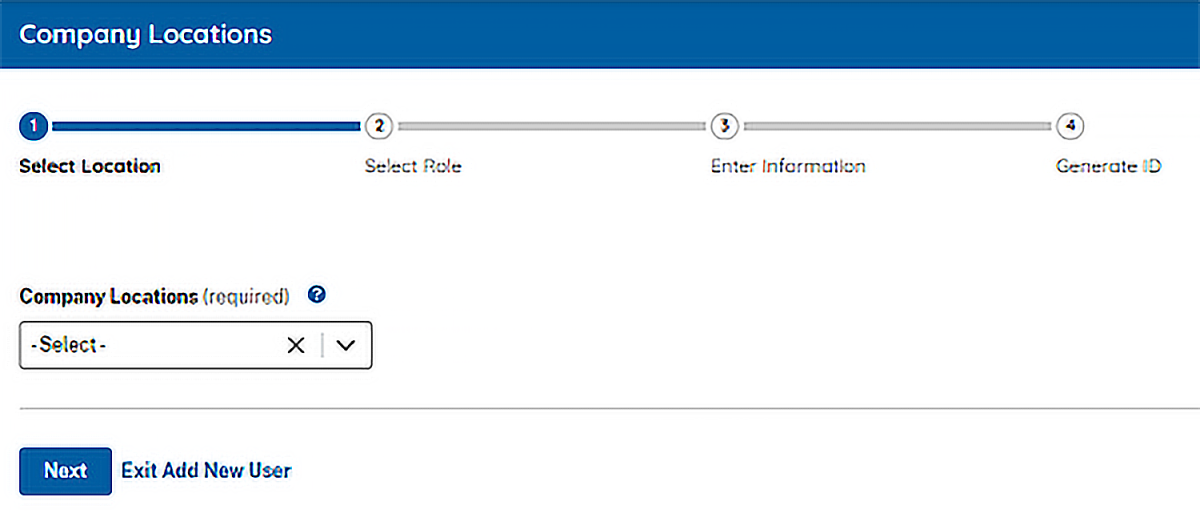
Add New Company Location User – Process Overview
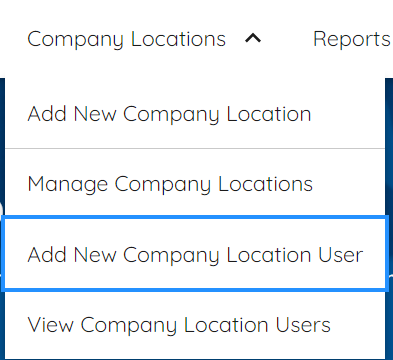
- From Company Locations, select Add New Company Location Users.
- Select the verification location of the new user and click Next.
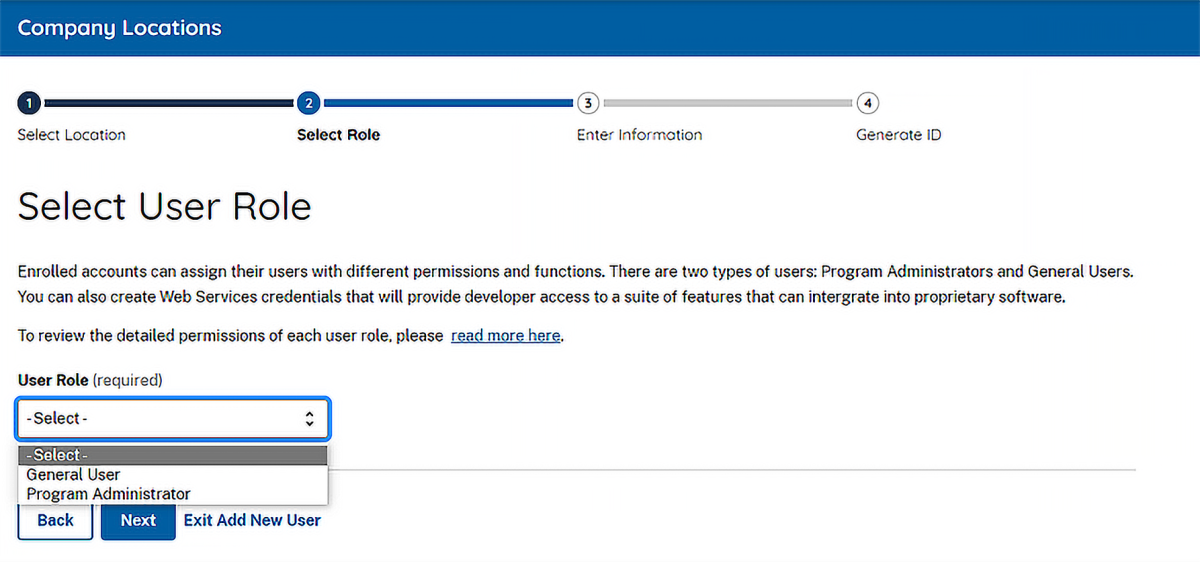
- Select general user or program administrator and then click Next.
- Provide the person’s email address, name and phone number.
- Review the information and click Next.
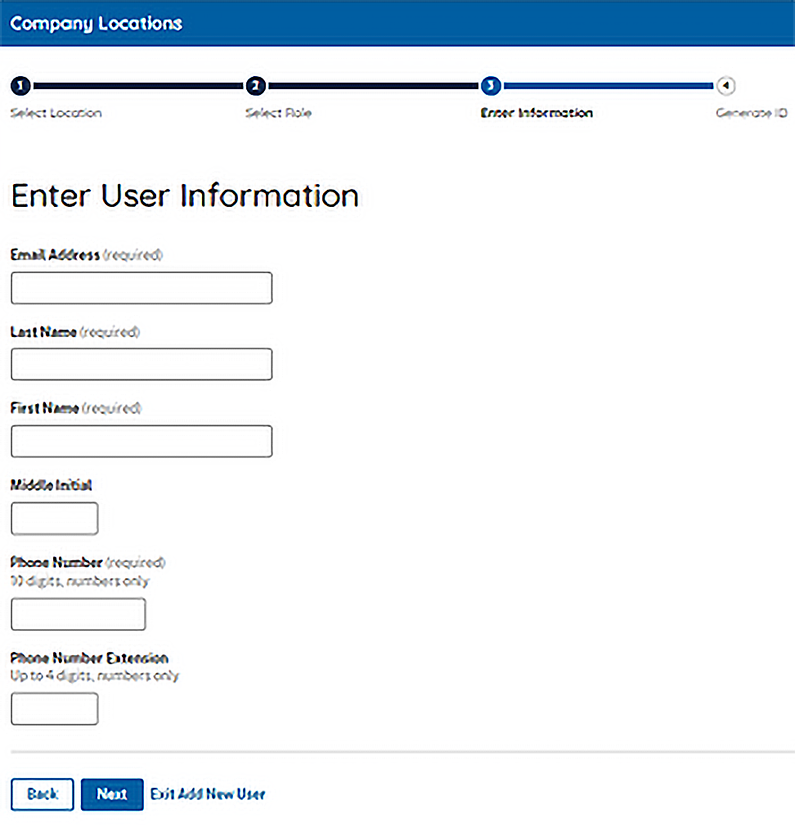
- Accept the system-generated user ID or create a new user ID.
This is the only opportunity to change the user ID.
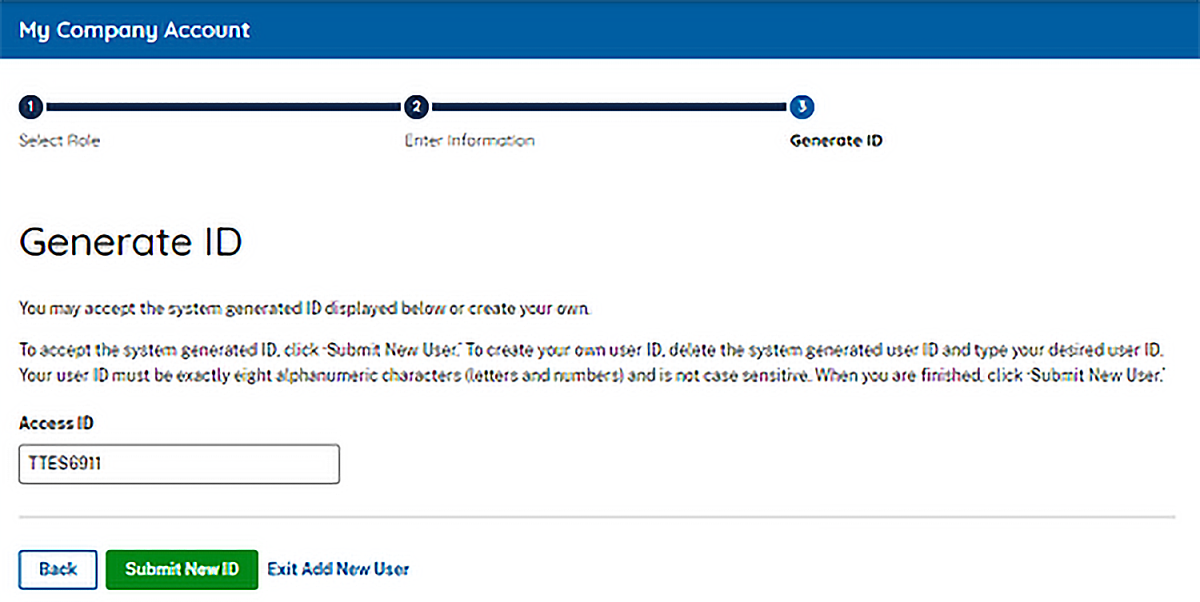
- Review the information and click Submit New ID.
- The New users will receive their user ID and password by email.
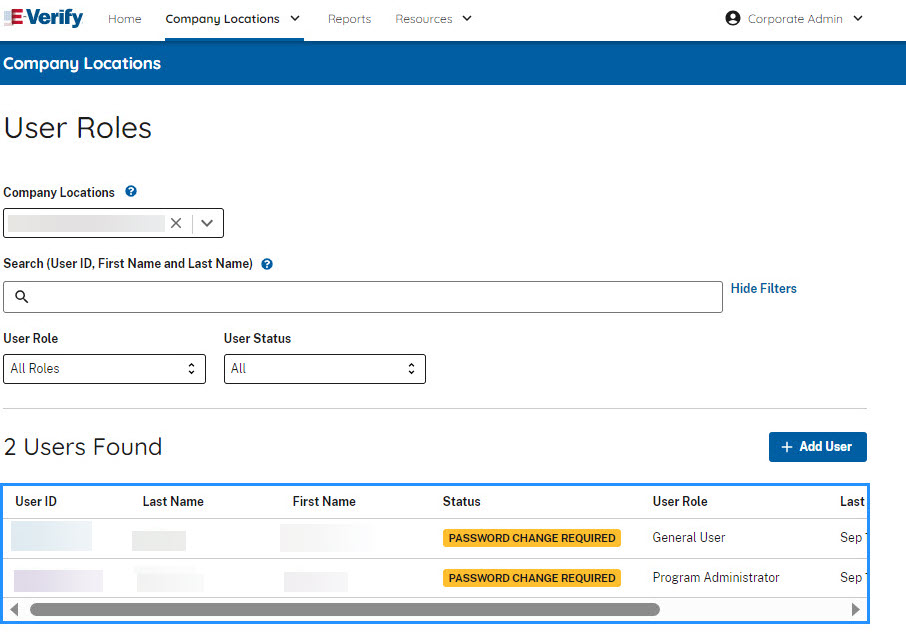
2.5 View Company Location Users
Only corporate administrators and program administrators can view user information and reset passwords. View Existing Users allows you to view, search and maintain the general users and program administrators assigned to each verification location. To view existing users, follow the View Existing Users – Process Overview.
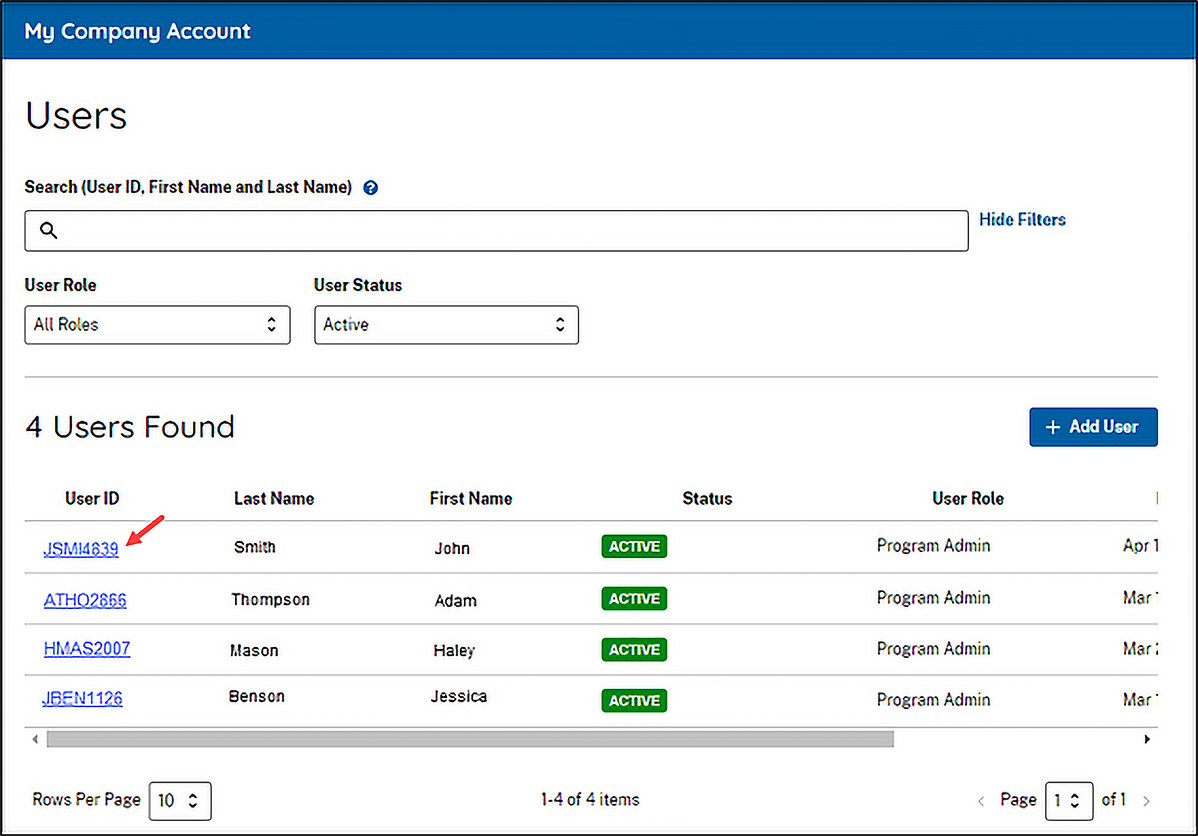
View Company Location Users – Process Overview
- From, Company Locations, select View Company Location Users.
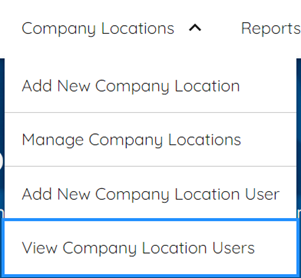
- Users are returned in the table. You can filter or sort the results by using the search criteria or clicking on a column heading in the table.
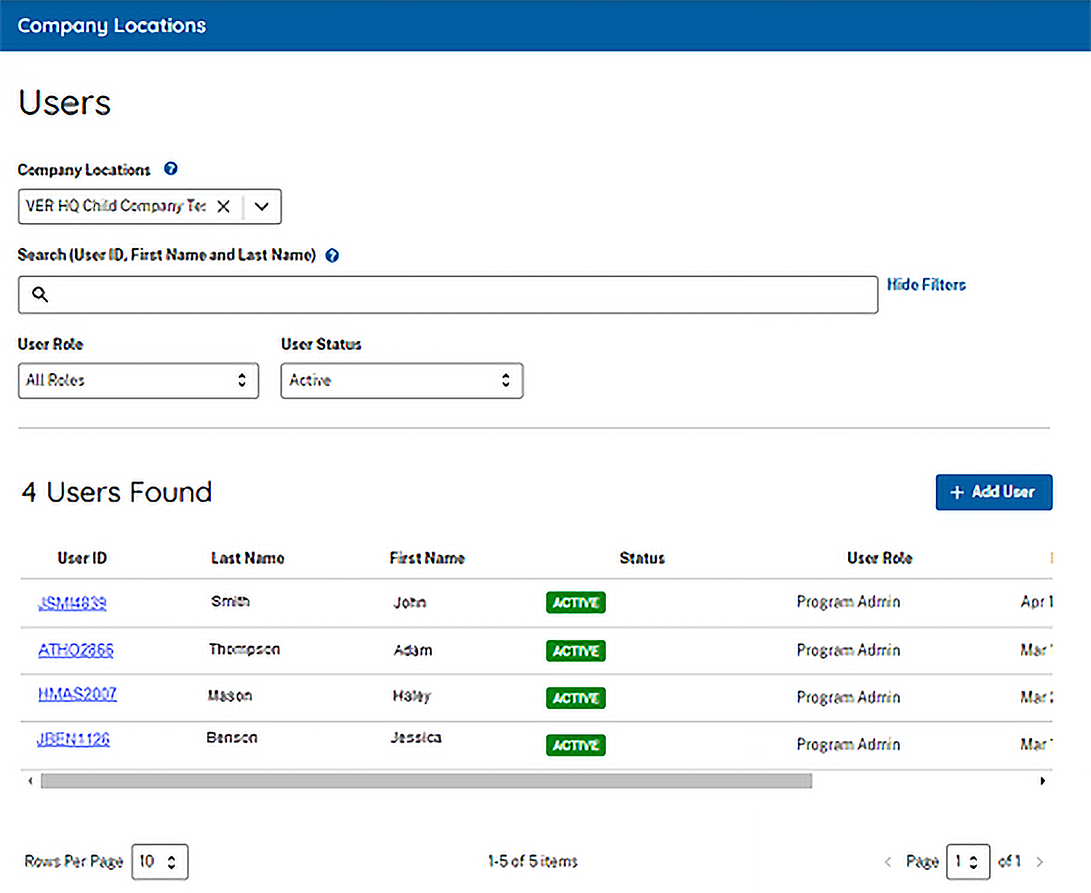
- This displays a list of user accounts. You can view or modify a user account by selecting the User ID link.
2.5.1 Reset User Password
To reset a user’s password, follow the steps outlined in Reset User’s Password – Process Overview.
Reset User’s Password – Process Overview
- Follow the steps in View Company Location Users – Process Overview to find the user who needs his or her password changed.
- Select the link for the appropriate User ID to display the View Existing Users information page.

- Assign a temporary password by completing both fields under Change Password.
- Click Save.
2.5.2 Delete User Account
Corporate administrators or program administrators may delete users account by following the steps in Delete Users – Process Overview.
Delete Users – Process Overview
- First, follow the steps in View Company Location Users – Process Overview above to find the user who needs to be deleted.
- Click the Delete icon in the row under Actions of the user’s account you wish to delete on the User Summary List page.
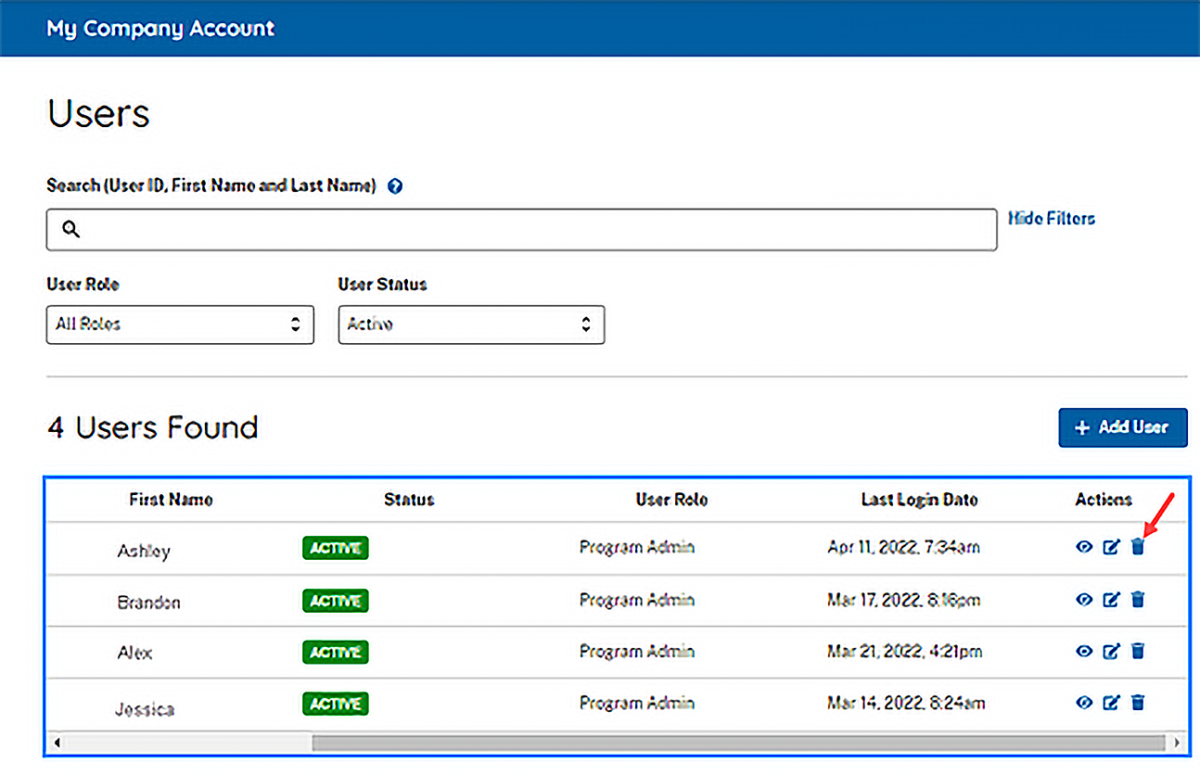
OR
- Select the link for the appropriate User ID to open User Information page.
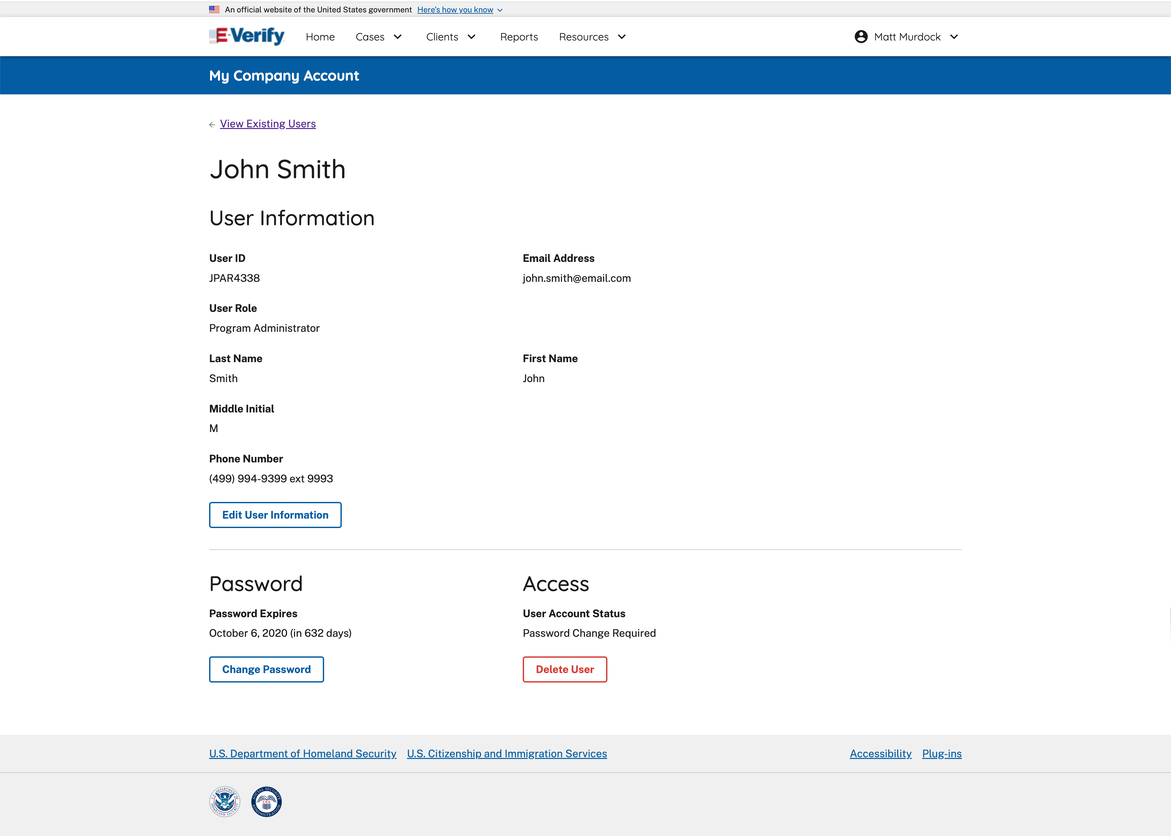
- Click Delete User on the View/Modify User Information page.
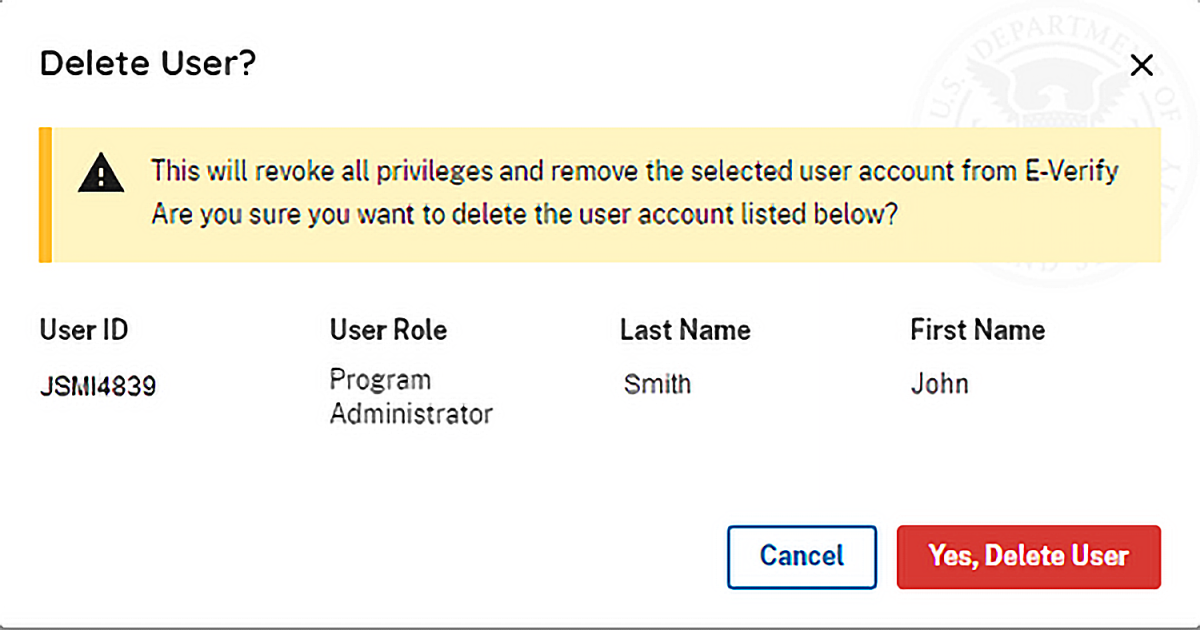
- In both instances, the User Deletion Information page will open, displaying the information for the user whom you want to delete. Click Delete User to delete the user’s account.
- After you click Delete User, changes will be permanent.
2.6 Terminate Company Locations
Account administrators can cancel a termination request if it's still within the 30-dayAccount administrators can cancel a termination request if it's still within the 30-day window before the account has been terminated window before the account has been terminated
Participation in E-Verify may be terminated voluntarily by employers. To terminate participation, a program administrator, corporate administrator, the signatory of the MOU, or an authorized employer representative must submit a termination request no later than 30 days in advance of the date the employer would like to close its account. Employers may request termination electronically through E-Verify (see Terminate Company Account – Process Overview) or by submitting a written termination notice by email to E-Verify@uscis.dhs.gov. E Verify employer agents should review the Supplemental Guide for E-Verify Employer Agents for more information on company account termination.
During this 30-day period, employers must resolve all open cases in E-Verify, and they must not use E-Verify to create new cases. Employers are required to close all open E-Verify cases, even after the request to terminate the E-Verify account is made.
IMPORTANT: Once an account is terminated, employers will no longer have access to their account and associated records. To preserve the records from an E-Verify account, see Section 3.0 to create and retain a user audit report before the account is terminated. E-Verify case information and documentation must be retained for your employees for the same length of time as their Forms I-9.
To close a verification location’s E-Verify account, complete the steps outlined in Close Company Account – Process Overview.
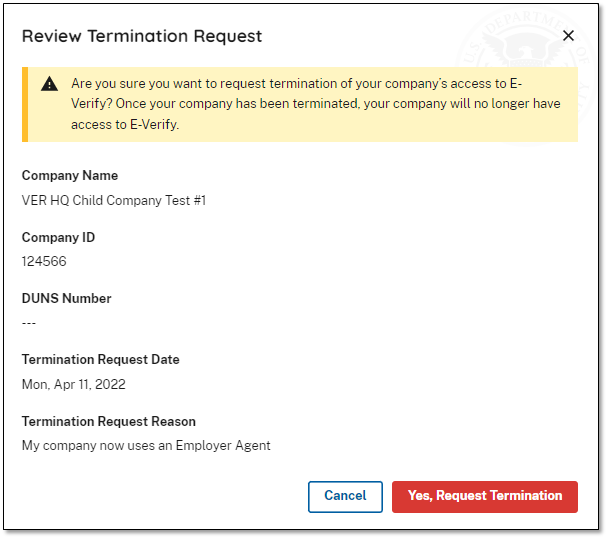
Terminate Company Location – Process Overview
- From Company Locations, select ‘Manage Company Locations’.

- Locate the location you want to terminate and select ‘Terminate’ link from the Company Locations Found page.
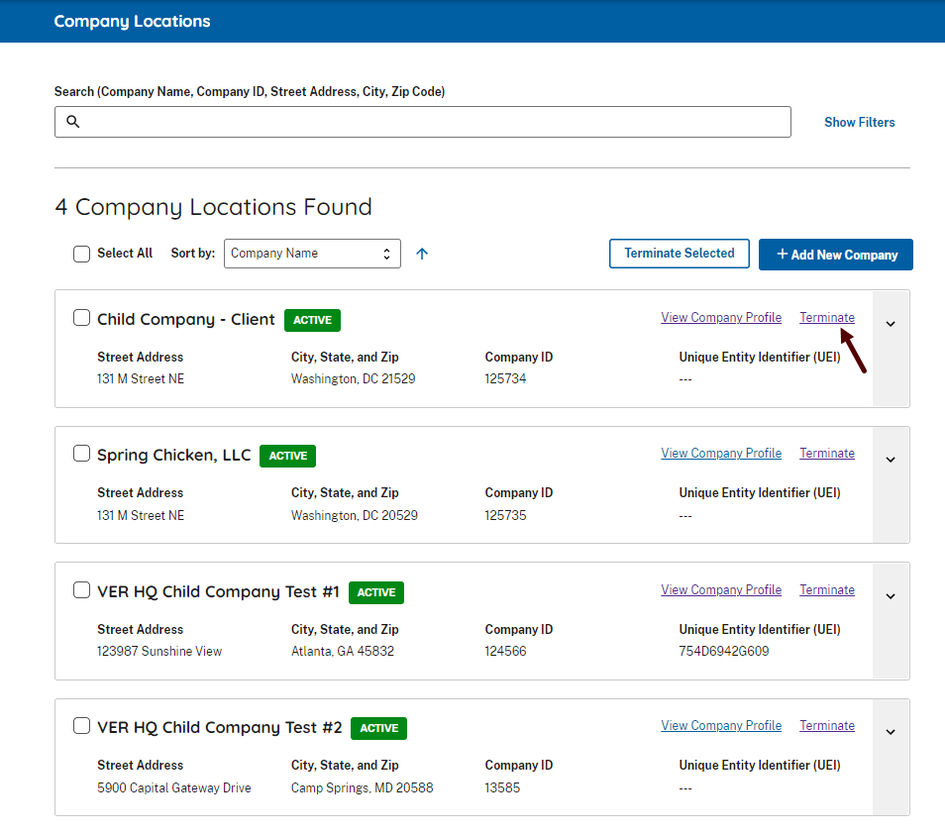
- Next, select your Termination Request Reason.
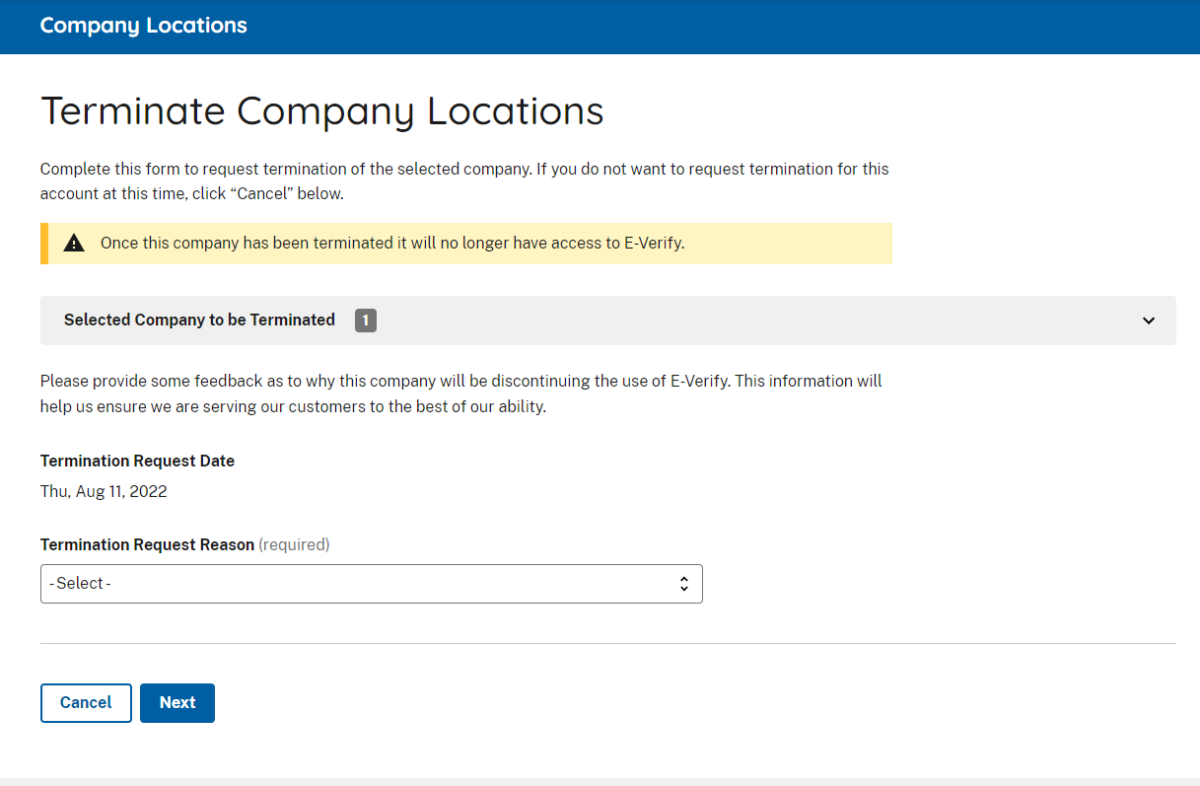
- Click ‘Next’.
- A ‘Review Termination Request’ message will appear informing the user that E-Verify will be notified of your request to terminate participation in the program.
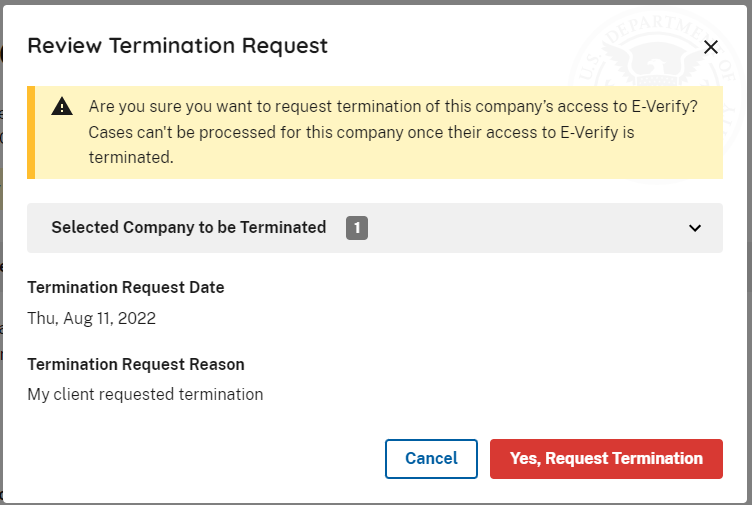
- Once you select Yes, Request Termination, you will receive an email confirming that your account is terminated in 30 days.
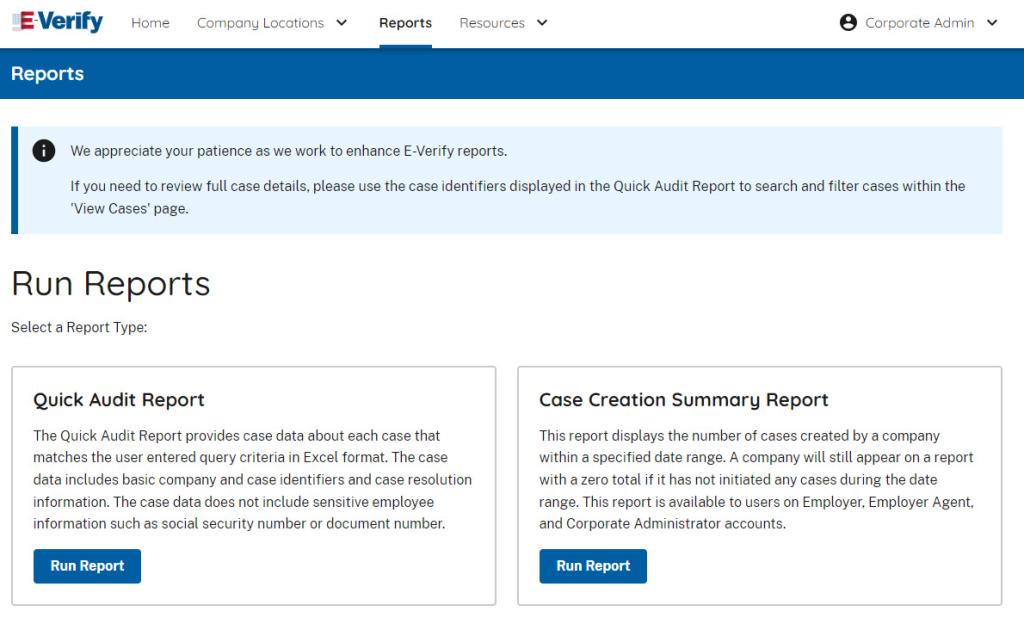
3.0 Case Reports
There are two types of case reports available in E-Verify for corporate administrators. These includes Quick Audit Report, and Case Creation Summary Report. The case data includes basic company and case identifiers and case resolution information.
A description of each report is provided in the Reports – Overview.
Reports – Overview
Report | Description |
|---|---|
| Quick Audit Report | This report provides case data about each case that matches the user entered query criteria in Excel format. The case data includes basic company information, case identifiers, and case resolution information. The case data does not include sensitive employee information such as Social Security number or document number. |
| Case Creation Summary | This report displays the number of cases created by a company within the specified time period. It will reflect zero if the company has not initiated any cases during that time period. This report is available to employer, employer agent, and corporate administrator accounts. |
To create a report, see the Report Process Overview.
On the home page, above the welcome banner, click Reports.
Select Reports from the navigation bar above the page.
A description of the report is provided on the report screen.
For more information review please review the E-Verify User Manual For Corporate Administrators.
Select a Report Type.
Enter company data to generate report.
4.0 Account Administration
User account administration provides individual users specific functions and permissions to update their accounts, change their passwords and perform other functions explained in this section.
It is important to distinguish that the user account functions are different for each user role.
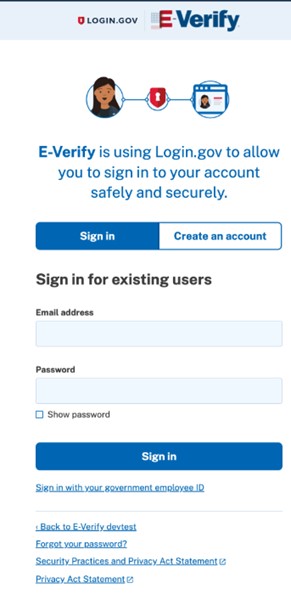
4.1 Use Login.Gov to Access E-Verify
A Corporate Administrator or Program Administrators can add users in E-Verify. Once registered by the Program or Corporate Administrator, users receive an email with login instructions.
To activate your new E-Verify account, follow the instructions in the email you received.
- Access E-Verify at everify.uscis.gov.
- Click I Agree to the User Agreement.
Sign in or create a Login.gov account:
- If you have a Login.gov account, sign in using your associated email address and password.
- If you do not have a Login.gov account, select Create an Account and follow the prompts to set up your Login.gov account. Review and confirm the information on Your Account screen is correct in your new Login.gov account.
- Review and confirm Your Account information is correct in your Login.gov account.
- From the Your Account screen in Login.gov, click Continue to E-Verify to view your Dashboard.
- From your E-Verify Dashboard, in the Linked User Accounts section, click Access, to complete the online training requirements. Once you have finished the training, you may begin using E-Verify.
4.2 Edit User Profile
All E-Verify user have a profile that includes their name, telephone number, fax number (optional) and email address. Users should update this information whenever it changes by using the Edit Profile link. To update this information follow the steps outlined in Edit User Profile – Process Overview.
Edit User Profile – Process Overview
From Corporate Administrator, click on User Account, select User Profile.
Update your User Account. Add information or edit fields as necessary.
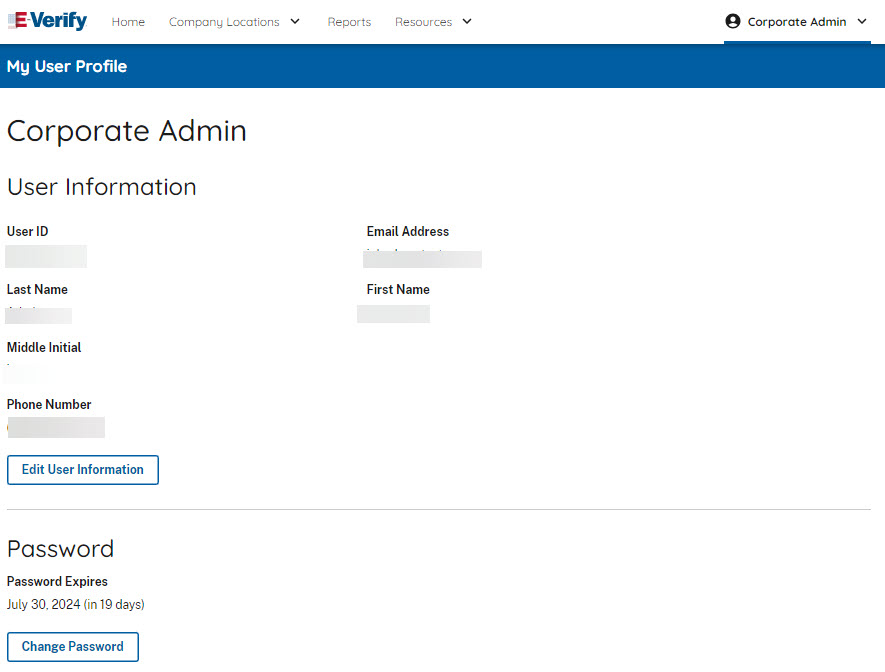
Select Edit User Information.
Click SAVE.
5.0 Corporate Administrator Account Administration
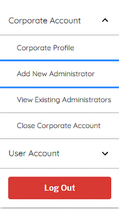
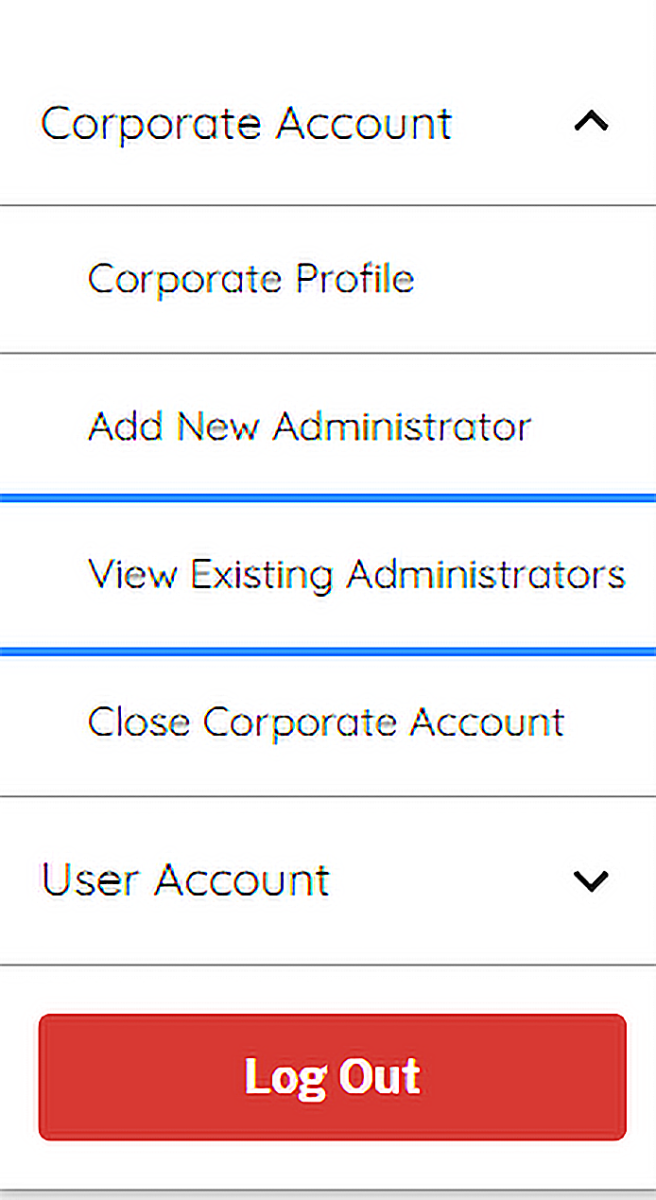
Corporate administrators manage the profile of the corporate administrator account. A corporate administrator uses the Corporate Account menu to:
- Change or update the corporate administrator account profile information
- Add other corporate administrators
- View or update the profile information of existing corporate administrators
- Close the E-Verify corporate administrator account
5.1 Edit Corporate Administrator Account Profile
To update corporate information in E-Verify, complete the steps in the Edit Corporate Administrator Profile – Process Overview.
Edit Corporate Administrator Profile – Process Overview
- From Corporate Account, select Edit Corporate Profile.
- To update any section of the Company Information page, click View / Edit in the section you want to edit (e.g., company name and physical location, Employer Identification Number, points of contact, North American Industry Classification System (NAICS) code, total hiring sites and total points of contact).

- Make the required updates and click Save & Continue
- The updated information should appear in the Edit Corporate Profile page.
After clicking Save & Continue, the program administrator cannot undo any changes that have been entered without manually re-entering the original information.
5.2 Add New Corporate Administrator
Employers may choose to have more than one corporate administrator user at the headquarters location to serve as a backup and/or share corporate oversight responsibilities. Only corporate administrators can view, add and delete other corporate administrator users.
To add an additional corporate administrator, the corporate administrator must provide the user’s email address, name, and phone number.
If a corporate administrator leaves the employer or no longer needs access to E-Verify, another corporate administrator must delete the user’s account. To delete a user’s account, see Delete Corporate Administrator User Account – Process Overview in Section 5.3.
If you need to add a new corporate administrator, follow the Add New Corporate Administrator - Process Overview.
Add New Corporate Administrator – Process Overview
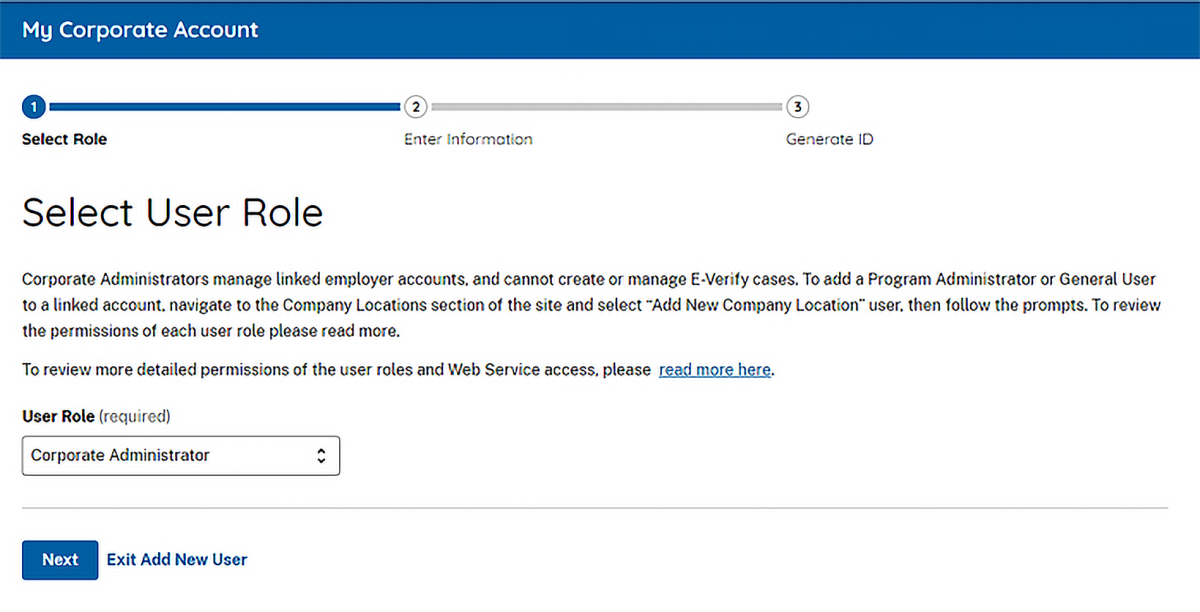
- From Corporate Account, select Add New Administrator.
- Select user role and click Next.
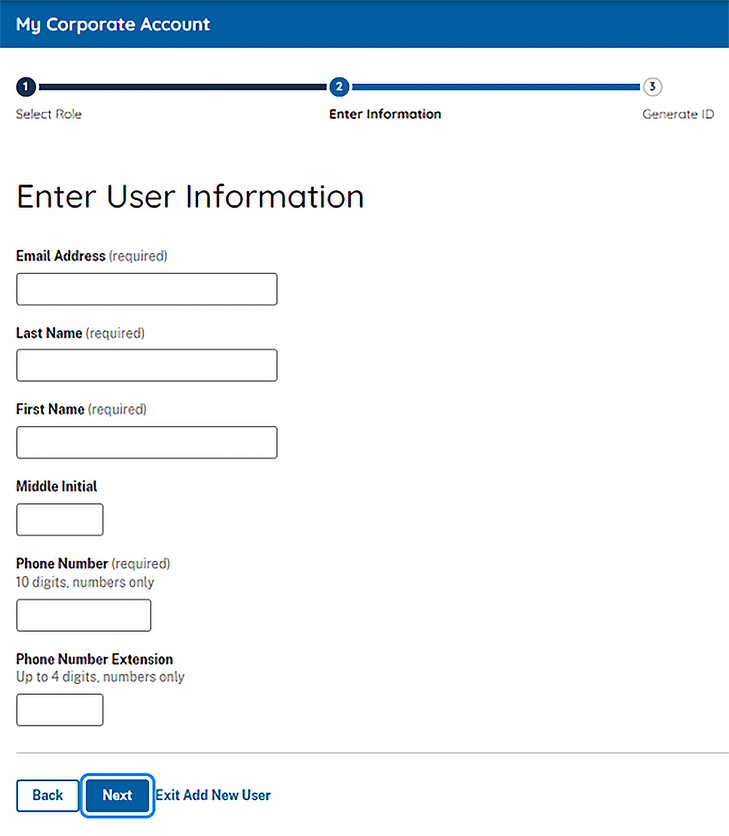
- Provide the person’s email address, name and phone number and click Next.
- Accept the system-generated user ID or create a different user ID.
This is the only opportunity to change the user ID.
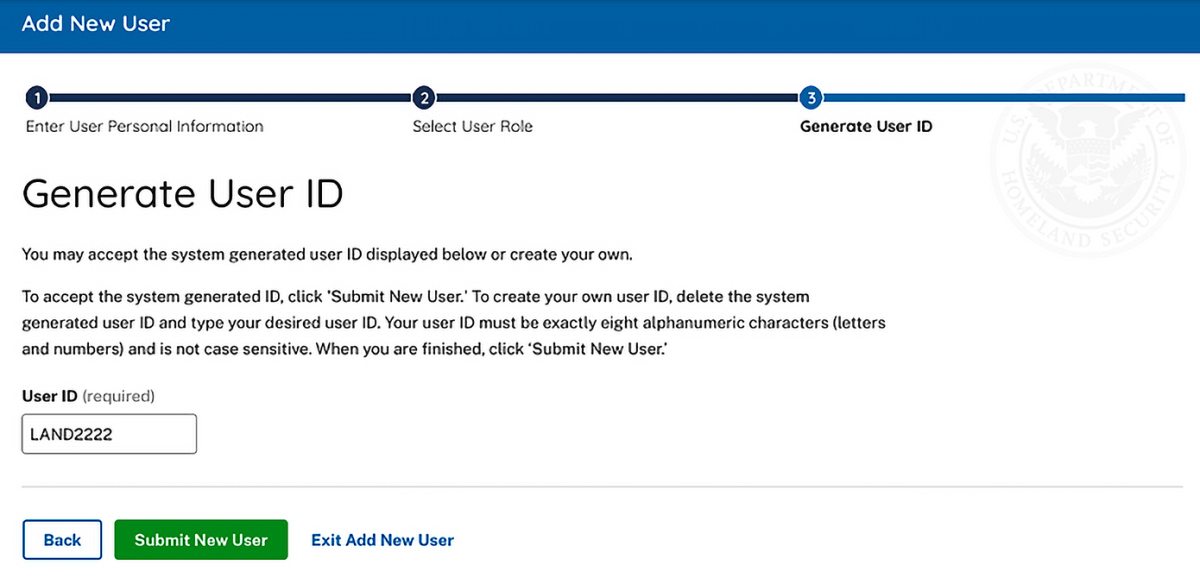
- Review the information and then click Submit New User.
- New users will receive their user ID and password by email.
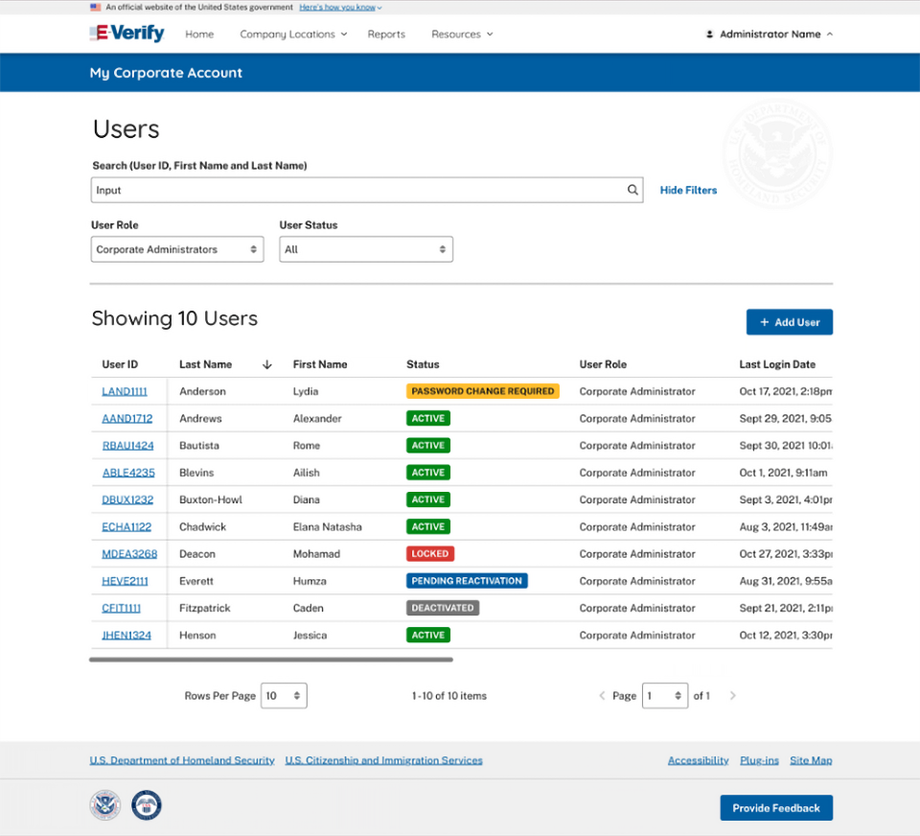
5.3 View Existing Corporate Administrators
Only corporate administrators can view the information for other corporate administrators and reset the passwords of other corporate administrators. “View Existing Administrators” allows you to view, search and maintain the other corporate administrators assigned to the employer, as demonstrated in the View Existing Corporate Administrators – Process Overview.
View Existing Corporate Administrators – Process Overview
- From Corporate Account, select View Existing Administrators.
- Search for a user by entering criteria requested in any field. You can enter a partial name and a percent sign (%) as a wildcard character.
- This displays a list of user accounts. You can view or modify a user account by selecting the User ID link.
5.3.1 Reset Corporate Administrator’s Password
To reset a corporate administrator’s password or delete the account, follow the steps outlined in Reset User’s Password/Delete Account– Process Overview.
Reset User’s Password/Delete Account – Process Overview
- To reset a user’s password, follow the steps in Manage Company Location Users – Process Overview to find the user who needs his or her password reset.
- From Company Locations, click Manage Company Location Users
Click the appropriate User ID to display the view/modify user information page or search (User ID, First Name and Last Name).
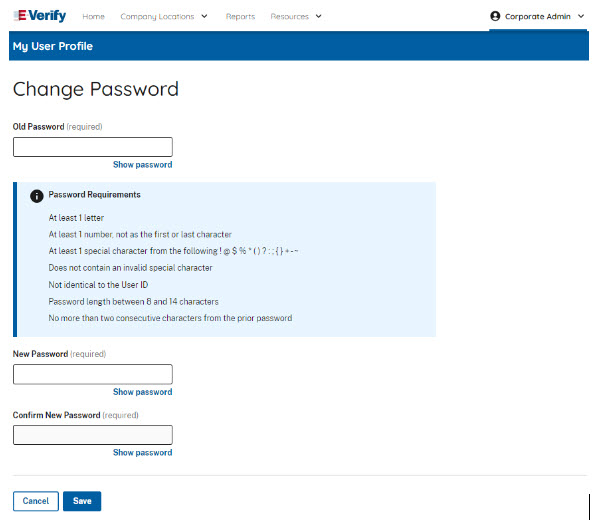
Click Change Password.
Change Password
Enter new temporary password.
Confirm new temporary password.
Click SAVE.
Note: Program administrators must notify users of the temporary password. E-Verify will prompt users to create a new password for security purposes.
Delete Corporate Administrator Account
Corporate administrators may delete the account of another corporate administrator by following the steps in Corporate Locations– Process Overview.
Delete Corporate Administrator – Process Overview
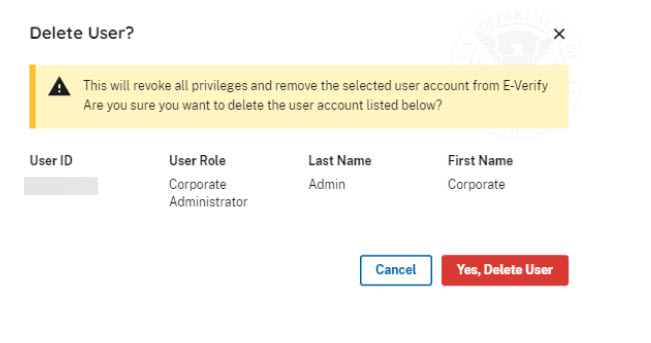
Click Delete User on the User Company Locations page.
Follow the steps in View Existing Administrators– Process Overview above to find the corporate administrator whose account needs to be deleted.
Under Actions, click the delete icon of the user’s account you wish to delete.
Click Delete User on the User Company Locations page.
Click Yes, Delete User.
5.4 Terminate Corporate Administrator Account
A corporate administrator may request that the employer’s corporate administrator access account be terminated in E-Verify. This request will only close the employer’s account at the corporate administrator level and will not close any employer accounts linked to the corporate administrator account.
If a corporate administrator needs to terminate certain or all verification locations, see Section 2.6. A program administrator at the verification location can also make the request to close the account.
To request termination of the corporate administrator account in E-Verify, perform the steps outlined in Terminate Corporate Administrator Account – Process Overview.
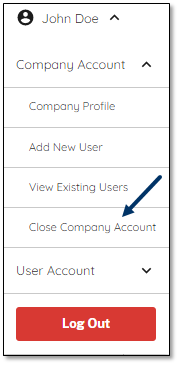
Terminate Company Account – Process Overview
- From Company Account, select Close Company Account.
- Click Termination Request Reason field.
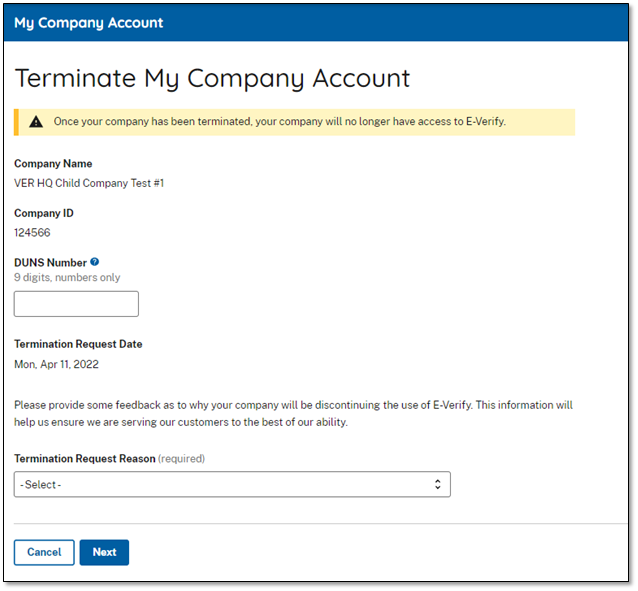
- From the drop-down list, select a Termination Request Reason.
- Click Next
- Review termination request and click Cancel or Yes, Request Termination.
- You will receive an email confirming that your account is terminated in 30 days.
- A message will appear informing you that E-Verify will be notified of your request to terminate participation in the program.
If you submitted a termination request by mistake, contact E-Verify Contact Center at 1-888-464-4218 for assistance.
6.0 Resource And Contact Information
The E-Verify public website is the primary resource for all E-Verify information, but do not hesitate to contact us via phone or email. For easy access to online resources, we suggest you bookmark or save the websites as favorites so you’ll have easy access to them in the future.
E-Verify Resources
E-Verify Public Website: www.E-Verify.gov
- General information about E-Verify
- Program information and statistics
- E-Verify user manuals
- E-Verify quick reference guides
- E-Verify Questions and Answers
- Information about employee rights and employer obligations
E-Verify Enrollment Application: https://everify.uscis.gov/enroll
- Website for initial employer enrollment
E-Verify Access for Employers and Corporate Administrators: https://everify.uscis.gov/emp
- User access to E-Verify
E-Verify Access for E-Verify Employer Agents: https://everify.uscis.gov/esp
- User access to E-Verify
E-Verify Contact Information
The E-Verify Contact Center is available to assist you with using E-Verify, password resets, cases and technical support. We can also answer your questions about E-Verify policies and procedures, Form I-9 and employment eligibility. We are available Monday through Friday, from 8:00 a.m. to 8:00 p.m. ET., except when the federal government is closed. For users with hearing and speech impairment, TTY phone is available from 8:00 a.m. to 8:00 p.m. ET.
For E-Verify Employer Agents
For Clients
For Employees
U.S. Department of Justice, Civil Rights Division, Immigrant and Employee Rights Section (IER)
IER is available to answer your questions about immigration-related employment discrimination, including discrimination based on citizenship status, immigration status or national origin in the Form I-9 and E-Verify processes.
For Employers
For Employees
Appendix A: Acronyms
| Acronym | Definition |
|---|---|
| DHS | U.S. Department of Homeland Security |
| DOS | U.S. Department of State |
| FAR | Federal Acquisition Regulation |
| IIRIRA | Illegal Immigration Reform and Immigrant Responsibility Act of 1996 |
| INA | Immigration and Nationality Act of 1952 |
| IRCA | Immigration Reform and Control Act of 1986 |
| MOU | Memorandum of Understanding |
| NAICS | North American Industry Classification System |
| IER | U.S. Department of Justice, Immigrant and Employee Rights Section |
| Portable Document Format | |
| SEVIS | Student and Exchange Visitor Information System |
| SEVIS ID number | Student and Exchange Visitor Information System identification number |
| SSA | Social Security Administration |
| SSN | Social Security number |
| USCIS | U.S. Citizenship and Immigration Services |