
Home Page
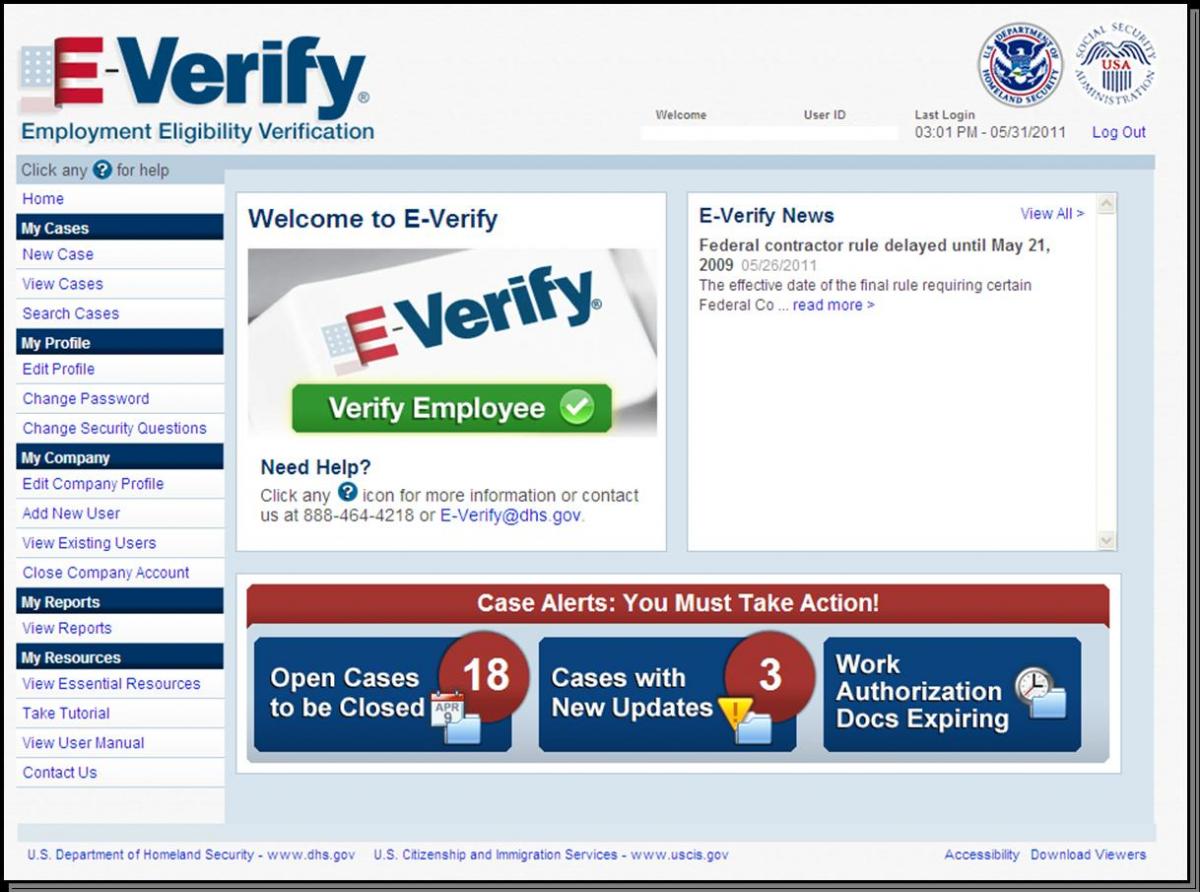
E-Verify’s home page welcomes you by name, displays your user ID and your last login date and time to enhance security.
Left menu
The home page also features a rewritten left menu that uses simple language. We've also added an E-Verify User Manual link to the left menu so that the manual is always just a click away no matter where you are.
Case alerts
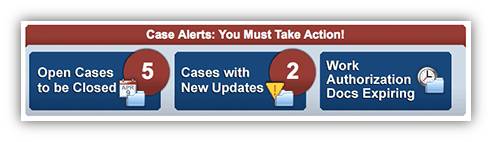
With the case alerts feature at the bottom of the home page, E-Verify will alert you when you're required to take action or when there's an update in the status of a case.
The top information bar lets you know whether you have any case alerts. The bar is blue when you don't have any case alerts and is red when you have at least one case alert. The number in the red circle of a case alert type tells you how many cases currently appear in that alert type. If there's no red circle, no cases currently appear in that alert type.
E-Verify news
Want to get your E-Verify news fix? The improved E-Verify news section on the home page allows you to view a single article at a time without the need to download a separate document.
Easy as 1-2-3
Verifying an employee's employment eligibility has never been easier—most cases require only three steps. To start, just click "New Case" on the left menu or the green "Verify Employee" button in the middle of the home page.
When creating a case, the first step is to enter the employee's Form I-9 information. We've streamlined the process to make it easier and reduce typos and other mistakes that often cause tentative nonconfirmations (TNCs).
The list of documents that an employee may have presented for section 2 of Form I-9 has been rewritten for easier identification. Since we found that most people are more familiar with a document's name rather than its form number, we listed document names first followed by their form numbers.
On the data entry screen, we used a three-column layout and grouped similar fields together in rows. Where possible, we tried to organize fields in the order in which they appear on Form I-9. Required fields are marked with a red asterisk (*) and you can find additional information (or "help text") by clicking on one of the blue question mark icons.
All date fields use drop-down boxes to eliminate formatting confusion (some countries write the day, then the month). There's no need to worry about slowing down though. You can still use your keyboard to select a date by doing the following:
- To select the month, type the first letter of your desired month. For letters that have multiple months, repeat typing the first letter until your desired month is selected. For example, to select the month of the June, press the "j" key twice.
- To select the day, type the two-digit day. For example, to select the sixth day of the month, type "0" then "6."
- To select the year, type the four-digit year. Typing "2" for the first digit will default to the current year. For example, to select the year 1980, type "1" then "9" then "8" then "0."
The Social Security number field is divided into three sections to improve accuracy. For added convenience, your cursor will automatically advance to the next section (or "auto tab") unless your Web browser has JavaScript turned off.
Three-day Rule
An E-Verify case is considered late if you create it later than the third business day after the employee first started work for pay. If the case you create is late, E-Verify will ask why, and you can either select one of the reasons provided or enter you own. The reasons provided are:
- Awaiting Social Security Number
- Technical Problems
- Audit Revealed that New Hire Was Not Run
- Federal Contractor with FAR E-Verify Clause verifying an existing employee (see note)
- Other
Note: This reason is displayed only to an organization enrolled in E-Verify as a “Federal Contractor with FAR E-Verify Clause.”
If you select “Other,” you must enter a reason. The reason you enter must be 200 or fewer characters and should not include any personally identifiable or sensitive information (such as Social Security numbers).
What if a case is created late?
The E-Verify Memorandum of Understanding (MOU) (PDF, 152.35 KB) specifies the acceptable reasons for creating a case late, which are:
- E-Verify was temporarily unavailable because of a technical outage and after subtracting the time period of the outage, the case wouldn’t have been considered late.
- The employee applied for, but did not yet have a Social Security number, and the case was created as soon as the employee was issued the Social Security number.
We realize there are other reasons why an employer might create a case late, but the above reasons are the only reasons considered acceptable in the MOU. While we are committed to identifying and taking action against employers that consistently don’t follow the rules, our primary goal here is to educate employers so that they do follow the rules.
Case Results
E-Verify features can't-miss case results displayed prominently on screen.
You can still view the entire history of a case by clicking the "View/Print Case Details" link that is located at the top of the page when viewing a case.
Only the last four digits of Social Security numbers are displayed on screen for added privacy and security. The employee's full Social Security number will still be included on TNC notices and referral letters as it is important for employees to confirm that their Social Security numbers have been entered correctly.
Case Alerts
E-Verify features three types of case alerts to help you work more efficiently.
Open cases to be closed
When a case gets a final result, you must close the case to complete the verification process. Any case that has been updated with a final case result within the past 30 days and that hasn't been closed appears in this alert. To remove the case from this alert, simply close the case.
Cases with new updates
Sometimes, it's necessary to wait for either DHS or SSA to update a case. When a case is updated within the past 30 days, it appears in this alert. The action you must take to remove the case from this alert depends the on the status of the case. To learn more about case statuses, consult the
E-Verify user manual.
Work authorization documents expiring
When you create a case for an employee who presents a work authorization document with an expiration date, E-Verify will remind you when the document is about to expire. For these cases, you must only complete section 3 of Form I-9 — you may not create a new case in E-Verify to re-verify the employee. This case alert provides a countdown of expiring work authorization documents beginning 90 days before expiration and will show the document as expired for 30 days past expiration. Once you've completed section 3 of Form I-9, you can remove a case from this alert by clicking the red "X" in the "dismiss alert" column. Any subsequent expirations won't appear in this alert though the usual Form I-9 rules (PDF) still apply.
A few things to keep in mind:
- General users see case alerts for only the cases they created. Program administrators see case alerts for all cases created under their company's account.
- When a user takes action that removes a case from a case alert, it removes the case from every user's case alerts.
- The case alerts feature is not available to corporate administrators as they do not manage cases.
Why not email?
We are often asked why we don't email users when E-Verify updates a case. We're looking into solutions that would allow us to use email more, but in the meantime, the new case alerts feature represents a big improvement in case management.
View Cases
Case management includes icons that accompany case statuses to make it easier to quickly identify cases that require your attention. Also, instead of having to wade through several pages of cases, you can select the number of cases you want to display per page.
A few things to keep in mind:
- When clicking "View Cases" on the home page, E-Verify displays a list of all open cases.
- You may also click "Search Cases" to search for specific cases.
- The maximum number of cases that can be displayed is 100. For example, if you have more than 100 open cases, it is possible to display only the first 100 open cases.
- Cases that were closed before June 13, 2010, retain the old terms, such as case status names and closure codes.
- You can sort cases by any of the column titles except Social Security number. To sort cases, click on the column title.
- You can select the number of cases to display per page though your selection won't be saved for subsequent visits.
View MOU
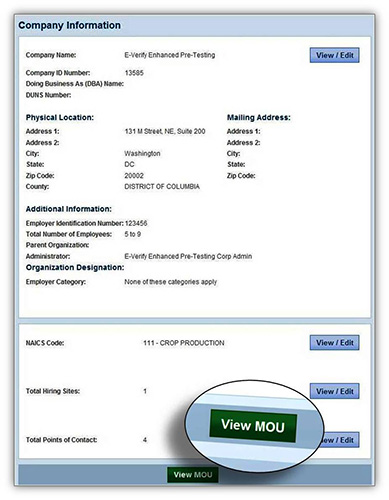
Need to download your signed memorandum of understanding (MOU)? No problem. E-Verify allows program administrators to download their electronically signed MOUs.
few things to keep in mind:
- Program administrators for companies enrolled as employers or E-Verify employer agents can view their signed MOUs by clicking on “Edit Company Profile” in the left menu. Then click the green “View MOU” button at the bottom of the page.
- The MOU is presented as a portable document format (PDF) file and is the version of the MOU that was originally signed at enrollment. Current version MOUs are available for download in “Essential Resources.”
- MOUs for employers and E-Verify employer agents are electronically signed and the downloaded version indicates that the MOU was electronically signed. For employers and E-Verify employer agents that enrolled before E-Verify implemented electronic signatures (and had submitted signed MOUs via fax), the employer or E-Verify employer agent signature field on the downloaded MOU will be blank.
- E-Verify employer agents can view client MOU signature pages that they electronically submitted in E-Verify. MOU signature pages that were submitted by fax are not available for download.