E-Verify User Manual

![]()
M-775, E-Verify User Manual | Current as of May 2025

1.0 Introduction
E-Verify helps ensure a legal workforce by electronically verifying information entered by employees on the Form I-9, Employment Eligibility Verification, against authoritative sources available to the U.S. Department of Homeland Security.
When employers – and the employees they hire – complete Form I-9, they are playing an important role in verifying identity and legal authorization to work in the U.S. E-Verify complements Form I-9 by taking employment verification to the next level, helping employers stay compliant with federal immigration law, prevent unauthorized employment, and protecting American Jobs.
This manual provides guidance on E-Verify processes and outlines the rules and responsibilities for employers and E-Verify employer agents enrolled in E-Verify. Users must follow the guidelines set forth in the E-Verify Terms and Conditions of the Memorandum of Understanding, E-Verify+ Terms of Service and the rules and responsibilities outlined in this manual.
E-Verify+ is a service of E-Verify that allows a participant to electronically initiate the employment verification process for their recently hired employees, prompting the employee to create and log in to their E-Verify+ account, enter their Form I-9 information, and have that information electronically confirmed by E-Verify. The result is transmitted to the E-Verify+ participating employer for creation and retention of a Form I-9 after physical examination or by using the DHS-authorized alternative procedure for remote examination of documentation.
For purposes of this manual, the term “employer” means any person, company, or other entity that is required to complete Form I-9, Employment Eligibility Verification, including any individual with an E-Verify user account. The term “E-Verify Employer Agent” means any person, company, or other entity that is providing the service of verifying employees as a third party to employers through the use of E-Verify.
This section provides a background, overview and an introduction to basic website navigation, participation, user roles, rules and responsibilities, as well as the privacy and security guidelines of E-Verify.
1.1 Background and Overview
In 1996, Congress passed the Illegal Immigration Reform and Immigrant Responsibility Act (IIRIRA), which required the Social Security Administration (SSA) and U.S. Citizenship and Immigration Services (USCIS), formerly the Immigration and Naturalization Service (INS), to conduct an employment verification pilot program. Under the U.S. Department of Homeland Security (DHS), USCIS operates the E-Verify program, previously referred to as the Basic Pilot program. E-Verify is a free internet-based system that implements the requirements of IIRIRA by allowing any U.S. employer to electronically confirm the employment eligibility of its newly hired employees.
E-Verify is a voluntary program. However, employers with federal contracts or subcontracts that contain the Federal Acquisition Regulation (FAR) E-Verify clause are required to enroll in and use E-Verify as a condition of federal contracting. Employers with employees in states with legislation that require participation in E-Verify, for example, as a condition of business licensing, may also be required to participate in E-Verify. In addition, an employer may be required to participate in E-Verify pursuant to a court order.
E-Verify does not provide guidance on state or local E-Verify laws. For help, contact the appropriate state officials, a local Chamber of Commerce, or other legal advisors.
Apart from any state or local law that requires participation in E-Verify, employers are fully responsible for complying with sections 274A (which addresses the requirements of the Form I-9 process) and 274B (which addresses unfair immigration-related employment practices) of the Immigration and Nationality Act. Employers who fail to comply with either section may be subject to penalties.
E-Verify works by electronically comparing the information from an employee’s Form I 9, Employment Eligibility Verification, with official goverment records that E-Verify can access to verify the identity and employment eligibility of each newly hired employee and/or employee assigned to a covered federal contract.
Employers can verify the employment eligibility of only one person at a time within E-Verify. All cases must be created individually.
E-Verify is free, and it is the best means available to confirm the employment eligibility of new hires. The E-Verify statute limits the scope of E-Verify operations to the United States, which includes the 50 states, the District of Columbia, Puerto Rico, the U.S. Virgin Islands, Guam, and the Commonwealth of the Northern Mariana Islands. Users may only create E-Verify cases in the United States.
E-Verify Self Check, referred to as Self Check, is a free, fast, secure and voluntary online service that allows individuals to confirm their own employment eligibility themselves. Employers may not ask current or prosepective employees to use Self Check to prove employment eligibility. The service is designed to provide visibility into government records, and if necessary, guidance on how individuals can correct those records. Self Check is separate from the E-Verify user interface. For more information and specific rules, visit https://www.E-Verify.gov/employees/employee-self-services/mye-verify/self-check.
Use of Self Check does not satisfy or supersede the requirements of federal contractors subject to the FAR E-Verify clause, or any other employers, to use E Verify.
For more information on E-Verify procedures, rules, and responsibilities for federal contractors with the FAR E-Verify clause, refer to the E-Verify Supplemental Guide for Federal Contractors.
1.2 Basic Website Navigation
All E-Verify users need to be familiar with the website navigation links. Once users leave Login.gov to access E-Verify, they will see the E-Verify Dashboard.
Click the appropriate User ID.
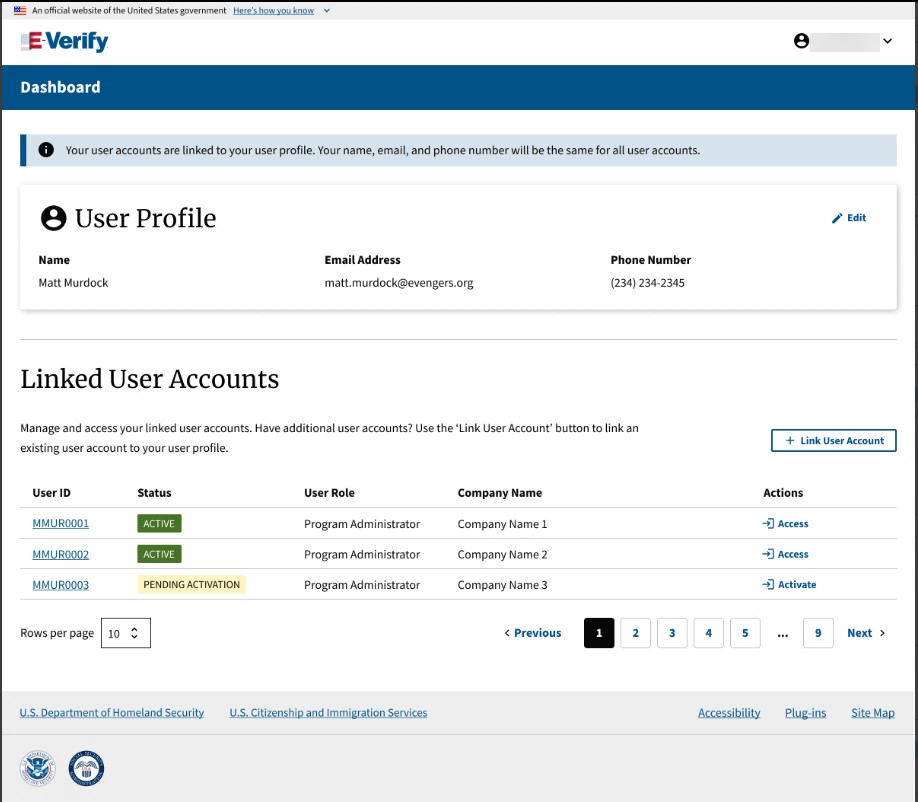
The figure below provides a screen shot of the employer user webpage. The navigation links within each area vary depending upon the type of user. For more information on navigation links for E-Verify Employer Agents, refer to the Supplemental Guide for E-Verify Employer Agents.
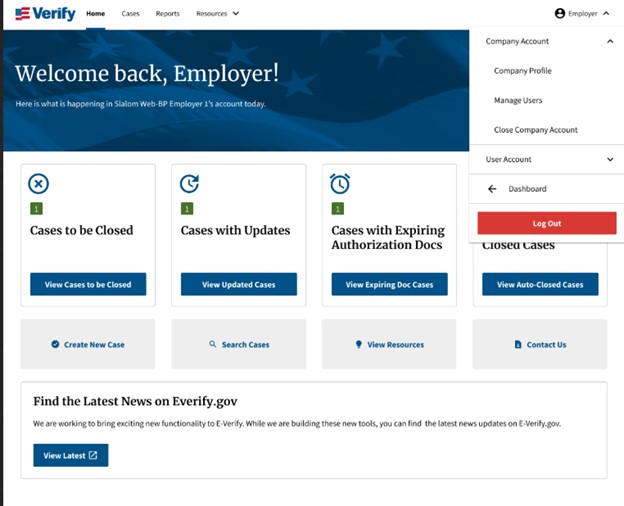
Each time you access a user account, you will see a welcome back banner with your name and company listed.
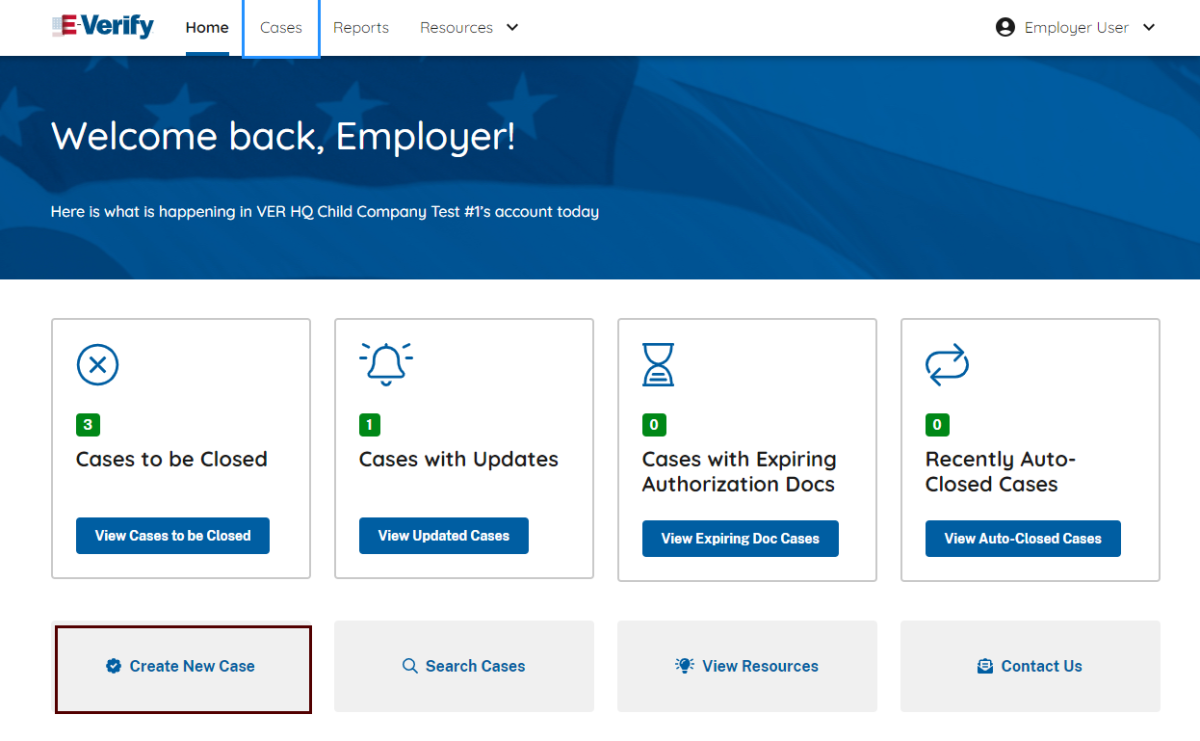
Under the welcome banner are case alert boxes with important information about your cases, including Cases to be Closed, Cases with Updates, Cases with Expiring Authorization Docs, and Recently Auto-Closed Cases.
Directly below the case alert boxes are convenient quick links in gray boxes, including Create New Case, Search Cases, View Resources, and Contact Us.
Below the quick links is the E-Verify News and Announcements.
E-Verify Menu Overview
| Menu Options | Function |
|---|---|
| Cases |
|
| Reports |
|
| Resources |
|
| Employer User [User Name] |
|
1.2.1 Essential Resources
View Essential Resources under Resources contains links to important documents and tools for employers that participate in E-Verify. The Essential Resources Overview provides specific information on the resources available to users.
ESSENTIAL RESOURCES OVERVIEW
| LINK | INFORMATION |
|---|---|
| E-Verify Posters |
|
| Manuals and Guides |
|
| E-Verify Further Action Notices |
|
| Document Reference Library |
|
| Form I-9 Resources |
|
| Memorandums of Understanding (MOU) |
|
| Other Resources |
|
1.3 E-Verify Participation: Enrollment vs. Registration
Significant differences between E-Verify and E-Verify+ enrollment and registration are outlined in the Enrollment vs. Registration Overview. For additional information on enrollment, visit Enrolling in E-Verify.
Employers who wish to check their enrollment status should contact:
E-Verify Customer Support Monday through Friday from 8 a.m. – 8 p.m. Eastern (TTY phone is available from 8 a.m. to 8 p.m. Eastern time)
Telephone: 888-464-4218; Email: E-Verify@uscis.dhs.gov
Employers who have enrolled and need information about registering additional users or about their functions, should see Section 6.0 of this guide.
ENROLLMENT VS. REGISTRATION OVERVIEW
| Question | ENROLLMENT | REGISTRATION |
|---|---|---|
| Who | Enrollment Point of Contact enrolls companies in E-Verify to participate in the program | Program administrators register new users in E-Verify who are then able to create cases. |
| How | Visit the E-Verify enrollment website at https://everify.uscis.gov/enroll | After completing the E-Verify online training requirements, Program Administrators may register general users and additional Program Administrators. For more information on adding new users, see Section 7.1. |
| Why | Employers enroll to use E-Verify and/or E-Verify+ to confirm employment eligibility of employees | Enrolled employers register users to create cases in E-Verify. There is no limit on the number of users an enrolled employer can register. |
To participate in E-Verify, employers must enroll online. You can find information about the system requirements on the E-Verify website under Enrolling in E-Verify.
To enroll, employers must electronically sign the E-Verify Terms and Conditions which details the responsibilities of DHS and the employer. In addition, E-Verify users must agree to and follow the guidelines and responsibilities outlined in the E-Verify Terms and Conditions and this manual. Employers should ensure that users are prepared and capable of using E-Verify properly. Misuse of E-Verify + and/or conducting discriminatory practices during the process may lead to legal liability, suspension, or termination from both E-Verify.
To enroll in E-Verify employers should visit the enrollment website which guides employers through the enrollment process. Additional information regarding enrollment is found at www.E-Verify.gov.
When employers enroll in E-Verify they choose an access method. Access methods are types of E-Verify accounts that determine who creates and manages the employer’s E-Verify cases. The four access methods include: Employer, E-Verify Employer Agent, Corporate Administrator, and Web Services.
*E-Verify+ is currently available to the Employer access method only.
The access methods are explained in the Access Method Overview. For more information, visit the Enrolling in E-Verify section at www.E-Verify.gov.
ACCESS METHOD OVERVIEW
| ACCESS METHOD | EXPLANATION |
|---|---|
| Employer Access | Employer plans to use E-Verify and/or E-Verify+ to verify its employees. This access method allows employers to create and manage their own cases directly in E-Verify and/or E-Verify+. Most E-Verify participants, regardless of their business size or structure, are enrolled under the employer access method. |
| E-Verify Employer Agent Access | Employer agent plans to use E-Verify on behalf of its clients to verify their clients’ employees. The E-Verify employer agent access method allows an individual or company to act on behalf of other employers to create and manage the E-Verify cases of the other employers. The E-Verify employer agent may also create cases for its own employees. |
| Corporate Administrator Access | Employer has a central office that needs to manage E-Verify use for all of its locations that access E-Verify. Corporate Administrator access is used only to manage multiple employer accounts. Corporate Administrator cannot create or manage individual E-Verify cases. For more information on Corporate Administrator access, refer to the E-Verify User Manual for Corporate Administrators. |
Web Services Access for Employers -or- Web Services Access for E‑Verify Employer Agents | Employer plans to develop its own software to access E-Verify. The web services access method requires an employer to develop software that interfaces with E-Verify to create and manage cases. The employer’s software should extract data from its existing system or an electronic Form I-9 and transmit the information to E-Verify. Employers who choose this option receive a web services Interface Control Agreement (ICA) which contains the information used to develop and test the software interface. Both employers and E Verify employer agents can use this access method. |
1.4 Overview of User Roles
Enrolled employers can assign their users with different permissions and functions, depending upon the user’s role. There are two types of users: general users and program administrators. Review the permissions of each user role in the User Role Overview below.
General users and program administrators must successfully complete the online E-Verify tutorial before they can create or manage cases. For more information on the specific functions of each user role, see Section 6.1.
USER ROLE OVERVIEW
| USER ROLE | PERMISSIONS |
|---|---|
Program Administrator (at least one required) | Every E-Verify account must have at least one program administrator. The program administrator is responsible for following all E-Verify program rules and staying informed of changes to E-Verify policies and procedures. The program administrator role includes functions of a general user. Permissions include:
|
General User (optional) | Employers can have as many or no general users as they desire. The general user is responsible for following all E-Verify program rules and staying informed of changes to E-Verify policies and procedures. Permissions include:
|
1.5 User Rules and Responsibilities
E-Verify users are bound by the guidelines in the E-Verify Terms and Conditions and the rules and responsibilities outlined in this manual.
To ensure proper use of E-Verify and protection of employee workplace rights, employers should periodically review all of the program rules and employer responsibilities with their users.
For information on E-Verify rules and responsibilities for federal contractors with the FAR E-Verify clause, refer to the E-Verify Supplemental Guide for Federal Contractors.
E-Verify users must follow the guidelines specified in the Rules and Responsibilities Overview.
E-Verify monitors user activity to identify and prevent misuse, discrimination, and other non-compliant behaviors. For more information about Account Compliance visit www.e-verify.gov/employers/account-compliance
RULES AND RESPONSIBILITIES OVERVIEW
Employers who participate in E-Verify must:
- Follow E-Verify procedures for each employee for whom an E-Verify or E-Verify+ case is created.
- Notify prospective employees and all employees, including those hired to work in a remote setting, of E-Verify participation by clearly displaying the Notice of E-Verify Participation and the Department of Justice, Immigrant and Employee Rights Section’s Right to Work posters in English and Spanish. This can include displaying the posters digitally, online, in hard copy at physical locations, and providing a copy of the posters with job application materials. You may also display the posters in other languages provided by DHS.
- Complete Form I-9 for each newly hired employee and create a case in E-Verify or E-Verify+.
- Obtain a Social Security number (SSN) from each newly hired employee on Form I-9.
- Ensure that Form I-9 List B identity documents have a photo (Section 2.1).
- Accept your employee’s Form I-9 documents accurately as they appear on the Lists of Acceptable Documents.
- Create a case for each newly hired employee no later than the third business day after he or she starts work for pay.
- Enter the employee’s email address in the case if it was provided on Form I-9 when creating an E-Verify case.
- Provide each employee with notice of and the opportunity to take action on a Tentative Nonconfirmation (mismatch).
- Ensure that all personally identifiable information is safeguarded.
Employers participating in E-Verify must not:
- Use E-Verify to pre-screen an applicant for employment.
- Specify or request which Form I-9 documentation an employee must use, except to specify that any Form I-9 List B document the employee chooses to present must contain a photo.
- Use E-Verify to discriminate against any job applicant or employee on the basis of his or her national origin, citizenship, or immigration status.
- E-Verify to discriminate against you on the basis of your race, color, religion, sex (including pregnancy), national origin, age (40 or over), disability, or genetic information.
- Create an E-Verify or E-Verify+ case for an employee who was hired before the employer signed the E-Verify Terms and Conditions, except in certain instances such as employees of federal contractors with the FAR E-Verify clause.
- Take adverse action against or terminate an employee because he or she received a mismatch result, unless E-Verify issues a case result of Final Nonconfirmation.
E-Verify Participation Notifications
Notice of E-Verify Participation
Provided by DHS
Right to Work Poster
Issued by Department of Justice, Immigrant and Employee Rights Section
1.6 Privacy and Security Statement
The use of E-Verify requires the collection of personally identifiable information (PII). Employers must protect the privacy of employees who submit information to be processed through E-Verify and ensure that all personal information collected is safeguarded and used only for the purposes outlined in the Terms and Conditions.
E-Verify protects PII in accordance with the National Archives and Records Administration (NARA) records retention and disposal schedule (N 1-566-08-7) by annually disposing of E-Verify records that are over 10 years old. This minimizes security and privacy risks associated with U.S. government retention of PII.
Failure to properly protect employee information can result in identity theft or fraud and can cause considerable inconvenience, harm or embarrassment to the employees or employer affected.
At a minimum, follow the steps in the Privacy Guidelines Overview to protect personal information and comply with the appropriate requirements.
PRIVACY GUIDELINES OVERVIEW
- Allow only authorized users to use E-Verify.
Ensure that only appropriate users handle information and create cases. - Secure access to E-Verify.
Use Login.gov to access E-Verify and ensure that unauthorized persons do not gain access to E-Verify. - Protect and store employee information properly.
Ensure that employee information is stored in a safe and secure location and that only authorized users have access to this information. - Discuss E-Verify results in private.
Ensure that all case results including Tentative Nonconfirmations (Mismatches) and Final Nonconfirmations are discussed in private with the employee.
2.0 Initial Verification
The E-Verify process begins with a completed Form I-9. E-Verify confirms employment eligibility by comparing the employee’s Form I-9 information entered in E-Verify by the employer with the information in records available to DHS and/or SSA.
When E-Verify checks the employee’s information with records available to DHS and/or SSA, a case result is provided. Case result statuses can be initial, interim or final. Proper use of E-Verify requires users to close all cases when they receive a final case results of Final Nonconfirmation or Close Case and Resubmit. Cases resulting in Employment Authorized are automatically closed by the system.
This section outlines the steps required to create a case in E-Verify and the initial case results provided by E-Verify. For additional guidance specific to E-Verify employer agents, see the Supplemental Guide for E-Verify Employer Agents.
2.1 Form I-9 And E-Verify
Employers are required to timely and properly complete and retain Form I-9 for each employee they hire. The first day of employment means the first day an employee works in exchange for wages or other remuneration. These Form I-9 requirements also apply to E-Verify employers. With the goal of ensuring a legal workforce, employers enrolled in E-Verify have chosen to take the additional step of electronically confirming that information their employees provide match government records.
To view or download Form I-9, go to the following website: http://www.uscis.gov/I-9.
For more information on Form I-9 procedures, refer to the Handbook for Employers: Guidance for Completing Form I-9 (M-274).
For additional assistance on Form I-9, contact E-Verify Contact Center Monday through Friday 8 a.m. – 8 p.m. Eastern at 888-464-4218 (TTY phone is available from 8 a.m. to 5 p.m. Eastern).
Newly hired employees must complete Section 1 of Form I-9 in its entirety on the first day of employment. They may complete Section 1 before this date, but only after acceptance of an offer of employment. Under general Form I-9 practice, employees can voluntarily provide their Social Security numbers (SSNs) on Form I-9. However, because SSNs are required for employers to create E-Verify cases, all employees whose employment eligibility will be verified in E-Verify must provide their SSNs.
If a newly hired employee has applied for, but has not yet received an SSN (for example, the employee is a newly arrived immigrant), attach an explanation to the employee’s Form I-9 and set it aside. Allow the employee to continue to work and create a case in E-Verify using the employee’s SSN as soon as it is available. If the case was not created by the third business day after the employee started work for pay, indicate the reason for this delay. Employers may choose a reason from the drop-down list or state a specific reason in the field provided.
Employers must complete Section 2 of Form I-9 in its entirety within three days of the employee’s date of hire. To complete Section 2, physically examine the documents presented by the employee in-person or remotely examine using an alternative procedure authorized by the Secretary of Homeland Security to establish the employee’s identity and employment authorization. Do not specify which documents from the “Lists of Acceptable Documents” on Form I-9 the employee must present. Employers may reject a document if it does not reasonably appear to be genuine and to relate to the person presenting it.
Documents from List A establish both identity and employment eligibility. Documents from List B establish identity only and documents from List C establish employment eligibility only. Employers must accept either one document from List A, or a combination of one document from List B and one document from List C.
Any List B document presented to employers participating in E-Verify must contain a photo. However, if an employee objects to providing a photo document for religious reasons, call E-Verify at 888-464-4218. If the employee presents a U.S. passport, a passport card, a Permanent Resident Card (Form I-551) or an Employment Authorization Document (Form I-766), the employer must obtain a copy of it and retain it with Form I-9. For more information on Form I-9 retention guidelines, refer to the Handbook for Employers: Guidance for Completing Form I-9 (M-274).
2.1.1 Receipts
If the employee presents an acceptable receipt for Form I-9 showing that he or she applied to replace a document that was lost, stolen, or damaged, the employer must wait to create a case in E-Verify. When the employee provides the actual document for which the receipt was presented, or other Form I-9 documentation from the List of Acceptable documents, the employer must update the employee’s Form I-9 and then create a case in E-Verify for the employee.
However, employers must create the E-Verify case by the third business day after the employee is hired if the employee presents one of the following documents, which are also considered receipts:
- The arrival portion of Form I-94/I-94A with a temporary Form I-551 Alien Documentation, Identification & Telecommunications (ADIT) stamp and a photograph of the individual.
- The departure portion of Form I-94 with a refugee admission stamp or computer-generated printout of Form I-94 with admission code “RE.”
For more information on acceptable receipts, see the Handbook for Employers (M-274) or visit Receipts on I-9 Central.
2.1.2 Rehires
Employers have the option of treating all rehired employees as new hires by completing a new Form I-9 and creating a case in E-Verify. However, employers also have the option of completing Supplement B, Reverification and Rehire, for rehires and only completing a new Form I-9 and creating an E-Verify case upon rehiring employees for whom no previous E-Verify cases were created.
If you rehire a former employee within three years of the initial execution of the previous Form I-9, but did not create an E-Verify case, or if you created a case and did not receive a result of employment authorized, have the employee complete a new Form I-9 and create a case in E-Verify.
If you rehire a former employee within three years of the date of the initial execution of the previous Form I-9, created a case from that Form I-9, and received a result of employment authorized, you may be able to rely on the information from the employee’s previous Form I-9. Follow the steps outlined below when rehiring an employee who previously had a case created in E-Verify and received an employment authorized result.
| If the previously created E-Verify case received a result of employment authorized and the Form I-9 has: | Then: |
|---|---|
| No expired documents | Write the employee’s rehire date in Supplement B of the existing Form I-9. Do not create a new case in E-Verify. or Complete a new Form I-9 for the employee and create a new E-Verify case for the employee. |
An expired:
| Write the employee’s rehire date in Supplement B of the existing Form I-9. Do not create a case in E-Verify. or Complete a new Form I-9 for the employee and create a new E-Verify case for the employee. |
| An expired List A or List C document that triggers reverification | Write the employee’s rehire date and the updated employment authorization document information in Supplement B of the existing Form I-9. Do not create a case in E-Verify. or Complete a new Form I-9 for the employee and create a new E-Verify case for the employee. |
Do not specify or request which document a newly hired employee must use for Form I-9.
If the employee presents a U.S. passport, a passport card, a Permanent Resident Card (Form I-551) or an Employment Authorization Document (Form I-766), and you will create a new E-Verify case for the employee, make a copy of the document and retain it with Form I-9.
See the Handbook for Employers M-274, Section 6.2 Reverifying or Updating Employment Authorization for Rehired Employees for more information on rehires.
2.1.3 Unexpired Document Required
Employees must present unexpired documents for Form I-9 verification (see exception below) and for the employer to create an E-Verify case. If information regarding an expired document is entered into E-Verify, it generates an error message and you will not be allowed to continue creating the case. The employee will need to present acceptable unexpired document(s) and the employer will need to correct Form I-9 before creating an E-Verify case.
Just because the employee presented an expired document does not mean he or she is not authorized to work. If the employee provides unexpired documentation that is used to create another case, it may still be possible for E-Verify to confirm their employment eligibility.
In limited situations, employers may accept a document that appears expired on its face for Form I-9 verification. Foreign nationals in certain eligibility categories who timely file a renewal application for an Employment Authorization Document (EAD) may receive an automatic extension of their EAD. The extension begins on the date the EAD expires and continues for up to the maximum automatic extension date (see Section 5.1 of the M-274 for guidance on calculating the applicable period) unless the application is denied. The employee’s EAD may be combined with the Form I-797C, Notice of Action, showing both that the renewal application was timely filed and the same qualifying eligibility category as that on the expired EAD, to demonstrate the extended validity of the EAD for the applicable automatic extension period. In the case of an EAD in category A12 or C19, Form I-797C can show either A12 or C19 and they do not have to match. This document combination is considered to be an unexpired EAD under List A. The receipt number on the Form I-797C should be entered as the document number when the case is created in E-Verify.
Not all EADs can receive an auto-extension; only EADS issued under specific category codes qualify. See section 5.1 Automatic Extensions Based on a Timely Filed Application to Renew Employment Authorization and/or Employment Authorization Document in the Handbook for Employers (M-274) or visit www.uscis.gov/I-9central for more information about which EAD category codes qualify for the auto-extension.
When a Temporary Protected Status (TPS) designation for a particular country is extended, DHS may automatically extend the expiration date of EADs issued to those TPS beneficiaries via a notice published in the Federal Register. In this situation, the published notice will state the date to which the EAD has been extended. Record the date the EAD has been automatically extended to as the expiration date. The employee may show you the Federal Register notice.
The employee does not have to provide proof that they are a national of a country designated for TPS.
DHS also sometimes extends two-year Permanent Resident Cards (Form I-551) via Form I-797. The Permanent Resident Card with Form I-797 noting the extension can be presented as a List C document for Form I-9. Additionally, an expired Permanent Resident Card with a USCIS-issued sticker or I-797, Notice of Action, receipt notice of Form I-90, Application to Replace Permanent Resident Card extending its validity is a List A document.
2.2 Create A Case
After Form I-9 is complete, the next step is to create a case in E-Verify using the information from Form I-9. E-Verify cases must be created no later than the third business day after the employee starts work for pay. Employers who learn that they inadvertently failed to create a case by the third business day after the employee started work for pay should bring themselves into compliance immediately by creating a case for the employee.
Do not create a case for an employee whose first day of employment is before the effective date of the employer’s MOU.
For more information on E-Verify procedures for federal contractors with the FAR E‑Verify clause, refer to the E-Verify Supplemental Guide for Federal Contractors.
Follow the steps outlined below in How to Create a Case – Process Overview.
How to Create a Case - Process Overview
- From the E-Verify home page, click Cases and select Create New Case; or
Click Create New Case from quick link below
Enter the employee’s information from Section 1 of Form I-9. If you do not enter required information, E-Verify generates a field error message and you must enter the required information to continue with the case.
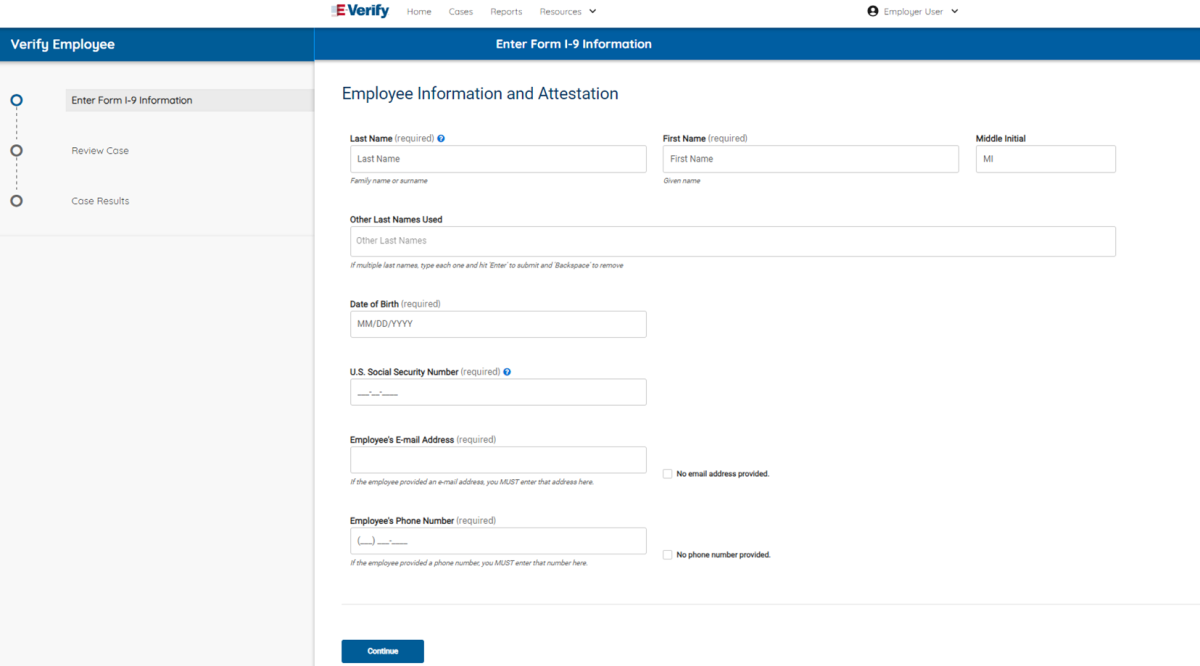
When entering more than one last name into the Other Last Names Used field, press the Tab or Enter key after each last name is added.
If the employee provided an email address on Form I-9, you must enter it into E Verify. E-Verify may send the employee email notifications with information about his or her E Verify case. If the employee did not provide an email address on Form I-9, click the box next to No email address provided.
- Click Continue.
From Section 1 of the employee’s Form I-9, choose the appropriate option for Citizenship Status.
- A citizen of the United States
- A noncitizen national of the United States
- A lawful permanent resident
- An alien authorized to work

Click Continue.
Click List A Document or List B & C Document, using information provided in Section 2 of the employee’s Form I-9. Then select the document or combination of documents provided in Section 2.
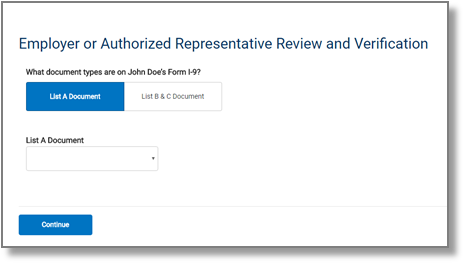
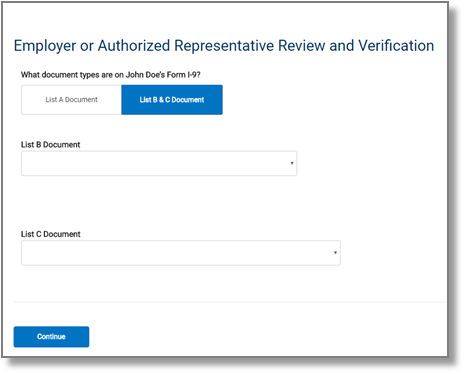
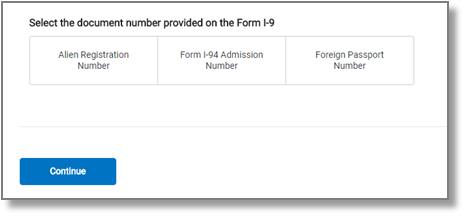
If you select driver’s license, E-Verify will prompt you to select the state. Enter the requested information and click Continue.
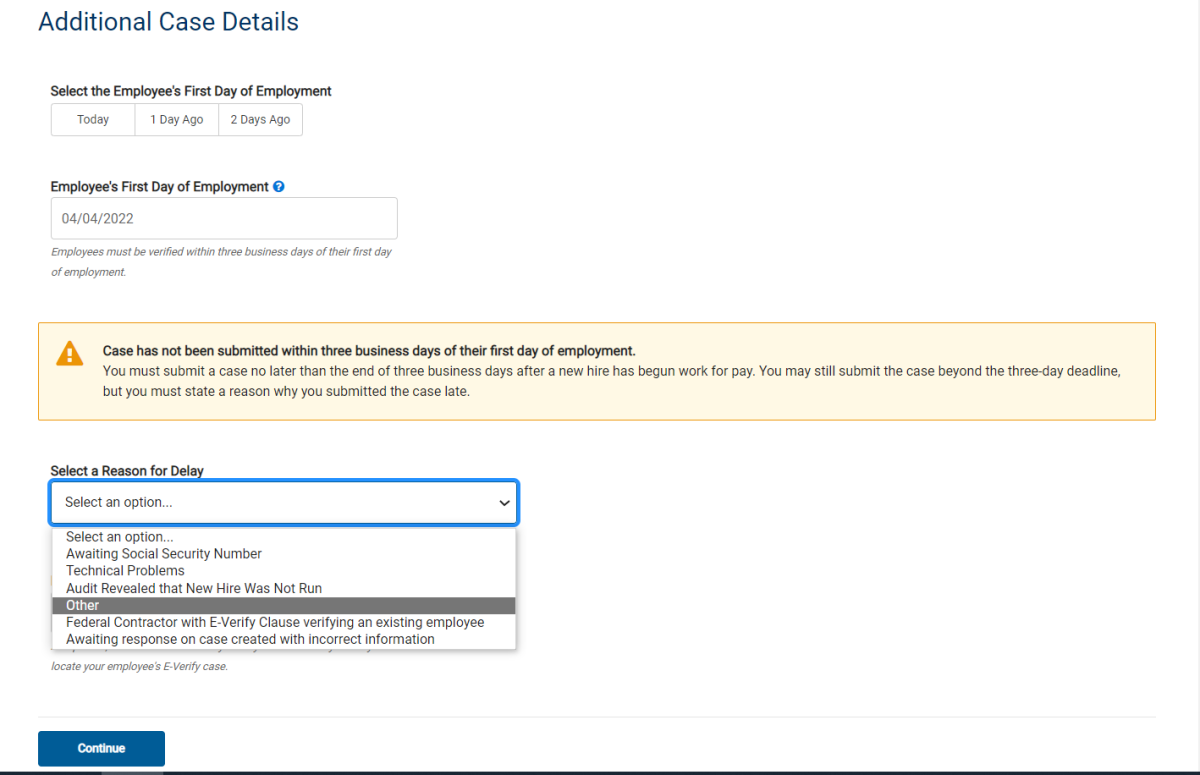
Type the employee’s first day of employment recorded in Section 2 of Form I-9 into the Employee’s First Day of Employment field. Alternatively, you may click Today, 1 Day Ago, or 2 Days Ago and the corresponding date automatically populates in the Employee’s First Day of Employment field.
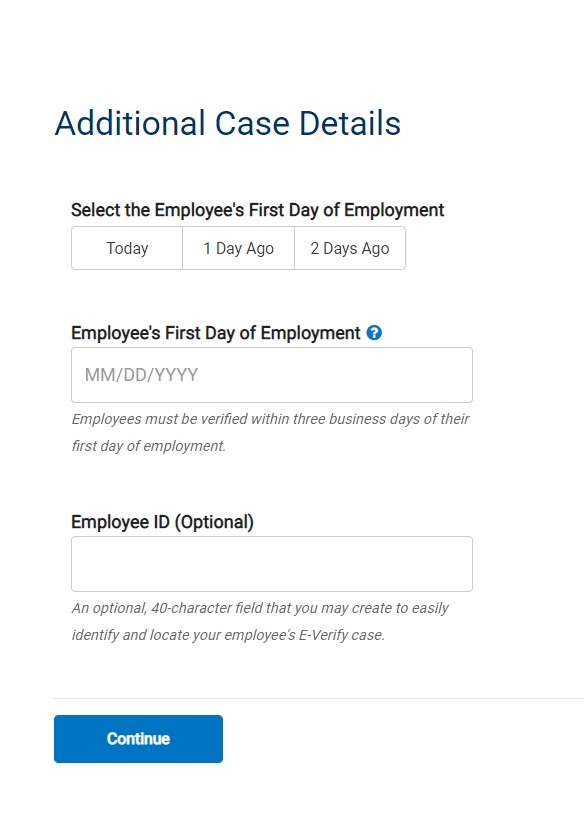
If the case is being created 3 or more days past the employee's first day of employment, you must provide a reason for the delay. Select one of the following reasons from the drop-down menu:
- Awaiting Social Security Number
- Technical Problems
- Audit Revealed that New Hire Was Not Run
- Other
- Federal Contractor with E-Verify Clause verifying an existing employee
- Awaiting Response on Case Created with Incorrect Information
If Other is selected, E-Verify requires you to type the reason in the Reason for Delay text box.
If you enter a date more than 90 business days beyond the current date in the Employee’s First Day of Employment field, E-Verify displays an error message informing this date must be between 11/07/1986 and 90 business days in the future.
- Provide Visa Number when applicable.
- The Student and Exchange Visitor Information System (SEVIS) ID number is an optional field.
Employee ID is an optional field for users who wish to assign an internal tracking code to a case. If desired, enter a unique identifier assigned to this case.
Click Continue.
For additional information simply click any help text symbol.
Reminder
- Complete Form I-9 before creating a case in E-Verify.
- Enter the employee’s email address if provided on Form I-9 or indicate “No email address provided.”
- Create cases for all newly hired employees no later than the third business day after the employee's first day of employment.
2.2.1 Employee’s First Day Of Employment
The employee’s first day of employment is the date the employee begins working in exchange for wages or other remuneration. The employee’s first day of employment is recorded in Section 2 of Form I-9.

If Form I-9 is completed after the employee accepts the offer of employment, but before the actual start of work for pay or other remuneration, it is possible that the first day of employment recorded on Form I-9 could change after the employer created the case in E-Verify. If this happens, no additional action is required in E-Verify as the first day of employment cannot be changed once the case has been submitted. If the employee’s first day of employment changes, employers should correct the date originally indicated as the employee’s first day of employment in the certification block in Section 2 on the employee’s Form I-9. Consult the Handbook for Employers (M-274) or visit www.uscis.gov/i-9central for more information.
Employees whose first day of employment was on or before November 6, 1986, are not subject to Form I-9. Therefore, employers may not create E-Verify cases for these employees based on this employment. Individuals hired for employment in the Commonwealth of the Northern Mariana Islands (CNMI) on or before November 27, 2009, are not subject to Form I-9 and their employers may not create cases in E-Verify for them based on this employment.
2.2.2 E-Verify Photo Matching
E-Verify photo matching will prompt the E-Verify user to compare the employee’s photo document with a photo displayed during creation of the E-Verify case. This helps ensure that the document the employee provided matches records available to DHS.
The four List A documents that will trigger photo matching are the U.S. passport, passport card, Permanent Resident Card (Form I-551) and Employment Authorization Document (EAD) (Form I-766). When the employee presents one of these documents, employers must copy the front and back of the document (or in the case of a U.S. passport, copy the Passport ID page and the Passport Barcode page) and retain the copies with Form I-9. If the employee’s Form I-9 information matches records available to DHS, E-Verify displays the employee’s photo from the document presented.
To match photos, compare the photo displayed by E-Verify to the photo on the employee’s actual document or a copy of the employee’s document and determine if the photos are reasonably identical. The photos should be identical with only minor variations in shading and detail based upon the age and wear of the employee’s document and the quality of your computer monitor.
Note that a watermark has been added to the photo displayed in E-Verify to prevent unauthorized use. The photo on the document presented by the employee should not have a watermark. Absence of a watermark on the photo from the employee’s document does not mean that the document is not genuine.
Do not compare the photo displayed by E-Verify to the actual employee. Employers should have directly compared the photo on the document to the employee during Form I-9 completion and prior to creating the E-Verify case. Photo Matching - Process Overview provides a summary.
PHOTO MATCHING – PROCESS OVERVIEW
After a selection is made, one of the following case results will appear: Each case result requires different actions or steps to continue or close the case. These actions are outlined in each case result section throughout this manual.
- E-Verify prompts you to compare a photo displayed in E-Verify with the employee’s Form I 9 photo document. You must obtain a copy of the employee’s document and retain it with Form I-9.
- Account for minor variations in shading and detail between the two photos.
- Select the option next to the appropriate response.
- Click Continue to Case Results.
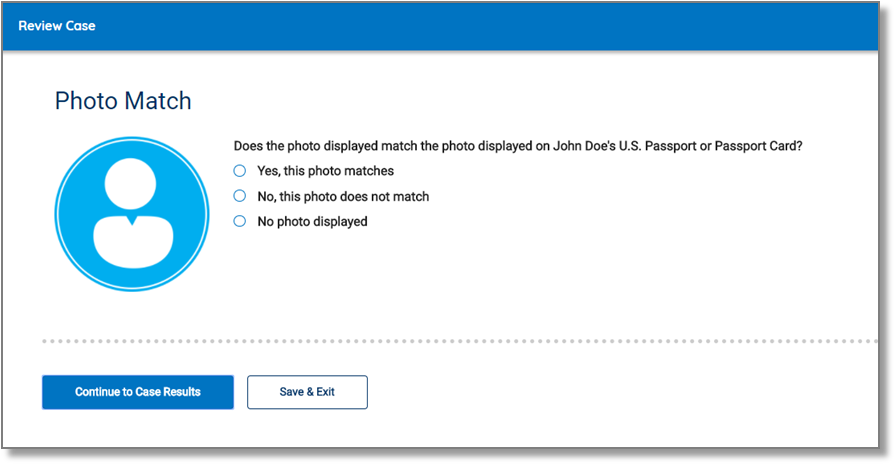
- Yes, this photo matches – The photo on the employee’s actual document or a copy matches the photo displayed by E-Verify. Clothing, hair style, facing direction and appearance on the card should be identical to the photo displayed by E Verify.
- No, this photo does not match – The photo on the employee’s actual document or a copy does not match the photo displayed in E Verify.
- No photo displayed – No photo was displayed for the E-Verify user to compare with the employee’s document provided. This option should be selected when E-Verify either displays no photo or it displays an image of something other than a photo of a person, such as an image of a document.
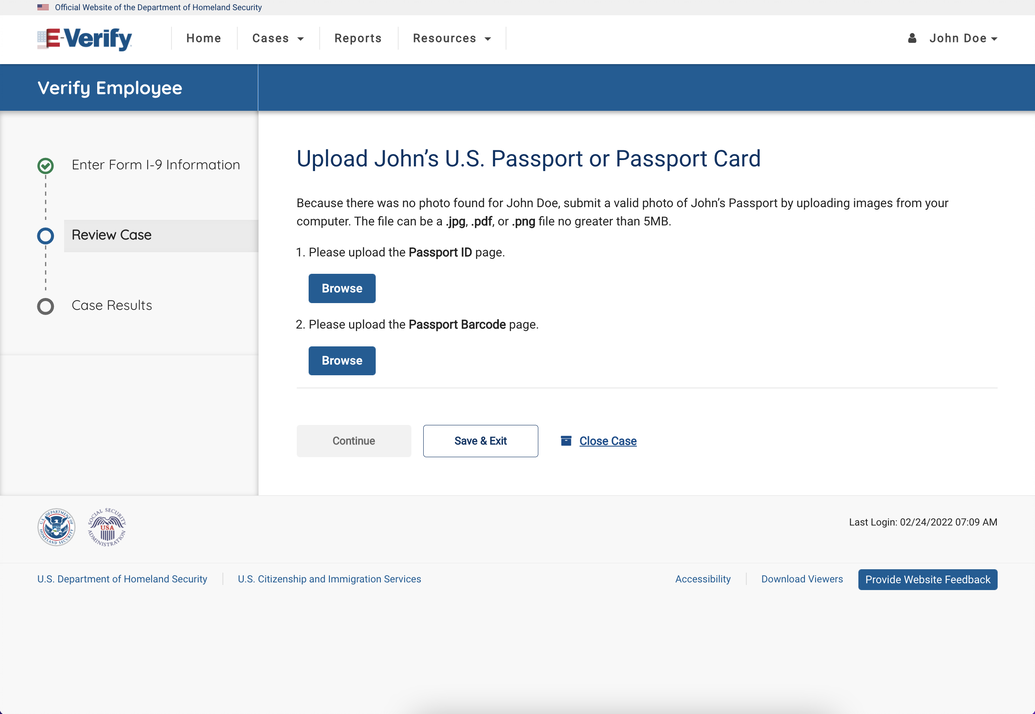
- For most documents presented, E-Verify requests an image of both the front and back. If you are entering a U.S. passport or passport card, E-Verify will request an image of the Passport ID page and the Passport Barcode page.
- If you select No, this photo does not match or No photo displayed, E-Verify prompts you to upload a photo of your employee's document and click Continue.
- If you do not make a selection and click Continue to Case Results, the case will receive a status of Photo Matching Required. See Section 4.2 Case Alerts and View/Search Cases for guidance on how to search for and view existing cases in E-Verify. If you select Save & Exit, any uploaded documents will not be saved and must be uploaded again.
- Click Continue or Save & Exit or Close Case.
- Click Continue or SAVE & Exit or Close Case.
- If you select Save & Exit, the following screen will appear:
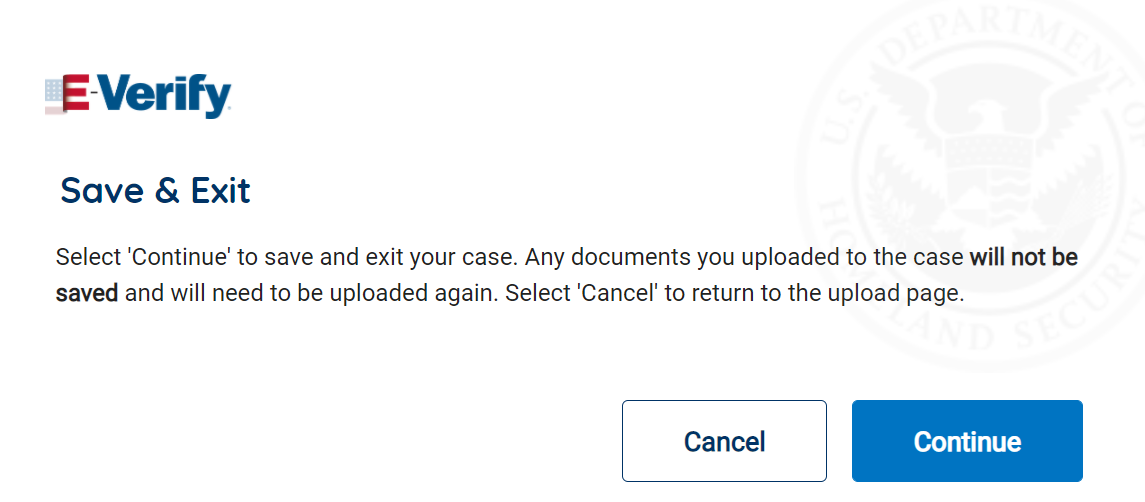
- If you want to return to the Review Case Upload page select Cancel.
- To save and exit this case, select Continue. Any documents you uploaded to the case will not be saved and will need to be uploaded again.
Each file must be a .jpg, .pdf, or .png file that is no greater than 4MBs.
Compare the photo displayed in E-Verify with the employee's Form I-9 photo document, not to the actual employee.
- If you select Close Case, the following screen will appear:
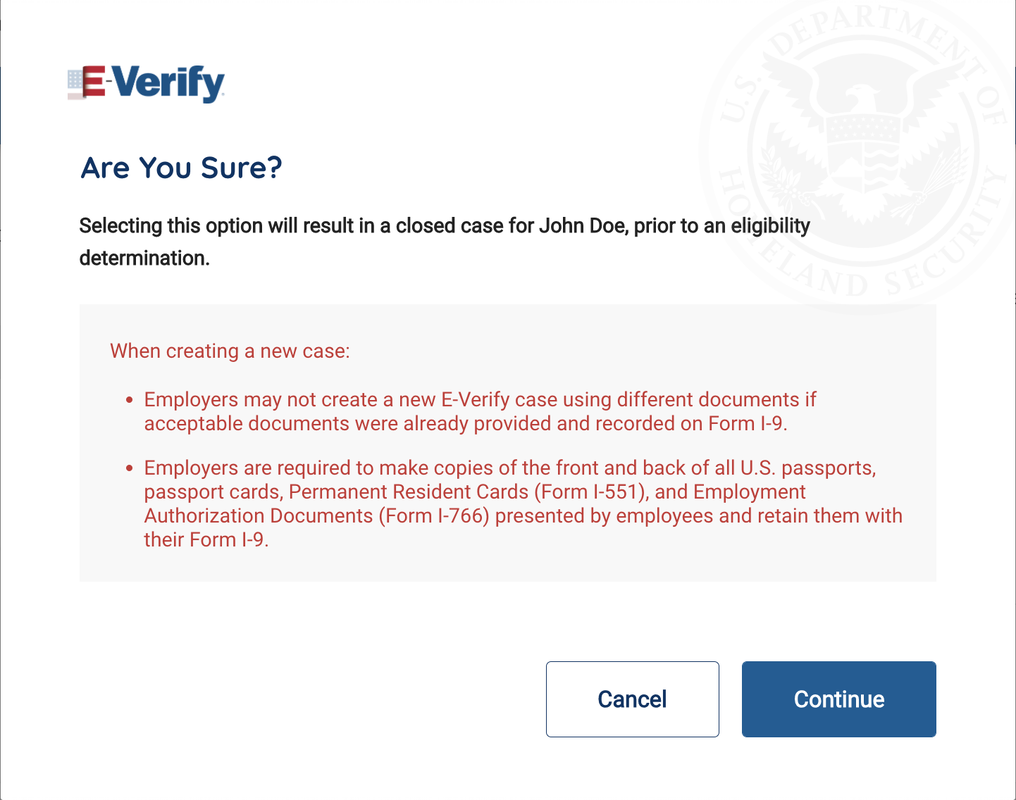
If you want to return to the Review Case Upload page select Cancel.
- To close this case, select Continue and the following screen will appear:
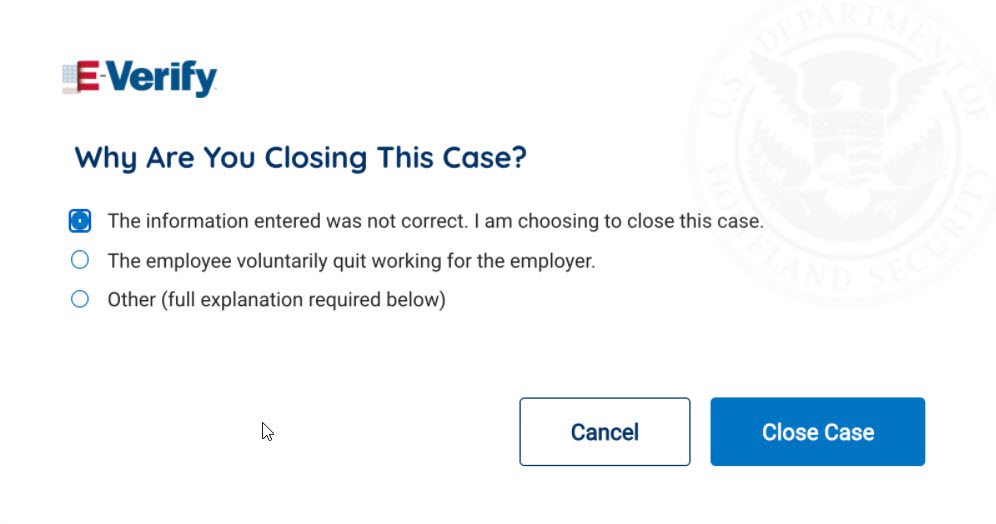
If you want to return to the Review Case Upload page, select Cancel.
- To close this case, select the appropriate option, indicating why you are closing this case, and select Close Case.
If you select Other, E-Verify requires you to type the reason in the text box.
- EMPLOYMENT AUTHORIZED, Section 3.1
- TENTATIVE NONCONFIRMATION (MISMATCH), Section 3.3
Reminder
- Employees always have a choice of which acceptable documents to present for Form I‑9; employers must not ask or require workers to present documents that activate photo matching.
- Make a copy of all U.S. passports, passport cards, Permanent Resident Cards (Form I-551) and Employment Authorization Documents (Form I‑766) presented by employees and retain them with Form I-9.
- The photo will display automatically in E-Verify during the verification process.
- Only compare the employee’s Form I-9 photo document to the photo displayed in E-Verify.
2.2.3 Review Case- And Are You Sure? Alert
Users are prompted to review and confirm that the information entered is correct and may edit case details before submitting the case. If the information entered does not immediately match official government records that E-Verify can access, the Review Case – Is the information below correct? screen appears so the user can confirm that the information entered matches the Form I-9. Users may either confirm that the information matches Form I-9 or change the information in the prompted fields if they entered the information incorrectly. Follow the steps in the Review Case – Process Overview.
REVIEW CASE - PROCESS OVERVIEW
- Review information entered into E-Verify and confirm it matches information entered on the employee’s Form I-9.
- Click Edit Case Details to make corrections, if necessary, then click Continue to return to the Review Case screen.
- Click Submit Case.
E-Verify will automatically close any case in draft status that is open and has not been updated within 180 federal government working days.
If you need more time to verify the information is correct, you may click Save & Exit to save the case as a draft. You can locate the case later under View Cases. Any case in draft status that is open and has not been updated within 180 federal government working days will be automatically closed. If you determine you no longer need to submit the case, you may click the Close Case link and the case will be closed without being submitted.
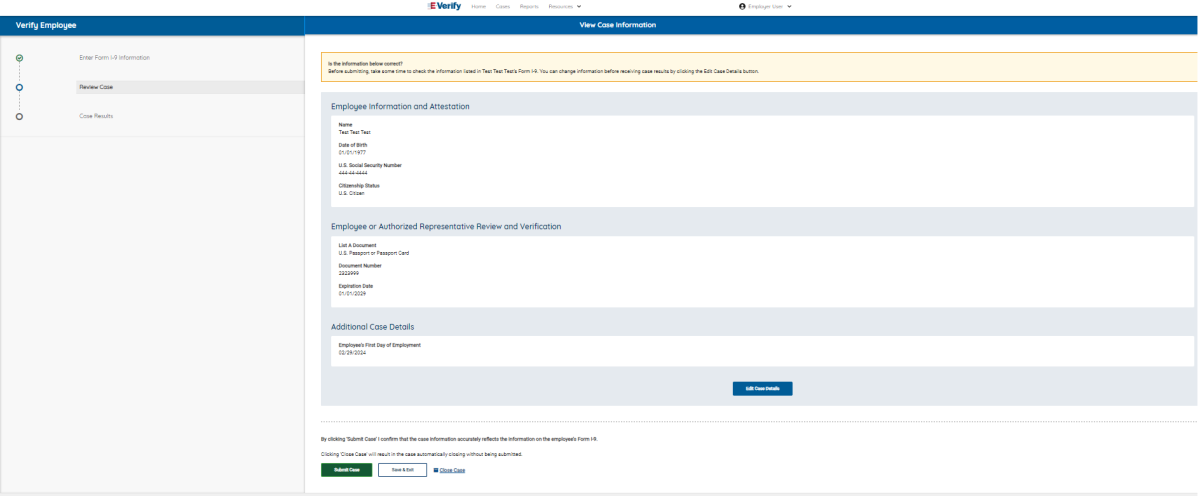
- If information entered does not immediately match official government records that E-Verify can access, E-Verify will prompt you with a second alert asking you to confirm the information is correct.
- Review information on the screen to ensure it matches what the employee entered in Section 1 of Form I-9. Select the appropriate option, indicating whether the information displayed matches the Form I-9. If the information does not match what was entered on Form I-9, correct the field in the alert to match the Form I-9.
- Click Continue to Case Results.
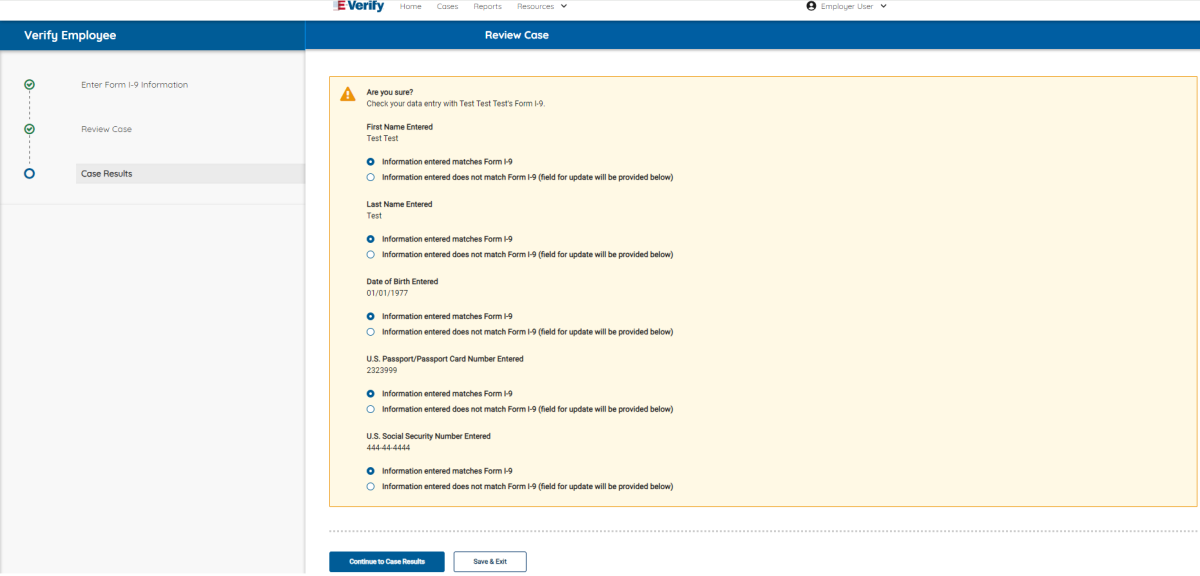
If you do not select an option, a message will appear instructing you to select an option before you can continue.
If you need more time to verify the information is correct, you may click Save & Exit to exit this case. You can locate the case later under View/Search Cases. If you do not click Continue to Case Results or Save & Exit, the case will receive a status of Case Incomplete. See Section 4.2 Case Alerts and View/Search Cases for guidance on how to search for and view existing cases in E-Verify.
2.3 Duplicate Cases Found Alert
A Duplicate Cases Found alert appears for a case that contains information found in one or more cases created within the last 365 days under the same employer account. If an employer receives a Duplicate Cases Found alert, there may be valid reasons for them to create a new case for the same employee, such as if the previous case contains incorrect information. Review the situation and decide whether to continue with the present case and close any open duplicate cases that may have been created in error. Follow the steps in the Duplicate Cases Found alert – Process Overview.
Duplicate Cases Found Alert - Process Overview
-
The Duplicate Cases Found alert
The Duplicate Cases Found alert displays all cases created under this employer account within the last 365 days using duplicate case information. Before proceeding with a new case, review all duplicate cases to determine whether a duplicate case is needed. If a new duplicate case is still warranted, all open duplicate cases must be closed prior to creating a new duplicate case.
-
Review All
To review all (open and closed) duplicate cases, click ‘Review and Manage Duplicate Cases.’
-
Close an individual case
To close an individual case, click the ‘Close Case’ hyperlink.
-
To continue with a previously created case
To continue with a previously created open duplicate case, click the ‘Continue Case’ hyperlink.
-
Decide to continue with case
If you decide to continue processing a duplicate case listed in this alert, you must select a reason for continuing a duplicate case.
Program administrators and general users can update and close all cases previously created under the same employer account, regardless of who created the case.
- If a duplicate case is identified during the case creation process and there is an open case for the same employee, you will receive the below message:
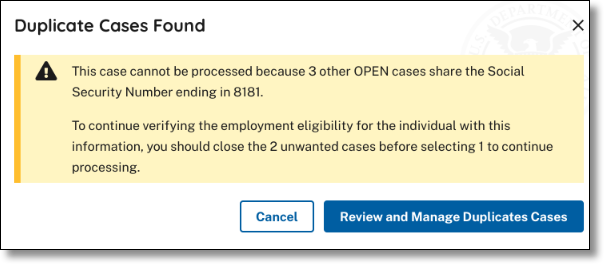
- Select Cancel to completely back out of the case (nothing is saved) or
- Select Review and Manage Duplicate Cases to see a list of duplicate cases. The image below shows an example of the Review and Manage Duplicate Cases screen.
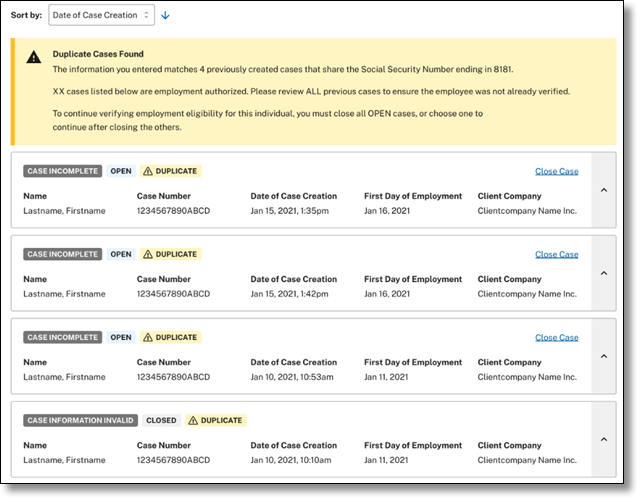
- From this page, view Open and Closed duplicate cases created on the employee during the 365-day lookback period.
You cannot continue a case without closing the open cases. You can continue a case if it is the only open case.
Select one of the reasons below why you are closing this case?
Select one of the reasons below why you are closing this case?
- The information entered was not correct. I am choosing to close this case.
- Employee is no longer employed
- Other (full explanation required)
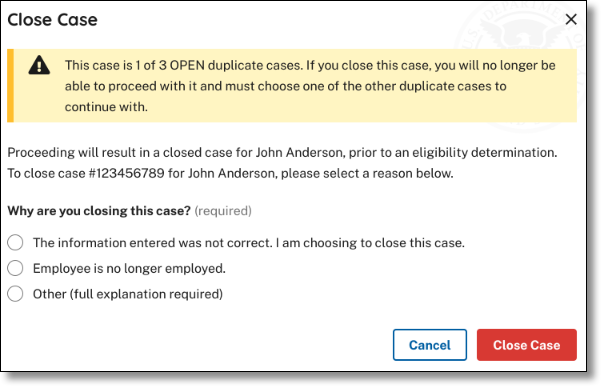
How to continue with a previously created duplicate case
- From the ‘Manage Duplicate Cases’ page, decide to continue with a previously created duplicate case.
- To continue with a previously created open duplicate, select ‘Continue Case’.
- After clicking continue case, you will be taken to the case’s last process step.
This can only occur if there is only one open duplicate
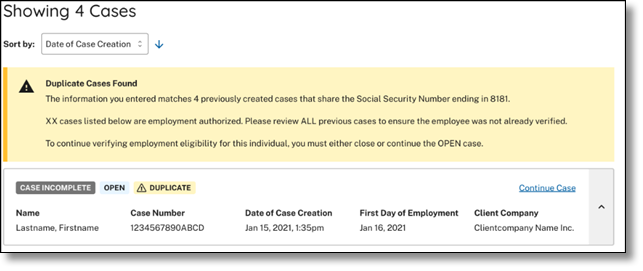
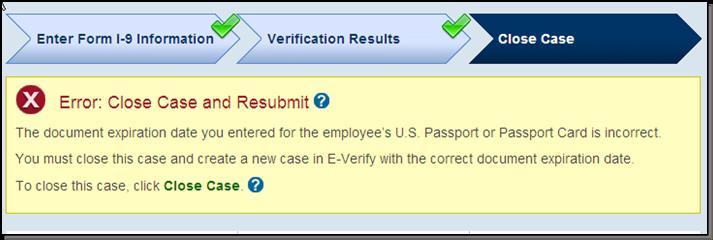
2.4 Error: Close Case And Resubmit
If the expiration date entered for the employee’s U.S. passport, passport card or driver’s license is incorrect, E-Verify prompts an Error: Close Case and Resubmit case result and processing of the case cannot continue.
Because document information for a case that has already been submitted cannot be changed, the case must be closed and a new case created with correct information. The employer should select the closure statement option,The case is being closed because the data entered is incorrect, and close this case. Now, the employer can create a new case for this employee using the correct document expiration date.
E-Verify can confirm the employment eligibility of this employee once the new case is created and the correct document expiration date has been entered.
2.5 Duplicate Case Alert
A duplicate case alert appears for a case that contains the same Social Security number of a previous case entered for the same employer account. A duplicate case alert can occur for several reasons. Receiving a duplicate case alert does not necessarily mean that you should not proceed with the new case and close it. There may be instances when the employer must create a new case for the same employee, such as in the case of a rehire or if the previous case contains incorrect information. Review the situation and decide whether to continue with the case. Follow the steps in the Duplicate Case Alert – Process Overview.
Duplicate Case Alert - Process Overview
- E-Verify prompts you to review the case information and determine whether you will continue with the case. You may need to contact the user that created the previous case.
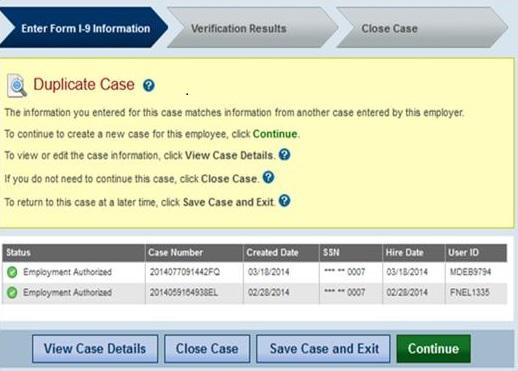
- Click View Case Details to review the case information. If the information is incorrect, update the appropriate information, then click Continue.
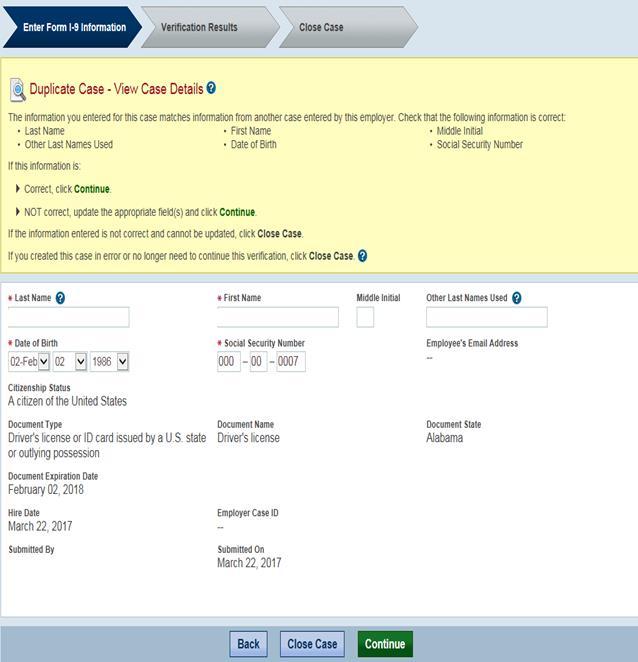
- If you determine that you need to continue with the case, click Continue and select a reason from the options presented in E-Verify.
- If you think the case is truly a duplicate and you no longer need to continue the verification process, close the case by clicking Close Case.
3.0 Case Results
E-Verify checks information entered against records available to DHS and SSA. Once a case is created, a result is displayed. The chart below provides an overview of the case results that E-Verify may return. This section provides additional information on each case result.
Case Results - Overview
| Employment Authorized | The employee’s information matched records available to DHS and/or SSA. |
|---|---|
| E-Verify Needs More Time | This case was referred to DHS for further verification. |
| Tentative Nonconfirmation (Mismatch) | Information did not match records available to DHS and/or SSA. Additional action is required. |
| Case in Continuance | The employee has contacted DHS or visited an SSA field office, but more time is needed to determine a final case result. |
| Close Case and Resubmit | DHS or SSA requires that you close the case and create a new case for this employee. This result may be issued when the employee’s U.S. passport, passport card, or driver’s license information is incorrect. |
| Final Nonconfirmation | E-Verify cannot confirm the employee’s employment eligibility after the employee has contacted DHS or visited SSA. |
Related Resources
3.1 Employment Authorized
Most E-Verify cases receive a case result of Employment Authorized. Employment Authorized means that the information entered into E-Verify matched records available to DHS and/or SSA confirming employment eligibility of the employee whose information was entered. E-Verify automatically closes cases resulting in Employment Authorized. You can locate the closed case and view case details in View/Search Cases. See Section 4.2 Case Alerts and View/Search cases for guidance on how to search for and view existing cases in E-Verify. At this stage, you should record the case number on this employee’s Form I-9 or print out the Case Details page and attach it to the Form I-9.
Automatic closure only applies to employers directly accessing E-Verify to create cases. If you are using web service software to create cases, you must manually close all cases, including cases resulting in employment authorized.
3.1.1 Employment Authorized - Request Name Review
In some cases E-Verify issues a case result of Employment Authorized, but the name returned in E-Verify does not match exactly the name on Form I-9. This happens when the information matches, but there are name variations in DHS records. In this case, request a review of the employee’s name so E-Verify can issue a final case result. To request a name review, follow the steps outlined in the Request Name Review - Process Overview.
Do not use this functionality in a discriminatory manner (e.g., based on an individual’s race, national origin or ethnicity).
Request Name Review - Process Overview
- Compare the name displayed in the yellow box with the name you entered which is shown in the white box.
- If the names match, click Close Case.
- If the names do not match, request DHS review of the case by clicking Request Name Review.
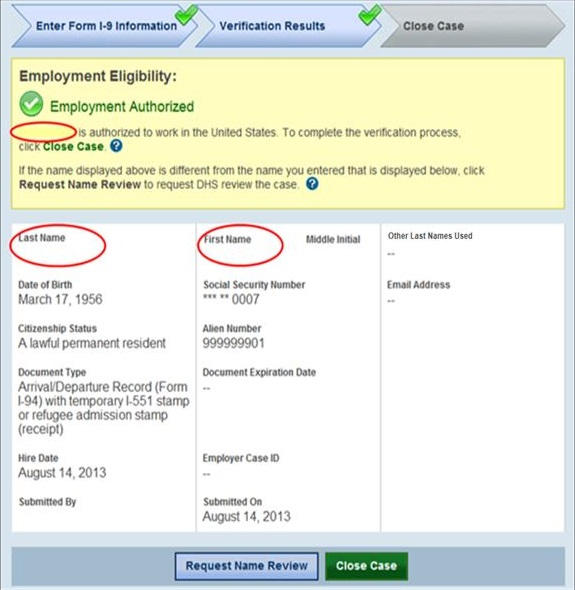
- Enter the specific reason for the name review request into the Comments field.
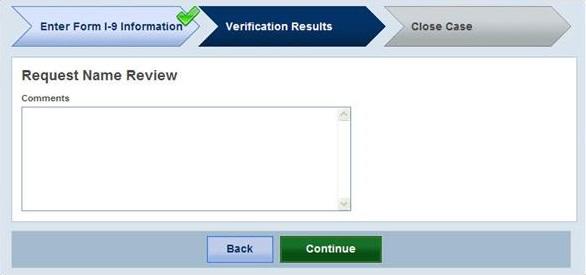
- Click Continue.
A case sent to DHS for name review will be updated with one of the following results:
- Employment Authorized, Section 3.1
- DHS and SSA Tentative Nonconfirmation (Mismatch), Section 3.3
Each case result requires different actions or steps to continue or close the case. These actions are outlined in the case result sections throughout this manual.
Request Name Review Summary
Employer Action
- Determine if a name review is required (if not required, close case)
- Click Continue
- Input reason for name review request in Comments field
- Click Continue
- Follow steps outlined in E-Verify Needs More Time
Employee Action
- None
3.2 E-Verify Needs More Time
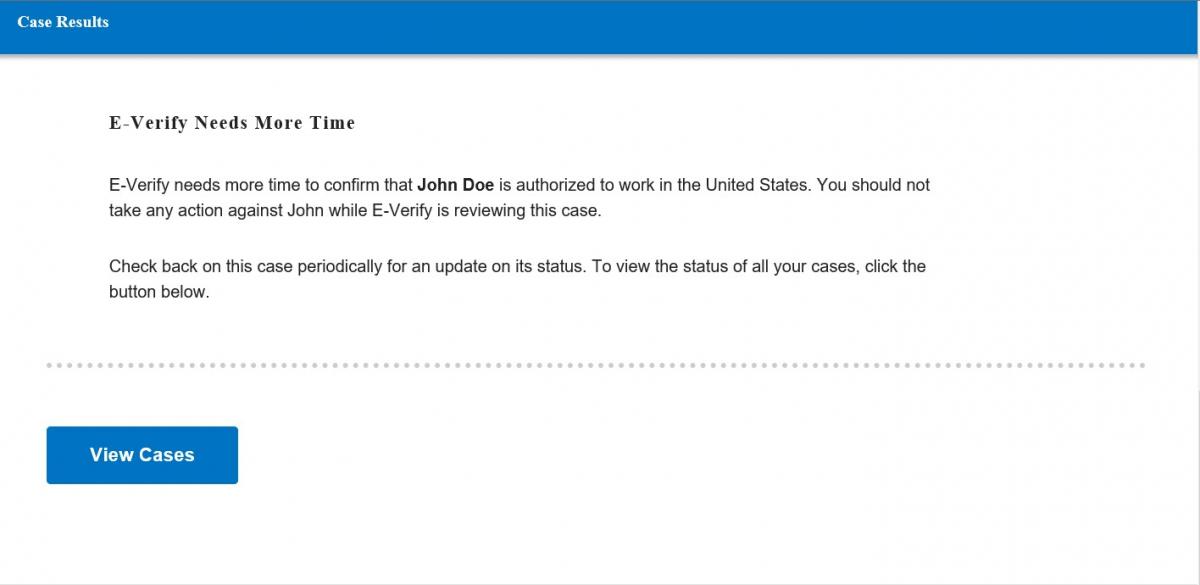
A case result of E-Verify Needs More Time means that DHS cannot verify the data and needs more time. The case is automatically referred for further verification. DHS will respond to most of these cases within 24 hours, although some responses may take up to 3 federal government working days. No action is required by either you or the employee at this time, but you can check E-Verify daily for a response. Employers may not terminate or take any other adverse action against an employee (such as denying work, delaying training, withholding pay, or otherwise assuming that he or she is not authorized to work) because of the mismatch, until the mismatch becomes a Final Nonconfirmation. See E-Verify Needs More Time – Process Overview.
E-Verify Needs More Time - Process Overview
- E-Verify displays a E-Verify Needs More Time case result in the View/Search Cases screen. See Section 4.2 Case Alerts and View/Search Cases for guidance on how to search for and view existing cases in E-Verify.
- When you open a case with a E-Verify Needs More Time case result, E-Verify displays the E-Verify Needs More Time screen below.
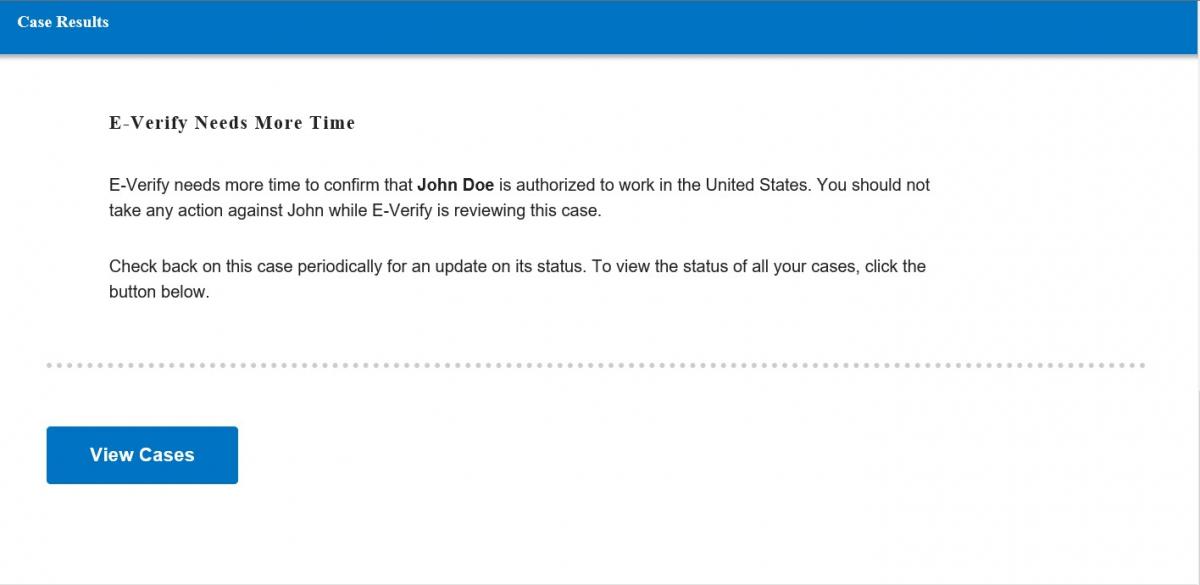
- Check E-Verify for changes to case results.
- DHS may take 3 federal government working days to respond.
- Follow the next step based on the case result provided.
After the 3 federal government working days, a E-Verify Needs More Time case result will provide one of the following case results:
- Employment Authorized, Section 3.1
- Tentative Nonconfirmation (Mismatch), Section 3.3
- Case in Continuance, Section 3.4
Each case result requires its own actions or steps to continue or close the case. These actions are outlined in the case result sections throughout this manual.
E-Verify Needs More Time Summary
Employer Action
- Check E-Verify for case result updates
- Follow next steps based on case result provided
- An employer may not take adverse action against an employee because of a E-Verify Needs More Time result
Employee Action
- None
3.3 Tentative Nonconfirmation (Mismatch)
A mismatch means that the information entered into E-Verify does not match records available to DHS and/or SSA. It is possible for an employee to receive a dual mismatch, which means the case received a mismatch result from both agencies at the same time because information entered into E-Verify does not match records available to both DHS and SSA. E Verify identifies the agency or agencies associated with the mismatch in the mismatch Further Action Notice. When E-Verify displays a mismatch case result, the employer must first notify the employee and complete the referral process as soon as possible within 10 federal government working days after E-Verify issued the mismatch result.
Employers may not terminate, suspend, delay training, withhold or lower pay, or take any other adverse action against an employee because the employee received a mismatch. If the mismatch becomes a Final Nonconfirmation, the employer may terminate the employee.
If the employee chooses not to take action on the mismatch, the employer may terminate employment with no civil or criminal liability as noted in “Responsibilities of the Employer,” Article II, Section A paragraph 13 of the MOU. The case can be treated as a Final Nonconfirmation and the employer should close the case in E-Verify.
If the employee does not give the employer their decision by the end of the 10th federal government working day after E-Verify issued the mismatch result, the employer should close the case in E-Verify. E-Verify will be unable to confirm the employee is authorized to work in United States and the employer can terminate employment.
For more information, see Section 4.1 Close Case.
The following sections outline the specific steps required when a mismatch case result is received.
Related Resources
3.3.1 Notify Employee Of Mismatch
You must notify the employee about their Tentative Nonconfirmation (Mismatch) result as soon as possible within 10 federal government working days after E-Verify issued the mismatch by following the steps in Notify Employee of mismatch – Process Overview.
Notify Employee of Mismatch - Process Overview
- Download and print the Further Action Notice.
The Further Action Notice prints in English by default, but may also be printed Spanish.
- To print in English, click Download Further Action Notice.
- To print in Spanish, click the down arrow next to English and select Spanish, then click Download Further Action Notice.
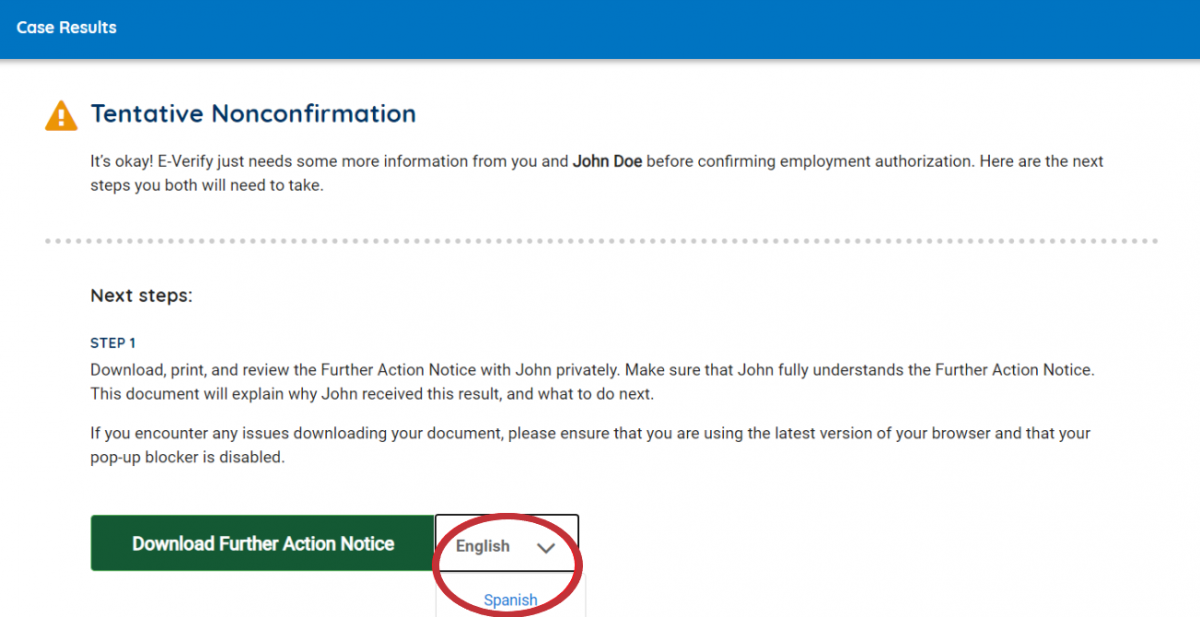
- Review the Further Action Notice with the employee in private and instruct the employee to confirm whether the information listed at the top is correct.
- If you determine that you entered information incorrectly, select the statement indicating the information was not correct, then click Close Case. The case will be closed due to incorrect data.
If the employee cannot read, you must read the Further Action Notice to the employee. If the employee does not speak English as his or her primary language and has a limited ability to read or understand the English language, provide the employee with a translated version of the Further Action Notice in the appropriate language, which is available in View Essential Resources.
You may provide the Further Action Notice to the employee in person, by fax, email, overnight or next-day delivery service, as long as you take proper precautions to ensure the employee’s information is protected.
- Instruct the employee to indicate whether he or she will take action to resolve the mismatch, then have the employee sign and date the Further Action Notice printed in English.
- Provide the employee a copy of the signed Further Action Notice in English (and a translated version, if appropriate).
- Attach the original signed Further Action Notice to the employee’s Form I-9.
If the employee does not tell you whether they will take action by the end of the 10th federal government work day after E-Verify issued the mismatch result, you should close the case in E-Verify.
If you need to exit the case for any reason, you may click Save & Exit. You can locate the case later under View/Search Cases. See Section 4.2 Case Alerts and View/Search Cases for guidance on how to search for and view existing cases in E-Verify.
Notify Employee of Mismatch Summary
Employer Action within 10 Federal Government Working Days After E-Verify Issued the Mismatch Result:
- Download and print the Further Action Notice and confirm whether the information listed at the top is correct
- Privately notify employee of the mismatch
- Have employee review and confirm whether the information listed at the top is correct
- Instruct the employee to indicate his or her decision to take action or not and to sign and date the Further Action Notice
- Provide the employee with a copy of the signed Further Action Notice in English (and a translated version, if appropriate)
- Keep the original signed Further Action Notice on file with Form I-9
- Instruct the employee that they must tell you their decision as soon as possible by the 10th federal government working day after E-Verify issued the mismatch result or you will close the case in E-Verify.
- Close the case in E-Verify if the employee does not give you their decision by the end of the 10th federal government working day.
Employee Action within 10 Federal Government Working Days After E-Verify Issued the Mismatch Result:
- Confirm if the information on the Further Action Notice is correct
- Decide whether to take action to resolve the mismatch or not and indicate choice on the Further Action Notice
- Acknowledge the mismatch case result by signing and dating Further Action Notice
3.3.2 Confirm Employee Decision
After the employee is notified of the mismatch and decides whether to take action to resolve the case result, the employee should acknowledge the decision on the Further Action Notice. Employees who choose to take action on a mismatch are referred to DHS and/or SSA. If a dual mismatch is received, the employee will be referred to both DHS and SSA if he or she chooses to take action. To resolve a DHS or SSA mismatch, employees should follow the steps outlined in the Confirm Employee Decision and Refer Case – Process Overview.
An employee has eight federal government working days to take action:
- DHS mismatch: Call DHS to begin to resolve
- SSA mismatch: Visit an SSA field office to begin resolving
- SSA citizenship mismatch: Call DHS or visit an SSA field office to begin resolving
If an employee chooses to take action to resolve a DHS mismatch issued because of a state motor vehicles agency mismatch, the employee must call DHS within 8 federal government working days after the case is referred. If DHS is unable to resolve the case, the employee may need to contact the state motor vehicles agency that issued the driver’s license or state identification card.
An employee who chooses to take action to resolve a dual mismatch is only given eight federal government working days to call DHS and visit SSA to begin resolving both mismatches after the case is referred. Federal government working days are Monday through Friday (except for federal holidays).
You must download the Further Action Notice before referring the case.
Give the employee the Referral Date Confirmation, and provide applicable documentation from E-Verify. The Referral Date Confirmation provides the date by which the employee must call DHS and/or visit SSA. The employee should bring the Further Action Notice when he or she visits an SSA field office.
If the photos do not match during E-Verify photo matching, E-Verify will prompt the employer to upload copies of the employee’s photo document and the case may result in a mismatch. When this happens, the employer must notify the employee of the mismatch and allow the employee to choose whether or not to take action to resolve the mismatch. If the employee decides to take action on the photo mismatch, the employer must refer the case in E-Verify and the employee must contact DHS to begin resolving the mismatch within eight federal government working days after the case is referred.
Confirm Employee Decision and Refer Case - Process Overview
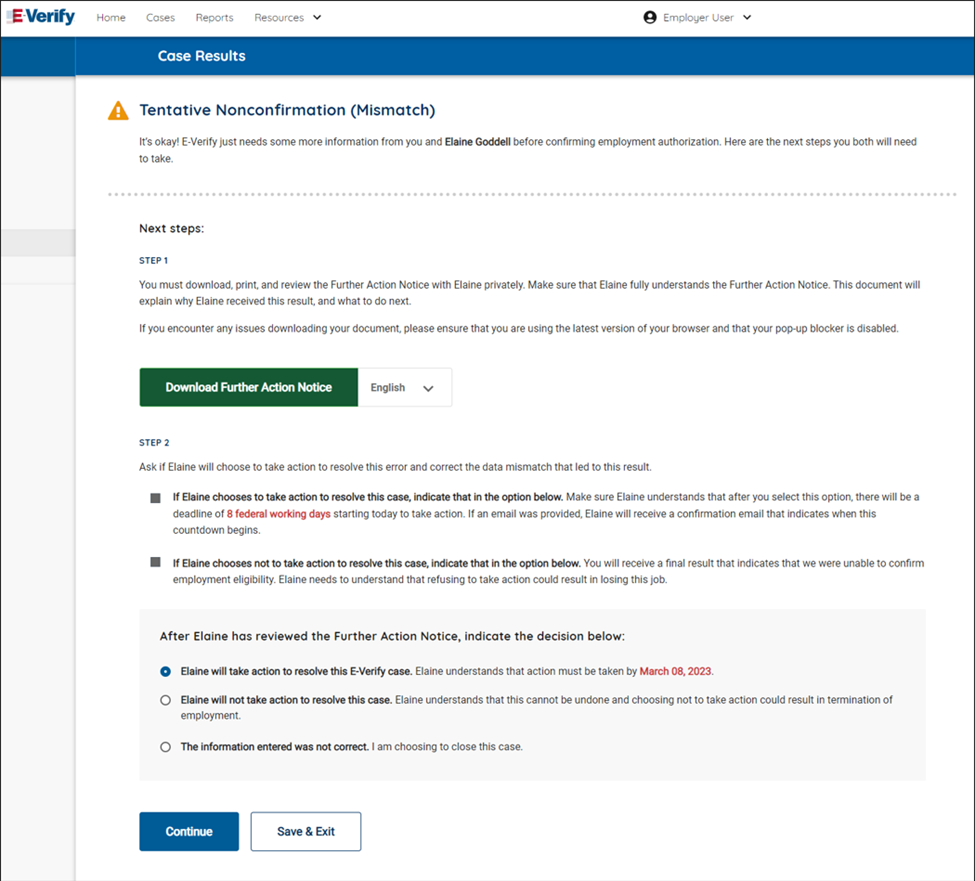
- Select the option indicating whether or not the employee will take action to resolve the mismatch.
- Click Continue.

If you indicate that the employee will take action to resolve the mismatch, the employee has eight federal government working days from when you click Continue call DHS and/or visit SSA.
Employee Will Take Action to Resolve Mismatch:
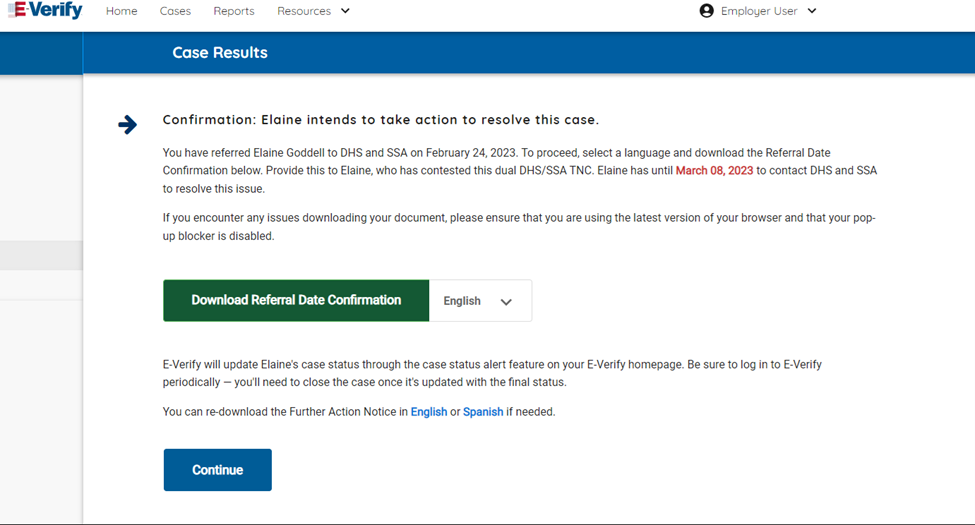
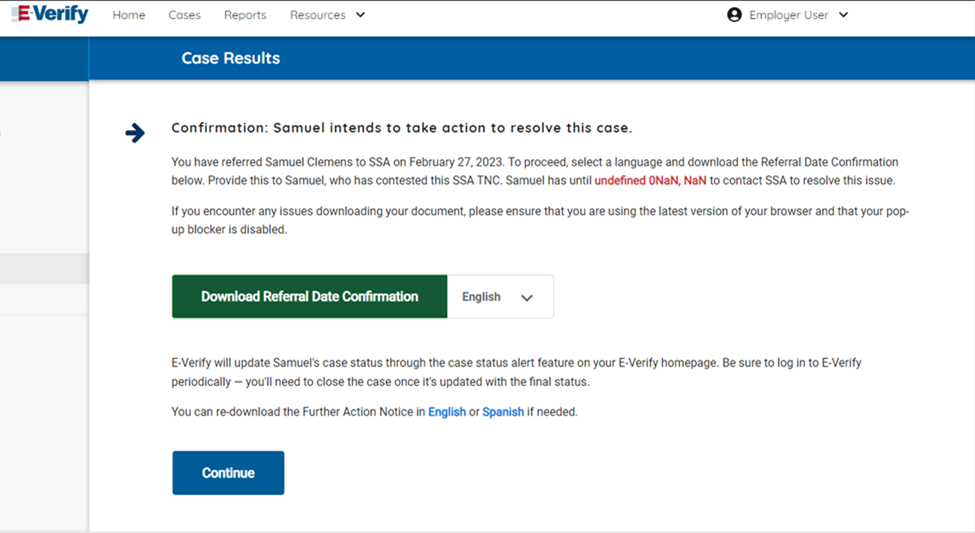
- Download and print the Referral Date Confirmation, attach a copy to the employee’s Form I-9, and provide the original to the employee.
- The Referral Date Confirmation downloads in English by default, but may also be downloaded in Spanish.
- To download/print in English, click Download Referral Date Confirmation.
- To download/print in Spanish, click the down-arrow next to English and select Spanish, then click Download Referral Date Confirmation.
- Click Continue.
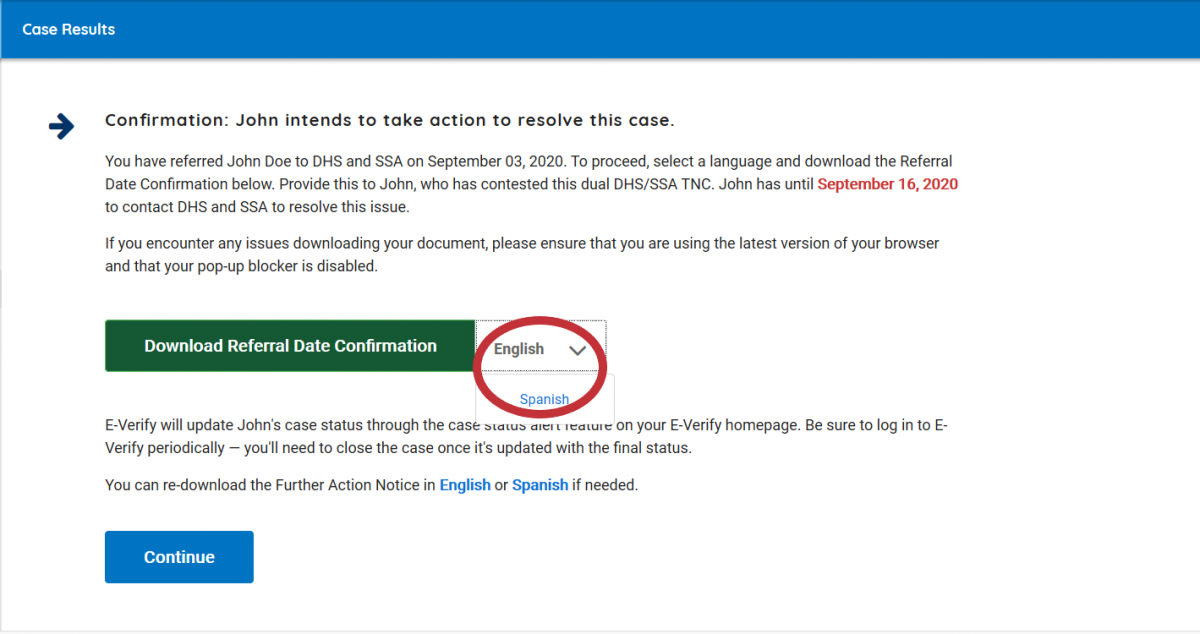
If the employee cannot read, you must read the Referral Date Confirmation to the employee. Provide employees who do not speak English as their primary language or have a limited ability to read or understand the English language, with a translated version of this confirmation in the appropriate language. Additional languages are available, in Other Resources under Resources/View Essential Resources in E-Verify.
If you determine information in the case is incorrect and the case should be closed, select the option indicating the employee will not take action. The case will receive a Final Nonconfirmation result and you will be prompted to close the case. Once you click Close Case, you may select an option indicating you are closing the case because information was entered incorrectly. Close the case only after E-Verify provides a final case result or if you no longer need to continue to confirm the employment eligibility of the employee. After closing the case, create a new E-Verify case with the corrected information.
If Employee Will Not Take Action to Resolve the Mismatch:
- Confirm that you selected the correct option.
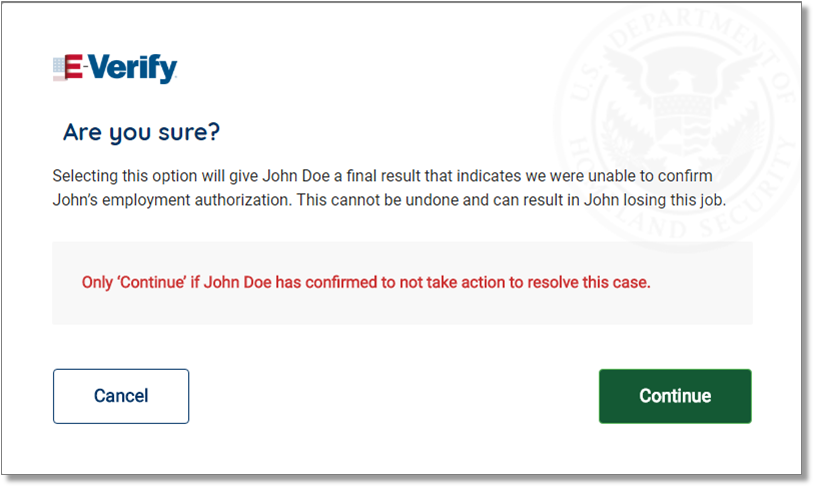
- Click Continue to close the case.
- Click Cancel to return to the previous screen.
If you click Continue to close the case, E-Verify displays an updated case status of Final Nonconfirmation.

- Click Close Case.
If the employee does not give you their decision to take action to resolve the mismatch by the end of the 10th federal government working day after E-Verify issue the mismatch result:
- Select the option indicating the employee will not take action to resolve this E-Verify case.
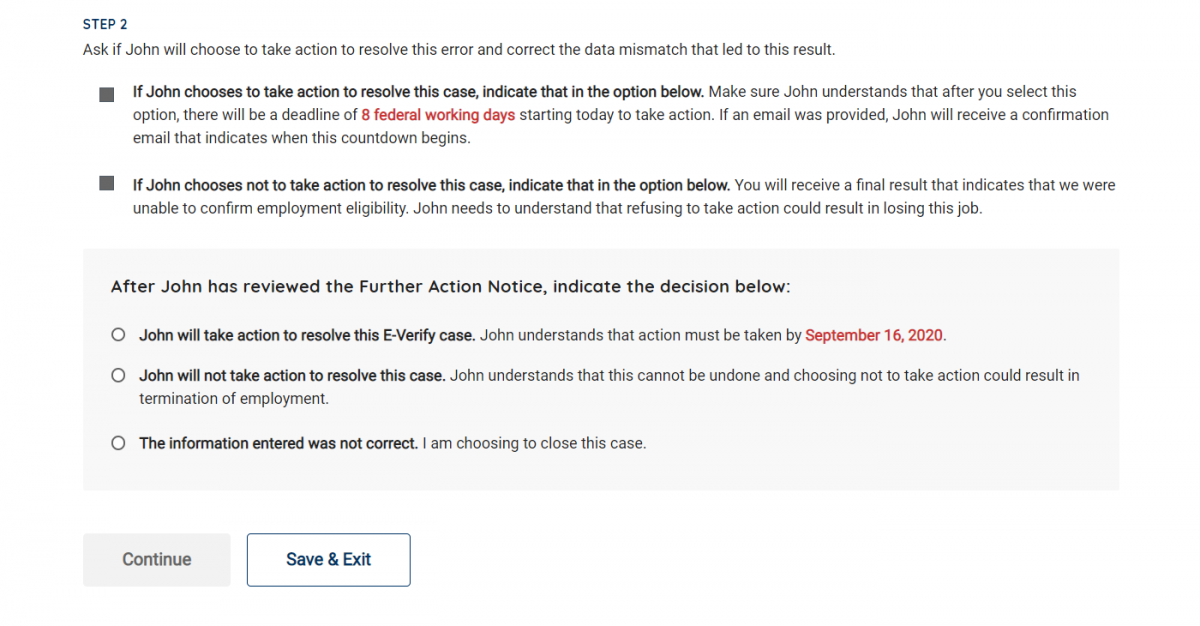
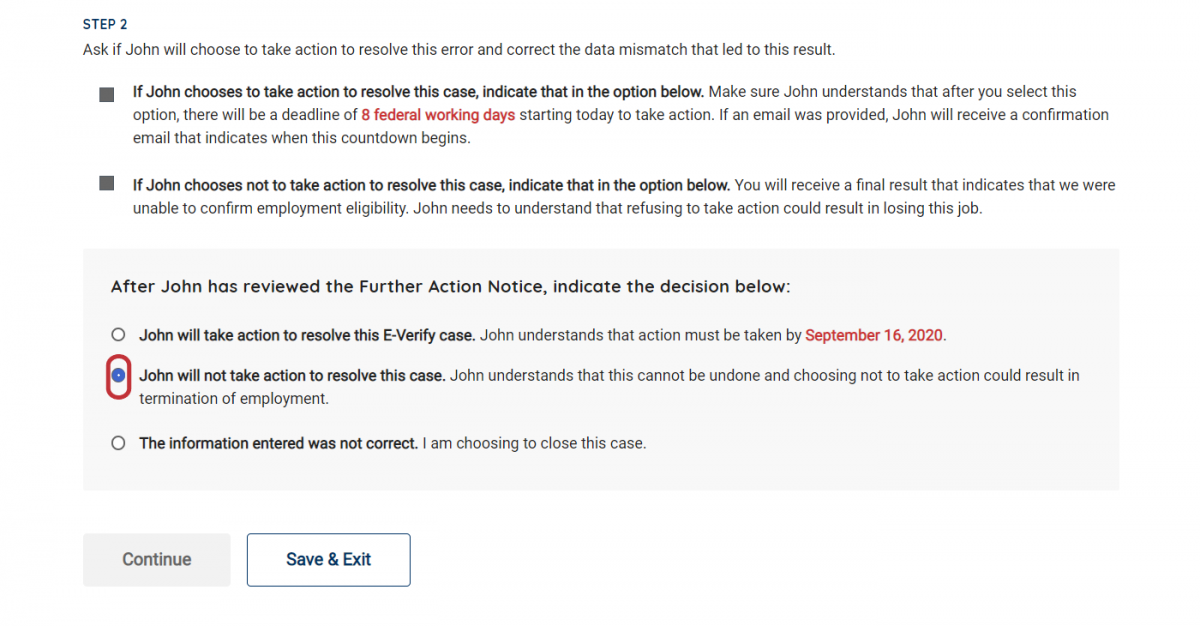

- Select “Neither of the options above apply - I am closing this case for a different reason.”
- Click drop-down list and select “Other”
- Type “Administrative / Employee Unavailable” or “Employee chose not to make a decision” in the text box.
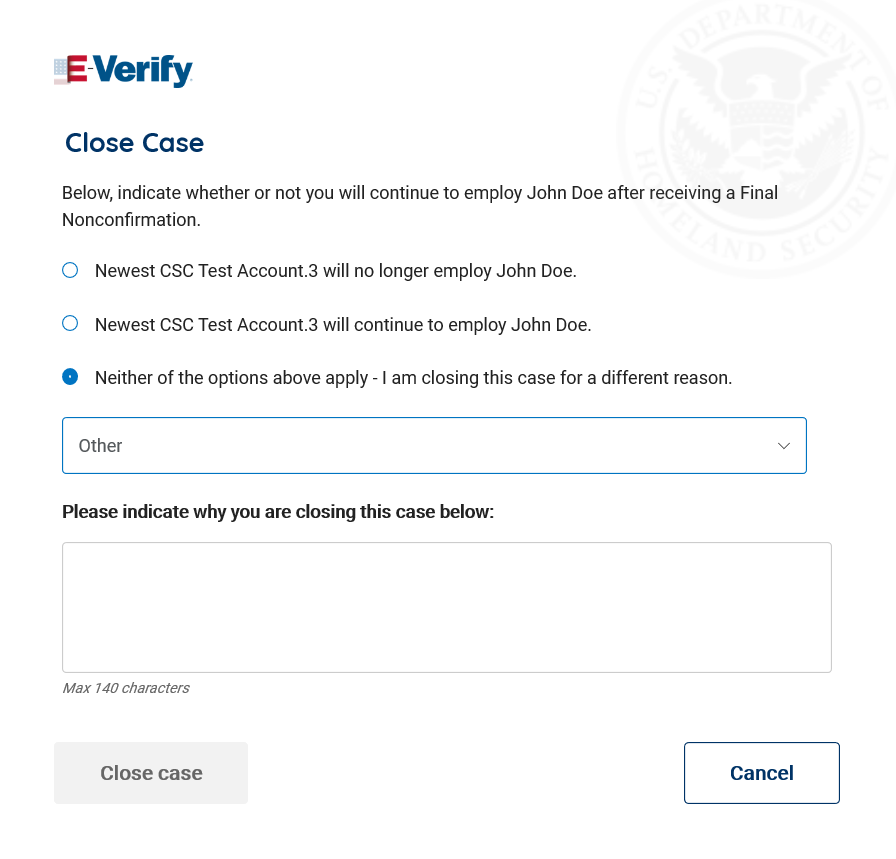
- Click Close Case.

See Section 4.1 Close Case – Process Overview for additional guidance on closing a case that received a Final Nonconfirmation result.
DHS and SSA have 10 federal government working days from the date the case was referred to update the case result in E-Verify. Check E-Verify periodically for an update on the case result. A case referred to DHS or SSA is updated with one the following results:
- Employment Authorized, Section 3.1
- E-Verify Needs More Time, Section 3.2
- Case in Continuance, Section 3.4
- Close Case and Resubmit, Section 3.5
- Final Nonconfirmation, Section 3.6
Each case result requires different actions or steps to continue or close the case. These actions are outlined in the case result sections throughout this manual.
Confirm Employee Decision and Refer Case Summary
Employer Action
- Take next steps in E-Verify based on the employee’s decision to take action or not regarding the mismatch.
- If employee decides to take action, refer the case.
- If referred:
- Print the Referral Date Confirmation, provide it to the employee and attach a copy to the employee’s Form I-9
- Check E-Verify for case result updates and follow steps based on case result provided.
- If the employee decides not to take action, close the case.
Employee Action
- Take next steps based on decision to take action or not
- If referred, contact DHS and/or visit a SSA field office within eight federal government working days and present the Further Action Notice and applicable original documents listed on the Further Action Notice
- Follow DHS or SSA instructions or next steps
3.3.3 Refer Employee To DHS or SSA
An employee who chooses to take action to resolve a DHS mismatch must call DHS within eight federal government working days to begin resolving the mismatch. An employee who chooses to take action to resolve an SSA mismatch must visit an SSA field office within eight federal government working days to begin resolving the mismatch.
Give the employee the Referral Date Confirmation from E-Verify. The Referral Date Confirmation provides the date by which the employee must call DHS or visit SSA. The employee should bring the SSA Further Action Notice when they visit an SSA field office.
Federal government working days are Monday through Friday (except for federal holidays).
If the employer fails to match photos during E-Verify photo matching, a photo mismatch may result. A photo mismatch requires the employer to take an additional step to refer the case but follows the same requirements of any mismatch. If the employee chooses to take action to resolve the photo mismatch, the employer must refer the employee to DHS and send a copy of the Form I-9 photo document to E-Verify. Follow the steps outlined in the Refer Employee to DHS or SSA – Process Overview to complete the mismatch process.
Refer Employee to DHS or SSA - Process Overview
- Download Further Action Notice in Step 1. Next, select employee will take action to resolve this E-Verify case in Step 2 and click Continue.
- Select Download Referral Date Confirmation in either English or Spanish and click Continue.
For some DHS mismatch cases, E-Verify prompts you to upload a copy of the employee’s photo document to DHS. See 2.2.2 E-Verify Photo Matching to learn more.
If the employee chooses not to take action to resolve the mismatch, select employee will not take action to resolve the case, and follow steps in Section 4.1 Close Case.

Refer Employee to DHS or SSA - Process Overview
- Provide the Referral Date Confirmation to the employee.
If the employee cannot read, you must read the Referral Date Confirmation to the employee. If the employee does not speak English as his or her primary language and has a limited ability to read or understand the English language, provide the employee with a translated version of this confirmation in the appropriate language, which is available in View Essential Resources under Resources in E-Verify. - Attach a copy of the Referral Date Confirmation to the employee’s Form I-9.
- Check E-Verify for case updates and follow steps based on next case result.
Close the case only when E-Verify provides a final case result or if you no longer need to continue to verify the employment eligibility of the employee.
DHS or SSA has 10 federal government working days to update the case result in E-Verify. Check E-Verify periodically for an update in the case result. A case referred to DHS or SSA is updated with one of the following results:
- Employment Authorized, Section 3.1
- E-Verify Needs More Time, Section 3.2
- DHS or SSA Case in Continuance, Section 3.4
- DHS or SSA Final Nonconfirmation, Section 3.5
Each case result requires different actions or steps to continue or close the case. These actions are outlined in the case result sections throughout this manual.
Refer Employee to DHS or SSA Summary
| Employer Action | Employee Action |
|---|---|
| Print the Referral Date Confirmation, provide it to the employee and attach a copy to the employee’s Form I-9 | Contact DHS or visit an SSA field office within eight federal government working days and present the SSA Further Action Notice and applicable original documents listed on Page 2 of the SSA Further Action Notice. |
| Check E-Verify for case result updates and follow steps based on case result provided | DHS or SSA instructs employee of next steps. |
3.3.4 Review And Update Employee Data
If SSA finds a discrepancy in the information it received in the E-Verify referral, E-Verify will issue a prompt for the employer to review and update the employee’s information.
A Review and Update Employee Data case result occurs for reasons including typographical errors and/or incorrect information provided on Form I-9. This requires the employer to review Form I-9 with the employee make any necessary corrections on Form I-9, and update the information in the E-Verify case.
You may only update a case once. Ensure that the changes are correct before updating the case.
A case that is resubmitted to SSA will have one of the following case results:
- Employment Authorized, Section 3.1
- E-Verify Needs More Time, Section 3.2
- DHS or SSA Tentative Nonconfirmation (Mismatch), Section 3.3
- DHS or SSA Final Nonconfirmation, Section 3.5
Review and Update Employee Data Summary
Employer Action
- Review the information on Form I-9 and E-Verify with the employee for accuracy and make any necessary changes on Form I-9
- Access the employee’s case
- If necessary, update the employee’s information in the fields provided
- Click Continue
- Follow steps based on case result provided
Employee Action
- Ensure that the information provided in Section 1 of Form I-9 is accurate and make any necessary corrections
3.4 Case In Continuance
A Case in Continuance status indicates that the employee has contacted DHS and/or visited an SSA field office, but more time is needed to determine a final case result. The reason DHS or SSA needs more time varies with each situation. Employers should check E-Verify periodically for case result updates. Employers may not terminate or take any other adverse action against an employee (such as denying work, delaying training, withholding pay, or otherwise assuming that they are not authorized to work) because of the mismatch, until the mismatch becomes a Final Nonconfirmation.
Once DHS or SSA has updated E-Verify, the case will have one of the following results:
- Employment Authorized, Section 3.1
- E-Verify Needs More Time, Section 3.2
- Close Case and Resubmit, Section 3.5
- Final Nonconfirmation, Section 3.6
Each case result requires its own actions or steps for employers to continue or close the case. These actions are outlined in each case result section throughout this manual.
If a case has had a DHS or SSA Case in Continuance result for more than 60 federal government working days, contact E-Verify Contact Center at 888-464-4218 or E-Verify@uscis.dhs.gov.
DHS or SSA Case in Continuance Summary
EMPLOYER ACTION
- Check E-Verify for case result updates and follow steps based on case result provided
EMPLOYEE ACTION
- None
Related Resources
3.5 Close Case And Resubmit
Your employee’s case may receive a Close Case and Resubmit case result if DHS and/or SSA are unable to process the case and confirm employment eligibility. The employer should close the case in E-Verify and create a new case. When the user clicks Close and Create a New Case, the case is automatically closed and E-Verify opens a new case for the user to begin entering the employee’s information from Form I-9.

Close Case and Resubmit Summary
Employer Action
- Receive Close Case and Resubmit Case Result
- Click Close and Create a New Case
- Create new case
Employee Action
- None
3.6 Final Nonconfirmation
A case receives a Final Nonconfirmation case result when E-Verify cannot confirm an employee’s employment eligibility after:
- The employee has contacted DHS or visited an SSA field office during the mismatch referral process;
- The employee failed to call DHS and/or visit an SSA field office within 8 federal government working days; Or
- The employee did not give the employer their decision whether or not to take action by the end of the 10th federal government working day after E-Verify issued the mismatch result.
Employers must close the case once a case receives a Final Nonconfirmation result. The employer may terminate employment based on a case result of Final Nonconfirmation with no civil or criminal liability as noted in “Responsibilities of the Employer,” Article II, Section A, paragraph 13 of the MOU.

Final Nonconfirmation Summary
EMPLOYER ACTION
- Receive Final Nonconfirmation case result
- Close case
EMPLOYEE ACTION
- None
4.0 Case Resolution
To complete the E-Verify case process, every case must receive a final case result and then be closed. E-Verify guides you through the process after you receive a final case result.
4.1 Close Case
To properly complete the E-Verify process, employers must close every case they create, except for cases that result in Employment Authorized, which E-Verify will automatically close. Follow the steps outlined in the Close Case – Process Overview.
Close Case - Process Overview
If the Case Result is Employment Authorized:
- E-Verify automatically closes the case. See Section 4.2 Case Alerts and View/Search Cases for guidance on how to search for and view existing cases in E-Verify.
- Record the E-Verify Case Number on the employee’s Form I-9 or attach a copy of the case details page to the Form I-9.
- This completes the E-Verify process for this case.
If the Case Result is Final Nonconfirmation:
- Click Close Case.

- Select the statement indicating whether or not you will continue to employ this individual.
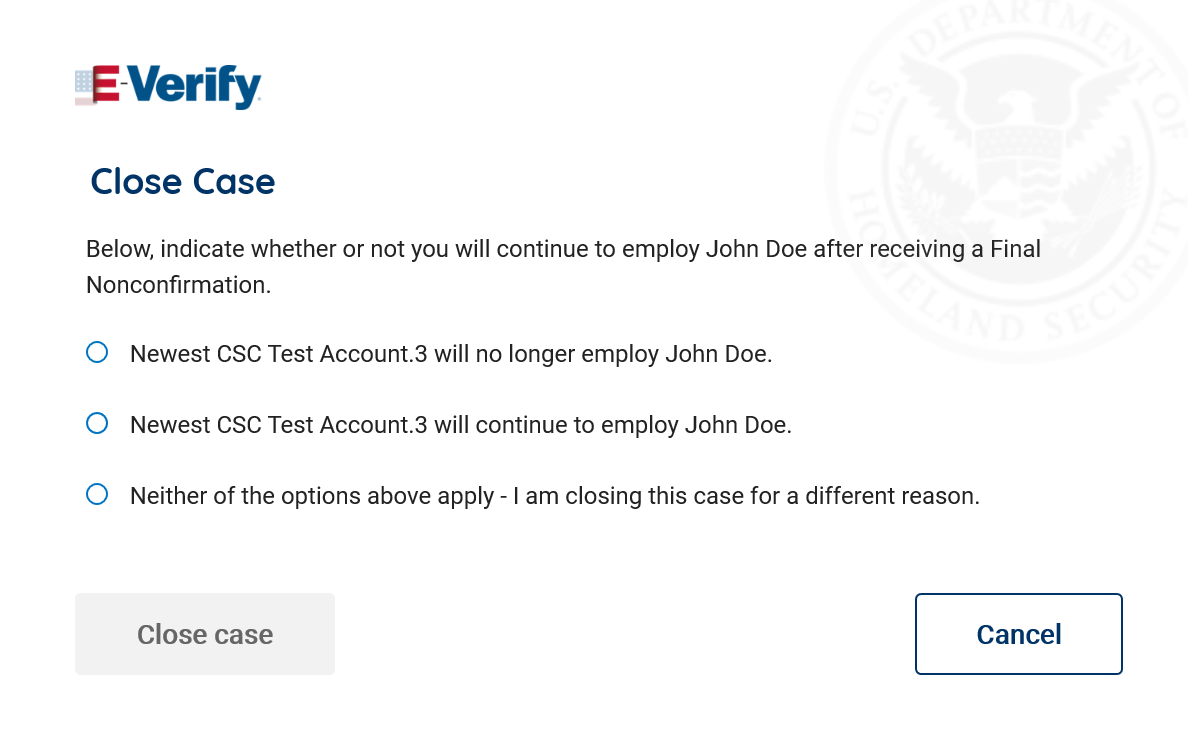
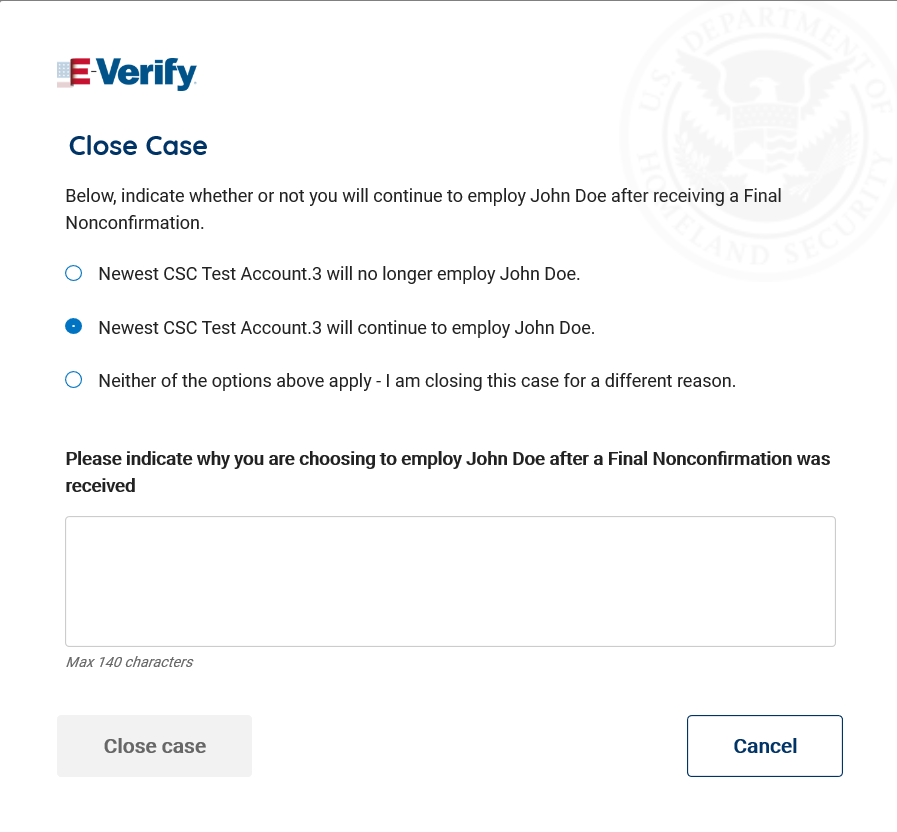
- If you select the option indicating you will continue to employee this individual, you must provide the reason why. Type the reason in the text box provided.
- If you select the option indicating that neither of the above applies and you are closing this case for a different reason, you must select the reason you are closing the case.
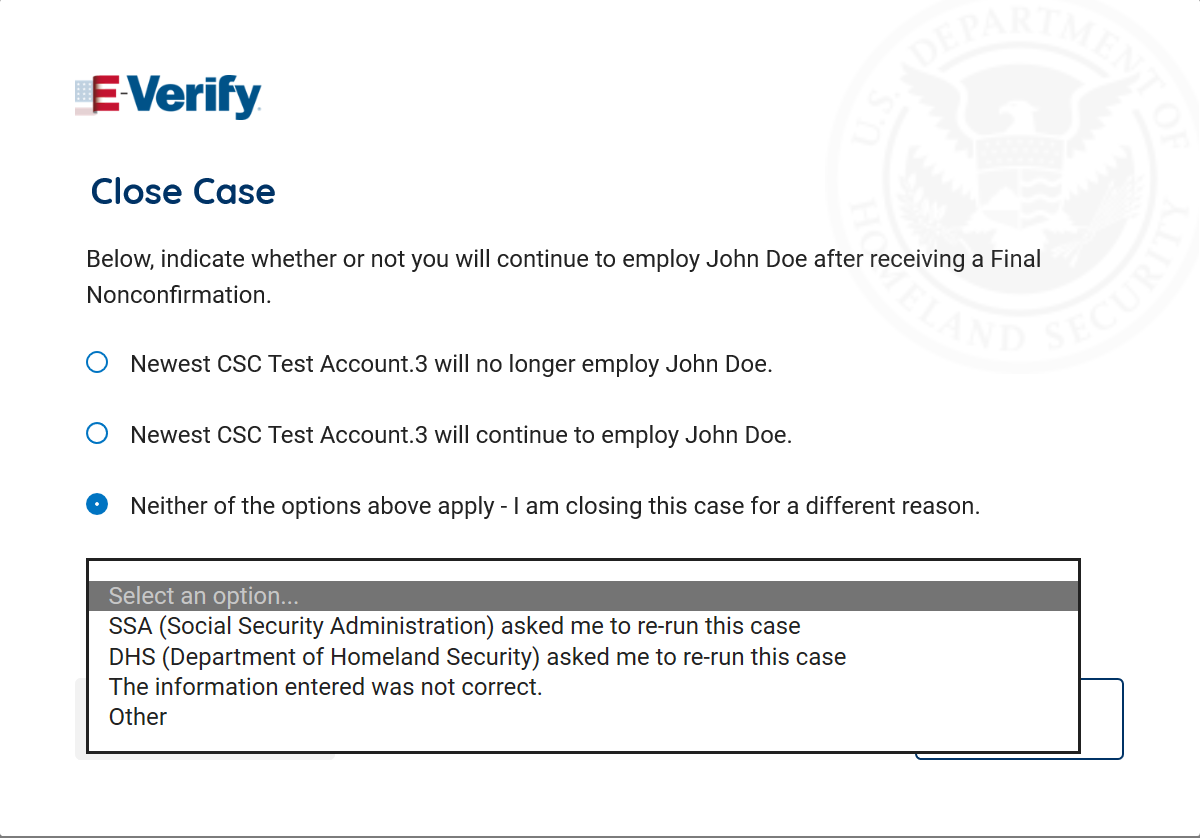
- If Other is selected as the reason, you must type the reason in the text box provided.

- After you’ve typed a reason, click Close Case.
- E-Verify displays an alert indicating the case was successfully closed.
- Record the E-Verify Case Number on the employee’s Form I-9, or click the link to View/Print Case Details and attach a copy of the case details page to the Form I-9.
- Click Create New Case to create a new case or click Continue to be redirected to view all your cases.
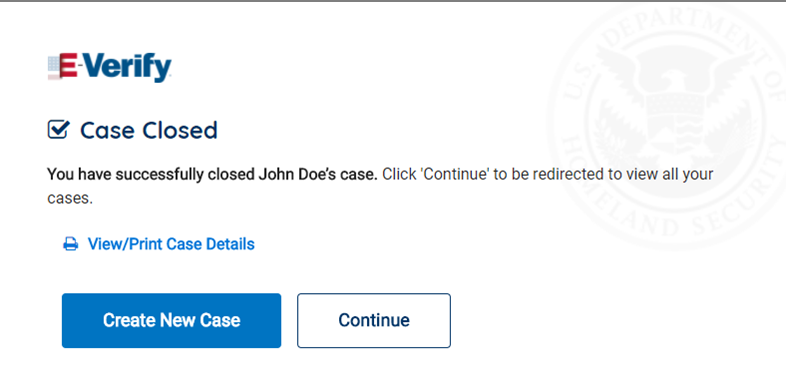
If the Case Result is Close Case and Resubmit:
- Click Close and Create New Case.
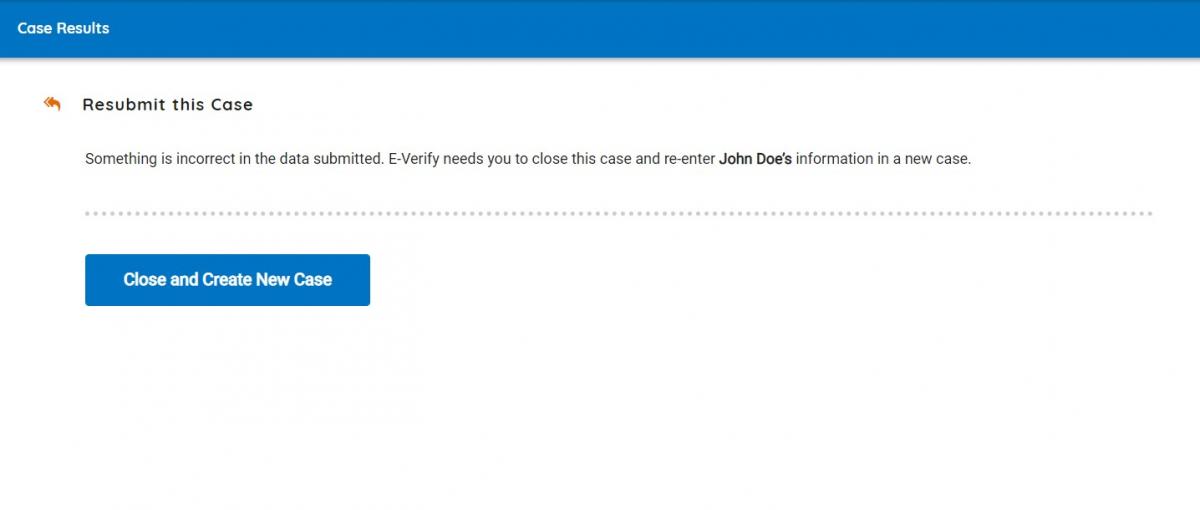
- This case will be automatically closed and E-Verify will open a new case so you can enter the employee’s information from Form I-9 and create a new case.
- This completes the E-Verify process for the first case.
Every case created in E-Verify must be closed. Some E-Verify case results require employers to provide additional information. When prompted, select the most appropriate statement displayed and type additional information when requested. E-Verify only presents statements that are relevant to each case because not all of the case closure reasons apply to every situation.
4.1.1 Case Closure Statements
- The employee continues to work for the employer after receiving an Employment Authorized result.
E-Verify has verified that the employee is eligible to work in the United States and the employee continues to work for the employer.
- The employee continues to work for the employer after receiving a Final Nonconfirmation result.
E-Verify could not verify that this employee is authorized to work in the United States. The employee took action to resolve the Tentative Nonconfirmation (mismatch), but was unable to resolve it and a Final Nonconfirmation was issued in E-Verify. The employer chooses to allow the employee to continue to work.
- The employee continues to work for the employer after receiving a Department of Homeland Security (DHS) No Show result.
E-Verify could not verify that this employee is authorized to work in the United States. The employee took action to resolve the Tentative Nonconfirmation (mismatch), but did not take action to resolve it and a ‘DHS No Show’ result was issued in E-Verify. The employer chooses to allow the employee to continue to work.
- The employee continues to work for the employer after choosing not to take action to resolve a Tentative Nonconfirmation (mismatch).
E-Verify could not verify that this employee is authorized to work in the United States. The employee chose not to take action to resolve the Tentative Nonconfirmation (mismatch). The employer chooses to allow the employee to continue to work.
- The employee was terminated by the employer for receiving a Final Nonconfirmation result.
E-Verify could not verify that this employee is authorized to work in the United States. The employee had to take action to resolve the Tentative Nonconfirmation (mismatch), but was unable to resolve it. The employer terminated the employee after the Final Nonconfirmation result.
- The employee was terminated by the employer for receiving a DHS No Show result.
E-Verify could not verify that this employee is authorized to work in the United States. The employee took action to resolve the Tentative Nonconfirmation (mismatch), but did not take action to resolve it and a ‘DHS No Show’ result was issued in E-Verify. The employer terminated the employee after receiving the ‘DHS No Show’ result.
- The employee was terminated by the employer for choosing not to take action to resolve a Tentative Nonconfirmation.
E-Verify could not verify that this employee is authorized to work in the United States. The employee chose not to take action to resolve the Tentative Nonconfirmation (mismatch). The employer terminated the employee after the employee chose not to take action to resolve the Mismatch.
- The employee quit working for the employer.
The employee chose to stop working for the employer.
- The employee was terminated by the employer for reasons other than E‑Verify.
The employer terminated the employee for reasons unrelated to E-Verify.
- This case is being closed because of technical issues with E-Verify.
This case is being closed because of technical issues with E-Verify. E-Verify was unable to process this case due to a technical issue. The employer is closing this case and needs to create a new case.
- The case is being closed because another case with the same data already exists.
An E-Verify case with the same data was already created for this employee. This is a duplicate case.
If a case is closed because another case with the same data already exists, it does not void the case or change the case result. The case will still display the last case result even though it has been closed.
- The case is being closed because the data entered is incorrect.
The data entered for this employee was not correct.
If a case is closed because the data entered is incorrect, it does not void the case or change the case result. The case will still display the last case result even though it has been closed.
- The case is being closed because the document is expired.
The document presented by the employee for verification was expired. The employer is closing the case and needs to create a new case with an unexpired document.
- The case is being closed because DHS or SSA instructed this employer to create a new case for this employee.
DHS or SSA instructed the employer to create a new case for this employee because E‑Verify was unavailable, or for another reason.
- The employee is no longer employed by the employer for reasons unrelated to E-Verify and the mismatch process could not be completed.
The employee is not available because they are no longer working for this employer for reasons unrelated to E-Verify. The Tentative Nonconfirmation (Mismatch) process could not be completed.
- The case is being closed because DHS or SSA instructed this employer to close the case.
The employer was directed by DHS or SSA to close this case.
Close Case Summary
Employer Action
- Click Close Case
- Indicate whether the employee is still employed
- Select the appropriate case closure statement
- Record E-Verify Case Number on Form I-9 or print screen and file it with Form I-9
- The E-Verify process is now completed
Employee Action
- None
4.2 Case Alerts And View/Search Cases
Case alerts are found at the bottom of the home page when a user logs in to E Verify. The alerts bring attention to cases that need action and provide the following information:
- Open Cases to be Closed
- Cases with New Updates
- Work Authorization Documents Expiring
- Recently Auto Closed Cases
The E-Verify home page indicates the number of cases that require attention by a number highlighted on the alert. Cases that need attention can be accessed by clicking on the alert or through Cases and Search Cases from the navigation menu in E-Verify. Follow the steps outlined in the Case Alerts and View/Search Cases - Process Overview to use the case alerts feature.
Case Alerts and View/Search Cases - Process Overview
- E-Verify user homepage display with case alerts.

- Click on the alert requiring your attention to access your case alert(s).
Case Alerts Can Also Be Accessed:
- From the E-Verify home page, click Cases and Search Cases. Both screens offer the same search features to locate existing cases in E-Verify
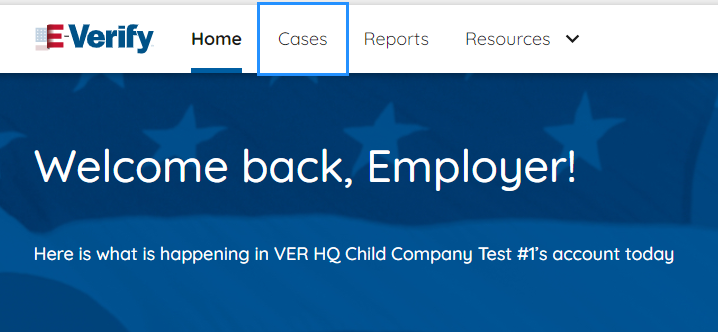
- The View/Search Cases screen displays open cases by default. Click Cases.
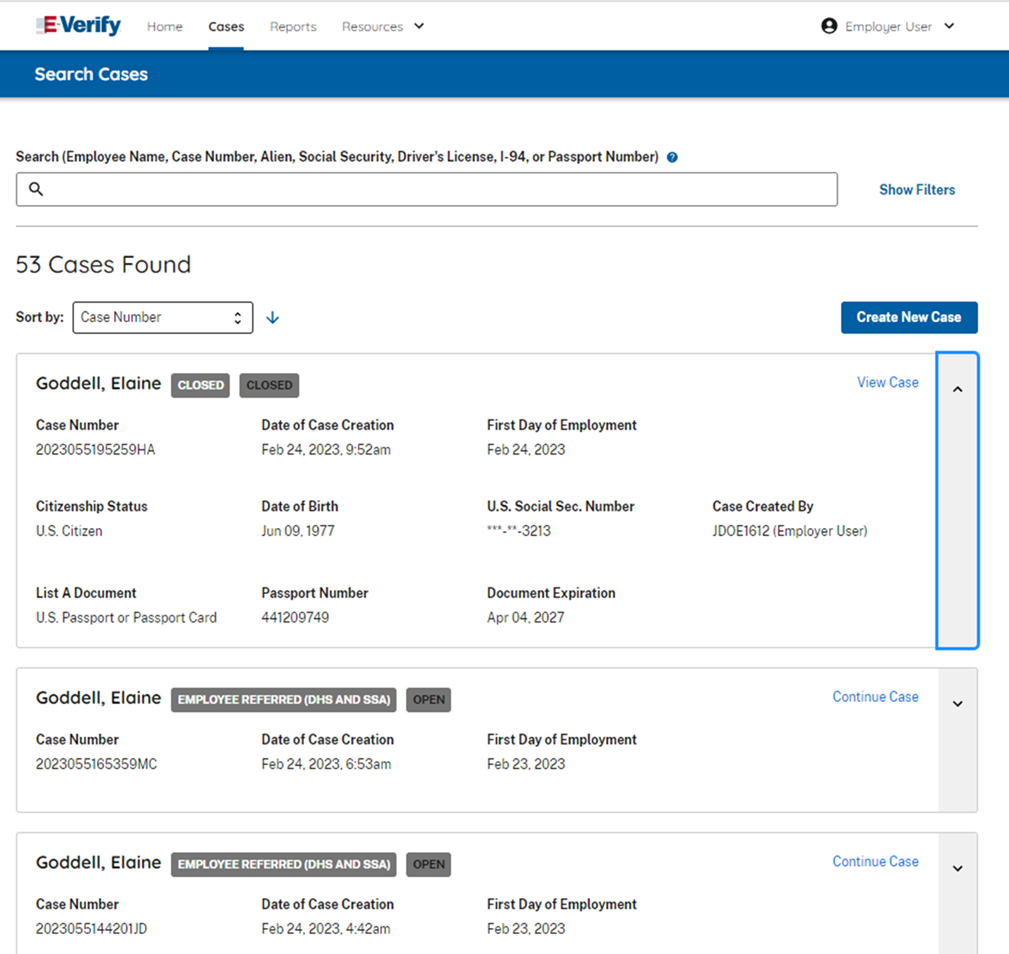
- Once a search result is displayed, it can be filtered with additional fields by clicking Show Filters
- You may further narrow the search by entering a single or multiple identifiers in the Search field. Search one or more of the following options:
- Employee Name
- E-Verify Case Number
- Alien Number
- Social Security Number
- I-94 Number
- Passport Number
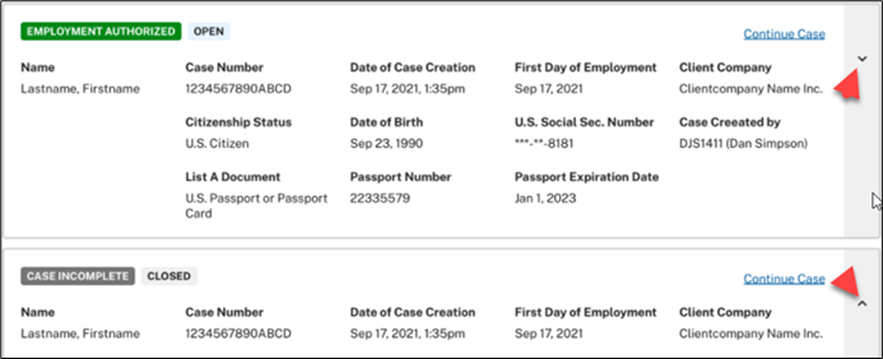
- To display more case result information, click on the case card icon on the right to expand or collapse case results
- Click Continue Case to take action on a case
- The top left corner of the case card will display the case status and whether the case is Open or Closed
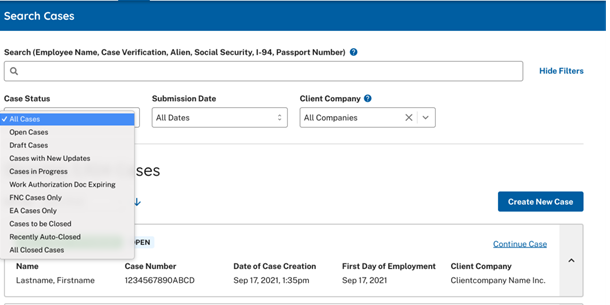
- Type the corresponding name, number or multiple identifiers in the Search By text box.
- For additional information simply click the helper text symbol.

- Press Enter to view cases containing the criteria you entered.
- Displayed cases can be sorted by Case Number, Case Status, Date Hired, or Last Name. Click the drop-down arrow next to Sort by on the left side of the screen and select the category you wish to sort.
- Click Create New Case button at the top right of the search results.
If there are more cases than the screen can display, you can select Rows Per Page in the bottom left corner to expand the total number of case cards viewed. You will see Next Page with a blue arrow on the bottom right side of the screen. Click the right pointing arrow to page through all cases with the criteria you specified. Click the Previous Page with the left pointing arrow to page back to the beginning of the list.
- To remove criteria entered in the Search By field, click in the text box where you entered a name or number and delete the information entered, then press Enter on your keyboard.
- Once you locate your case, click anywhere in the box containing the case information to open and continue processing the case.
4.2.1 Open Cases To Be Closed
Any E-Verify case assigned a E-Verify case number must be closed. The Open Cases to be Closed case alert provides quick access to all cases that must be closed.
4.2.2 Cases With Updates
The Cases with Updates case alert is a quick link to all cases that have had a change in case result. This case alert is an easy way to manage these cases.
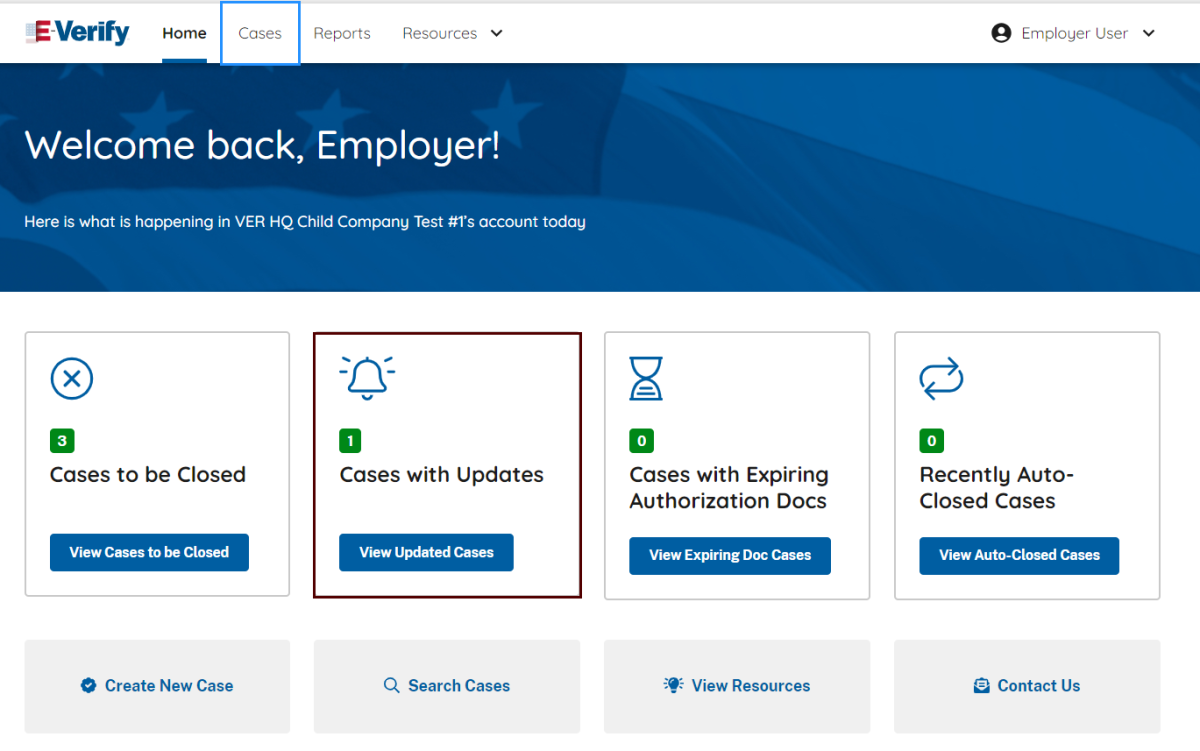
- You can also view cases with updates by clicking Cases.
- Click on Show Filters to expand and under Case Status dropdown menu, select Cases with Updates.
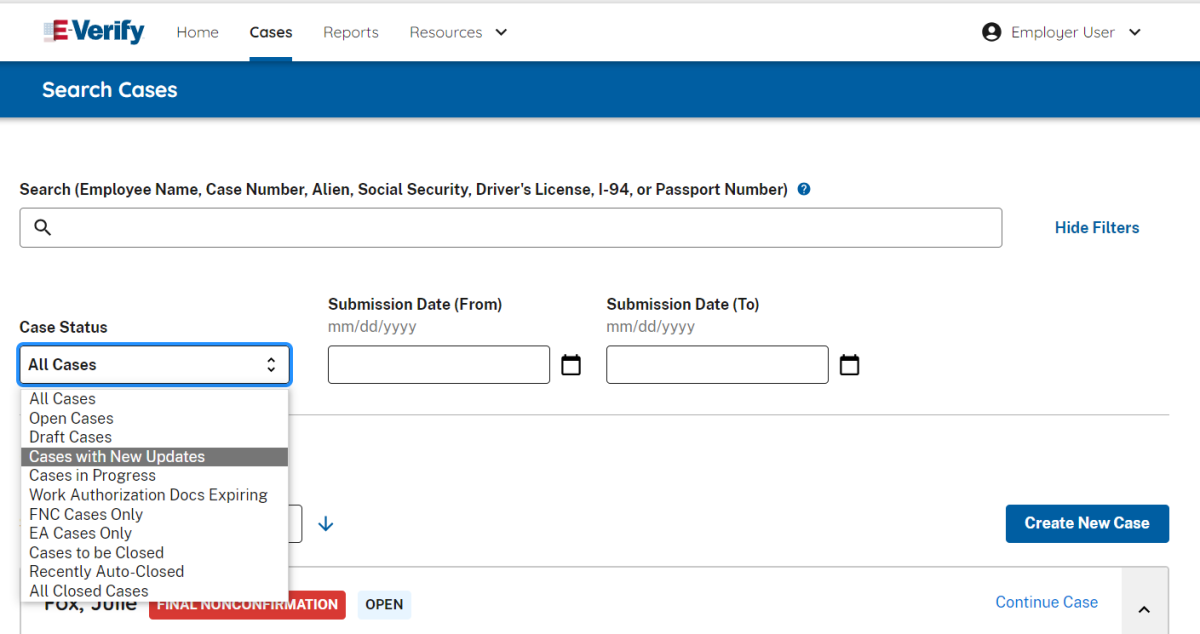
4.2.3 Work Authorization Documents Expiring
The Work Authorization Docs Expiring case alert is a notification that an employee's Employment Authorization Document (Form I-766) or Arrival-Departure Record (Form I-94) document is expiring. This alert is intended as a reminder to reverify the employee by completing Supplement B, Reverification and Rehire of Form I-9. For reverification, do not create a new E-Verify case.
Because this is simply a reminder, no action is required or permitted in E-Verify. You may dismiss each alert by clicking Dismiss Alert.
This alert will only appear if the document the employee presented for the original E Verify case was either an Employment Authorization Document (Form I-766) or an Arrival-Departure Record (Form I-94). The alert will appear in E-Verify 90 days prior to expiration. Also, the alert only appears when the Form I-766 or Form I-94 used for the E-Verify case expires—subsequent expiration dates of other documents will not activate another case alert.
If you have employees who are Temporary Protected Status (TPS) beneficiaries who provided a TPS-related EAD when they first started working for you, and the Department of Homeland Security has automatically extended this EAD, you will receive a ‘‘Work Authorization Documents Expiring’’ case alert when the automatic extension period for this EAD is about to expire. This alert indicates that at the end of the automatic extension period, employment authorization must be reverified in Supplement B of Form I-9. Employers must not use E-Verify for reverification.
4.2.4 Recently Auto-Closed Cases
All E-Verify cases that result in Employment Authorized will automatically close. The Recently Auto-Closed Cases alert will help users find cases that were automatically closed. This case alert shows the number of cases that were automatically closed within the past 30 days.

Clicking on the case alert allows users to easily see that their employee (or their client’s employee) is authorized to work, and to access the case information they (or their client company) need to record on Form I-9.
5.0 Case Reports
There are various types of case reports available in E-Verify for persons or entities who are enrolled as employers. These are: Case Creation Summary report, Historic Records Report and Quick Audit Report. This section provides information on these reports and how to create them in E-Verify.
Reports display only the last four digits of an employee’s Social Security number for added security and to protect employees’ privacy.
A description of each report is provided in the Reports – Overview.
Reports - Overview
- Case Creation Summary report - This report displays the number of cases created by a specific account within a user-selected timeframe; no case details are provided. If the employer has not created any cases during the fiscal year, a report will appear with a total of zero. The report is available to all users on Employer, Employer Agent, and Corporate Administrator accounts.
- Historic Records Report - This report provides case data about each resolved case that is 10 years or older. The case data includes basic company and case identifiers and case resolution information. The case data does not include sensitive employee information such as Social Security number or document number. This report is available to corporate administrators and program administrators for 3 months in the fall of each year.
- Quick Audit Report - This report provides case data about each case that matches the user-entered search criteria in the .csv file format. The case data includes basic company and case identifiers and case resolution information. The case data does not include sensitive employee information such as SSNs or document numbers. This report was designed to satisfy the requirement of employers to report their E Verify activity to federal, state, or local government entities. Users should note that this report may contain up to 5,000 rows and is populated with the city and state that is associated with their account. This report is available to corporate administrators and program administrators.
To create a report, see the Reports Process Overview.
Reports Process Overview
- Select Reports from the Navigation menu.

- Select the report you want to create from the options available. A description of the report is provided on the Select a report screen.

- Click Run Report.
- Determine your search criteria and click Run Report.
6.0 Account Administration
User account administration provides individual users specific functions and permissions to update their accounts, edit their profile information, and perform other functions explained in this section.
It is important to distinguish that the user account functions are different for each user role.
6.1 Overview of User Roles
Enrolled employers can assign their users with different permissions and functions, depending upon the user’s role. There are two types of users: Program Administrators and General Users. Program Administrators provide support for the General Users and manage the company profile. Employers must have at least one Program Administrator but can have as many Program Administrators as they choose.
General Users are only able to create and manage cases. Employers are not required to have General Users, but can have as many General Users as they choose.
General Users and Program Administrators must successfully complete the online E-Verify training requirements before they can create or manage cases. Review the permissions of each user role in the User Role Overview below.
User Role - Overview
| User Role | Permissions |
|---|---|
| Program Administrator (at least one required) | Every E-Verify account must have at least one program administrator. The program administrator is responsible for following all E-Verify program rules and staying informed of changes to E-Verify policies and procedures. Permissions include:
|
| General User (optional) | Employers can have as many or no general users as they desire. The general user is responsible for following all E-Verify program rules and staying informed of changes to E-Verify policies and procedures. Permissions include:
|
6.2 Use Login.gov to Access E-Verify
Program Administrators can add users in E-Verify. Upon being initially registered by the Program Administrator, users will receive an email with a link to access E-Verify through Login.gov.
You must use Login.gov to access E-Verify, which includes multi-factor authentication (MFA).
To activate your new E-Verify user account using Login.gov, follow these instructions.
- Access E-Verify at https://everify.uscis.gov/ .
- Click I Agree to the User Agreement.
- Sign in or create a Login.gov account:
- If you have a Login.gov account, Sign In using your associated email address and password.
- If you do not have a Login.gov account, select Create an Account and follow the prompts to set up your Login.gov account. Review and confirm the information on Your Account screen is correct in your new Login.gov account.

Review and confirm Your Account information is correct in your Login.gov account. This completes setting up your new user account through Login.gov.
From the Your Account screen in Login.gov, click Continue to E-Verify. This takes you to the Dashboard within the E-Verify system.
From Select a User Account, click the User ID to complete the E-Verify online training requirements.
You may begin using E-Verify through your new user account.
E-Verify Dashboard Screen Overview
The E-Verify Dashboard lists your name, User Profile and User Account sections.
Click Edit to make changes to your User Profile; or
Select the User ID and be directed to the E-Verify system home page.
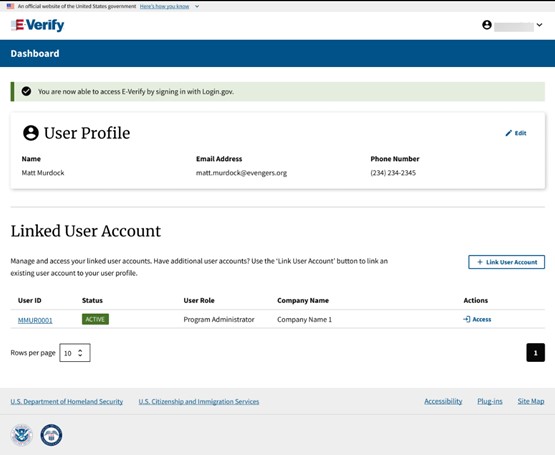
If the user has additional user accounts and would like to link those accounts with their user profile, click Link User Account. See XX XX to learn more about how to link your accounts.
6.3 Update User Profile Information
E-Verify user information including name, email address, and phone number are stored in a user profile. Your user profile information is associated to one or multiple user accounts depending on how you access E-Verify. Users should update user profile information whenever necessary. To edit user profile information, you must be on the Dashboard. You always enter E-Verify on the Dashboard after logging in or to return to the Dashboard from a user account, select your name and then Dashboard. Any updates to user profile information will apply to all user accounts associated under your user profile.
From the Dashboard:
- Click Edit on User Profile page.
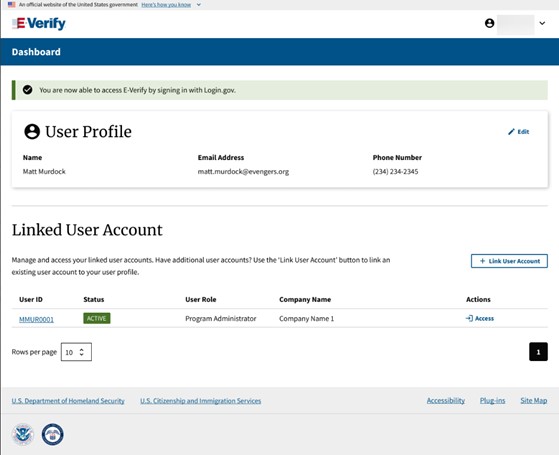
If you want to use an email address that is not available as a selection above, you need to first add that email address to your Login.gov account.
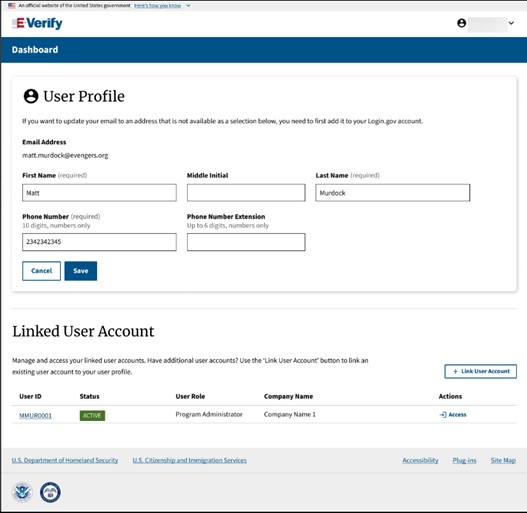
- Review your information to confirm your update was successful.
- Click Save.
7.0 Company – Program Administrators
Program Administrators manage the site administration of their E-Verify employer account. They use the Company menu to:
- Register new users
- Add other program administrators
- View existing users
- Delete user accounts
- Change or update company profile information
- Request termination of participation in E-Verify
7.1 Register New User
Only Program Administrators can add E-Verify users. To add a user, the Program Administrator must provide the user’s email address and appropriate user role.
If a user leaves the employer or no longer needs access to E-Verify, a Program Administrator must delete the user’s account. To delete a user’s account, see Delete User Account – Process Overview in Section 7.2.2.
Program Administrators who need to register a new E-Verify user should see Register New User - Process Overview.
Register New User – Process Overview
- From Company Account, select Manage Users.
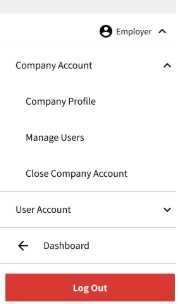
- Click Add User.
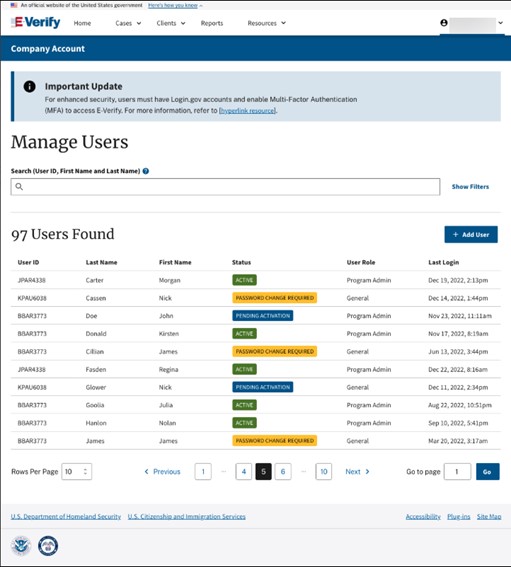
- Enter email address.
Select user role as General User or Program Administrator and click Next. E-Verify will look to see if the email address you entered is associated with an existing E-Verify user. If it is, the associated name and phone number are stored in a user profile and will only be visible after the user signs in for the first time. If not, you will be asked to enter the new user’s name and phone number.
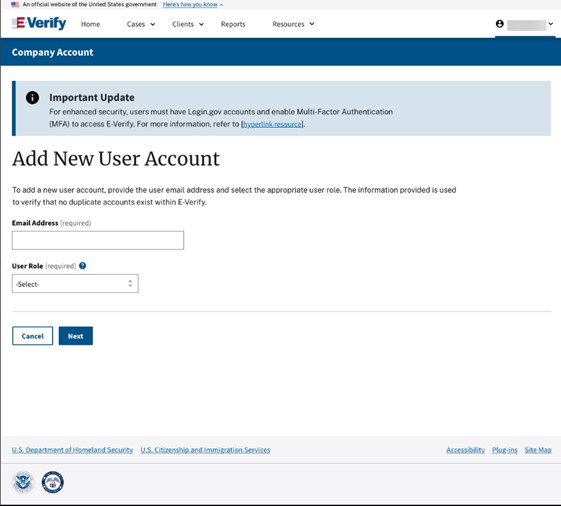
- Accept the system-generated user ID or create a new user ID.
Click Create User Account.

An email will be sent to the new user with an E-Verify activation link.
7.2 Manage Users
Only Program Administrators can view, search and maintain their company’s General Users and other Program Administrators. See Manage Users – Process Overview to learn more.
Managers Users – Process Overview
From Company Account, select Manage Users:
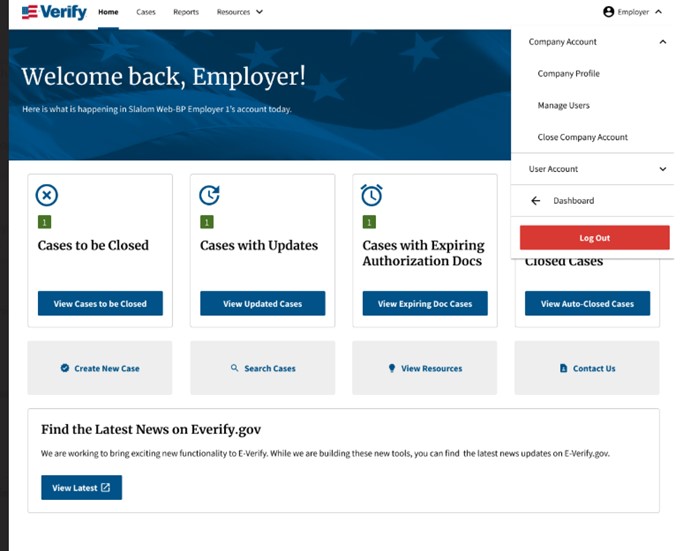
- From the Manage Users screen, search for a user by typing the User ID, Last Name, and First Name;
- Click Show Filters and search by user role and/or user status; or
Scroll through list and select the appropriate User ID. Navigate to right to click on the view, edit, or delete action icons.
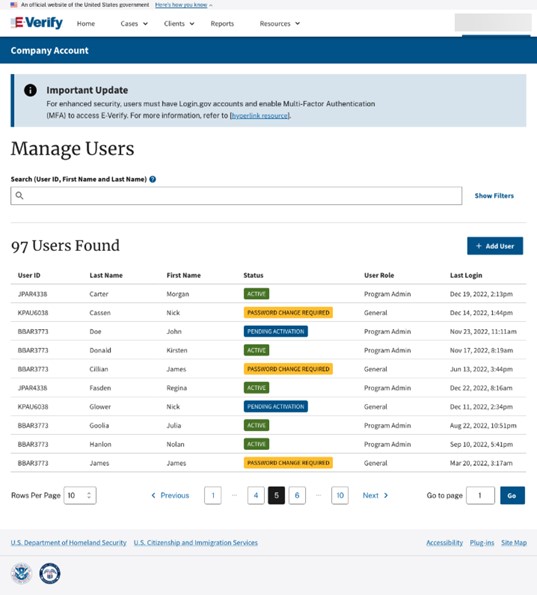
7.2.1 Delete User Account
Program administrators may delete user accounts by following the steps in the Delete Users – Process Overview.
Delete Users Account - Process Overview
- Follow the steps in View Existing Users – Process Overview above to find the user whose account needs to be deleted.
- Click the Delete icon in the row under Actions of the user’s account you wish to delete on the User Summary List page.
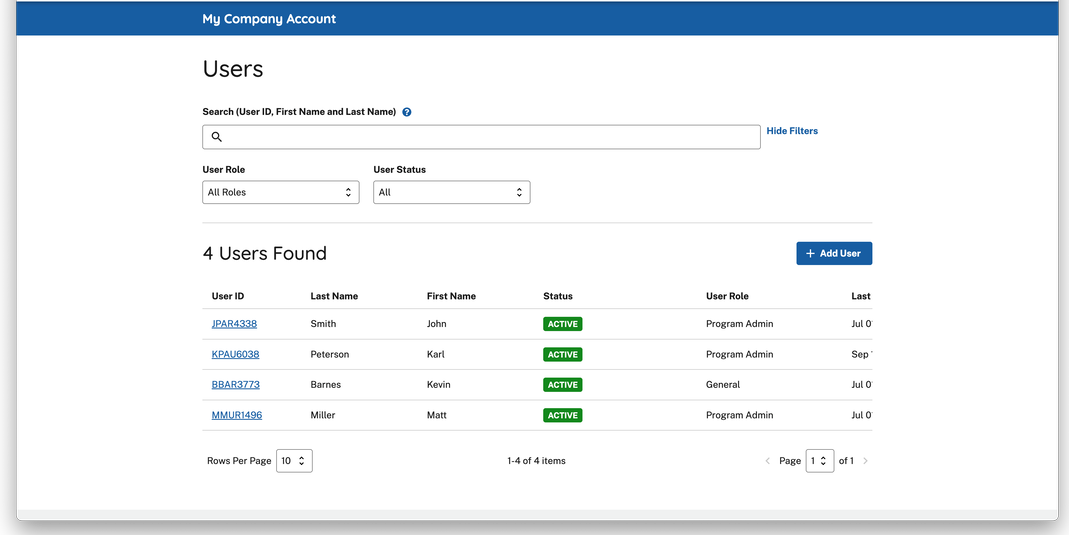
OR
- Select the link for the appropriate User ID to open User Information page.
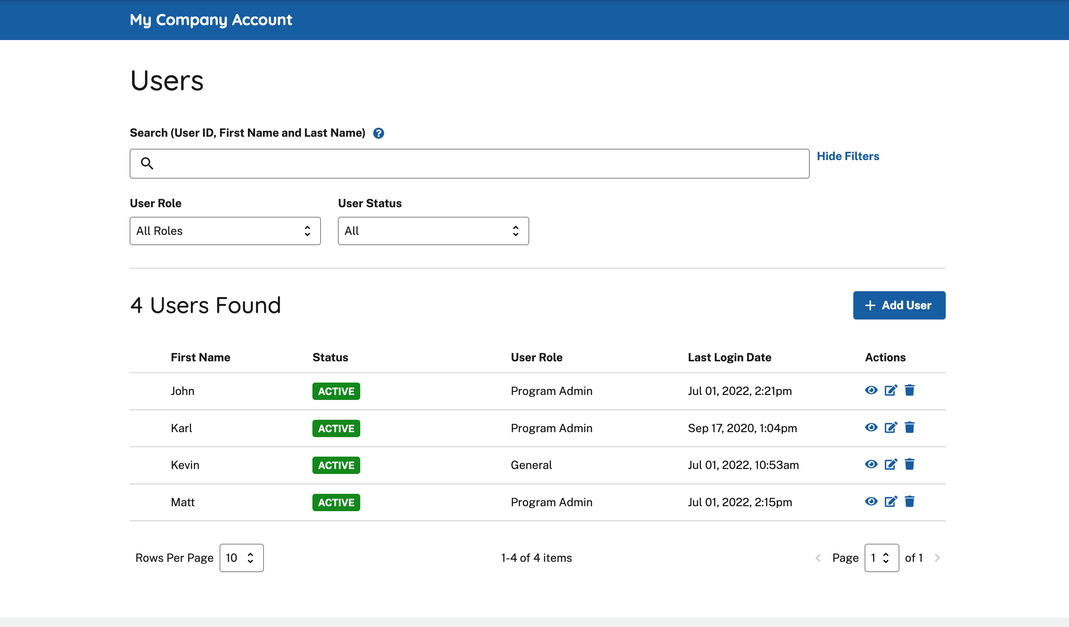
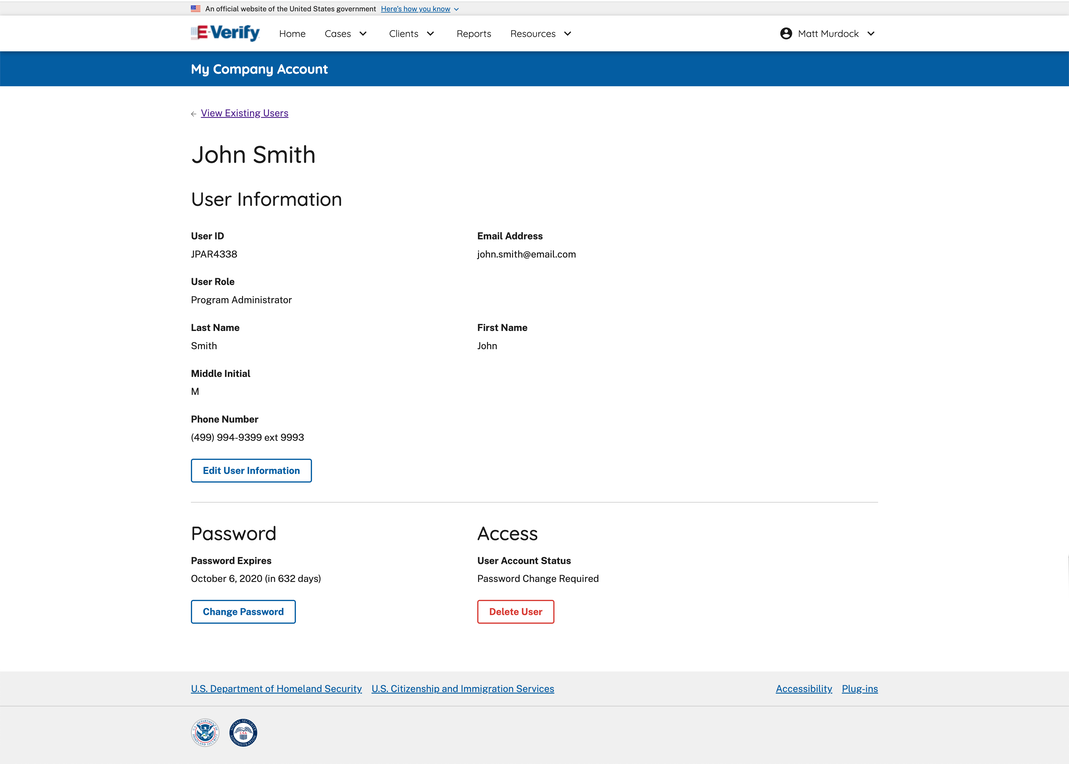
- Click Delete User
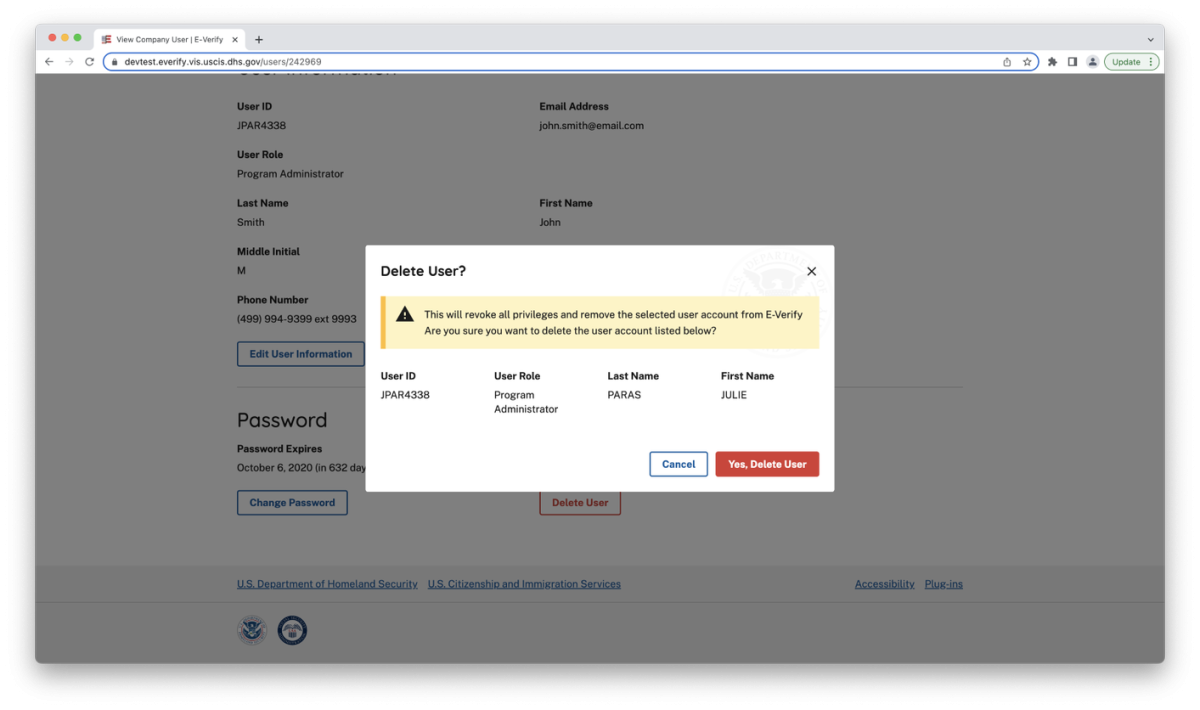
- In both instances, E-Verify displays the information for the user's account you want to delete. Click Yes, Delete User to delete the user’s account.
- After you click Yes, Delete User, changes will be permanent
7.3 Edit Company Profile
Program Administrators must maintain accurate company information in the company profile and should update their profile as needed.
To update employer information in E-Verify, complete the steps in the Edit Company Profile – Process Overview. Once a Program Administrator has updated the employer’s profile, he or she will be subject to the rules and requirements associated with the profile and have access to all online resources specific to the profile.
Edit Company Profile - Process Overview
- From Company Account, select Company Profile.
Click on the section of the company profile you need to update (Company Information, Employer Category, Company Addresses, or Hiring Sites).
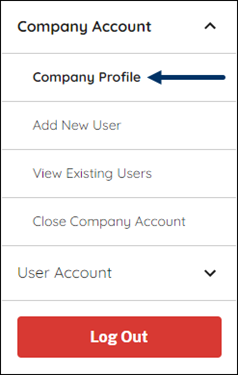
The E-Verify company ID number is located at top of the Company Information page.
7.3.1 Company Profile Fields
Many fields can be updated in the Company Profile page. You are responsible to keep your information page up to date. For additional information on each field, see the Company Information table below.
Company Profile Overview
| FIELD NAME | DESCRIPTION |
|---|---|
| Company Name | Name of employer enrolled in E-Verify. |
| Doing Business As (DBA) | The DBA Name is the name under which a company operates. The DBA is visible to the public, but is not the legal, registered name of that organization. |
| Employer Identification Number (EIN) | An EIN is also known as the Federal Tax Identification Number, and is used to identify a business entity. An EIN is required for an employer to enroll in E-Verify. Employers who do not have an EIN can apply online with the IRS to receive an EIN immediately. |
| Data Universal Numbering System (DUNS) | A DUNS number is a unique, 9-digit identifier issued and maintained by Dun & Bradstreet that can help verify the existence of a business entity. |
| Unique Entity Identifier (UEI) | A UEI is a 12-digit alphanumeric identifier that is provided by SAM.gov to all entities who register to do business with the federal government. Learn more about the UEI. |
| Total Number of Employees | Total Number of employees in the company. |
| North American Industry Classification System (NAICS) | The NAICS classifies businesses by industry to collect, analyze, and publish statistical data related to the U.S. business economy. A three (3) digit NAICS code is required for an employer to enroll in E-Verify. If you do not know your client company's three (3) digit NAICS code, you can select the sector and subsector of the client company to determine the NAICS code. |
| Employer Category | The category that identifies the employer as a federal, state or local government organization or a federal contractor with the FAR E-Verify clause in their federal contract, if applicable. |
| Company Addresses | Physical Address is the location where the employer creates E-Verify cases. Employer’s mailing address (if this address is different from the physical address). |
| Hiring Sites | Locations where your company’s employees are hired. Typically, a hiring site is where an employee completes Form I-9. |
7.3.2 Update North American Industry Classification System (NAICS) Information
The NAICS code classifies employers by industry. The employer selects the NAICS code during enrollment. If the employer’s industry classification has changed, this should be updated in the E-Verify company profile.
To update the NAICS code, follow the Update NAICS Code - Process Overview.
Update NAICS Code - Process Overview
- From Company Account, select Company Profile.
- Next, from the Company Profile, click Edit Company Information to view the NAICS Code(s) section.
To update the NAICS Code field:
- Enter the new three-digit NAICS code.
- Click Save.
- If you don't know the new number, follow the steps below to search available codes.
To determine the employer's NAICS code:
- Click Look up a Code.
- Select the appropriate Sector from the drop-down list. Click Done.
- Select the appropriate Subsector from the drop-down list. Click Done.
- Click Save to return to Company Profile.
7.3.3 Update Points Of Contact
Every employer must have at least one person assigned as a point of contact for E-Verify issues. Program administrators added during account enrollment are automatically assigned as points of contact. Employers should keep their point of contact information up-to-date. E-Verify will rely on this information if it ever needs to contact the employer. To update the point of contact information when it changes, see the Update Points of Contact – Process Overview.
Update Points of Contact - Process Overview
- From Company, select Edit Company Profile.
- Click View/Edit in the Total Points of Contact section of the Company Information page to update this information. The Points of Contact Summary page opens.
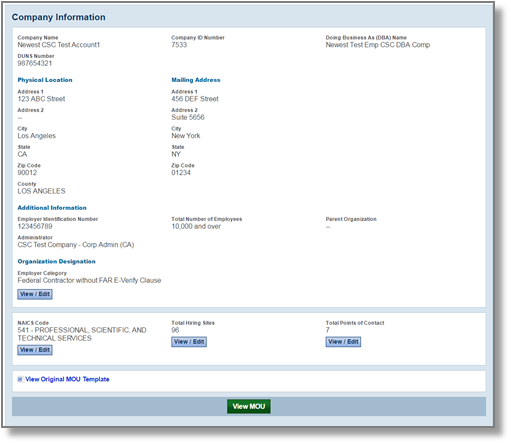
- Click Add to add a new point of contact. Or select Edit next to the point of contact you are updating.
- Click Next after adding the new point of contact's information or modifying an existing point of contact's information. The updated Points of Contact Summary List page will appear.
- Click Delete to delete a point of contact. The updated Points of Contact Summary List page will appear.

- Click Save when finished updating the point(s) of contact information. This brings the program administrator back to the Company Information page.
7.3.4 Update Hiring Site(s)
An E-Verify hiring site is the location where employees are hired and complete Form I-9. The employer creates an E-Verify case for every newly hired employee who is hired and completes a Form I-9 at that site. Program Administrators can modify the number of hiring sites that participate in E-Verify in each state.
The Edit Hiring Sites page shows the states where the employer has participating hiring sites and the number of participating hiring sites for each state. Program Administrators have the option to add participating hiring sites for a new state, edit the number of sites in a state where the employer currently has participating hiring sites, delete a state from the participating hiring site list if the employer will no longer use E-Verify in that state, or use bulk upload to add multiple hiring sites. To add a new state where the employer will have participating hiring sites, edit, or delete participating hiring sites and use bulk upload see the Update Participating Hiring Site(s) – Process Overview.
Add Hiring Site(s) - Process Overview
- From Company Account, select Company Profile.
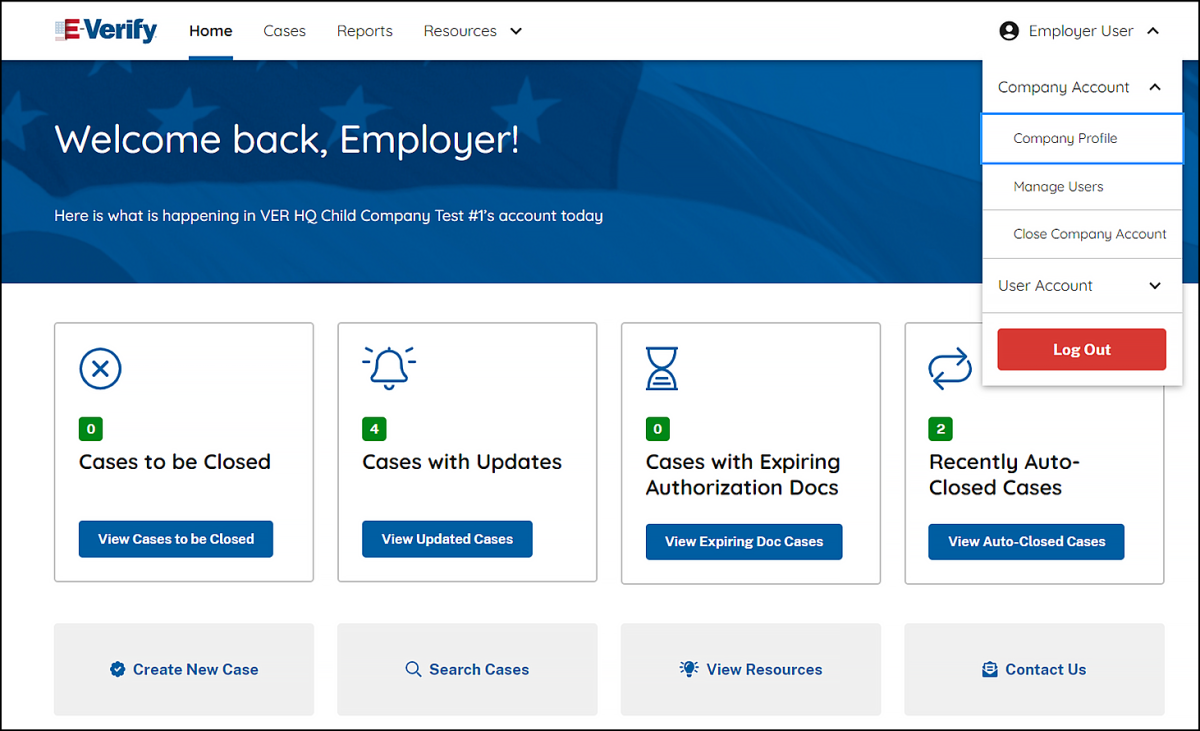
- From the Company Profile, select Edit Hiring Sites.
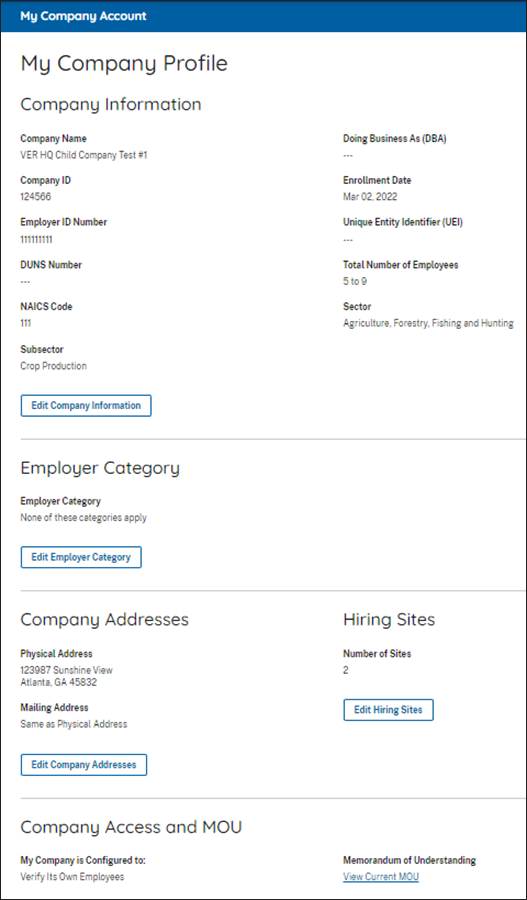
- Select + Add Hiring Site and enter the street address, city, state and zip code and select Add Hiring Site to add your hiring sites one a time.
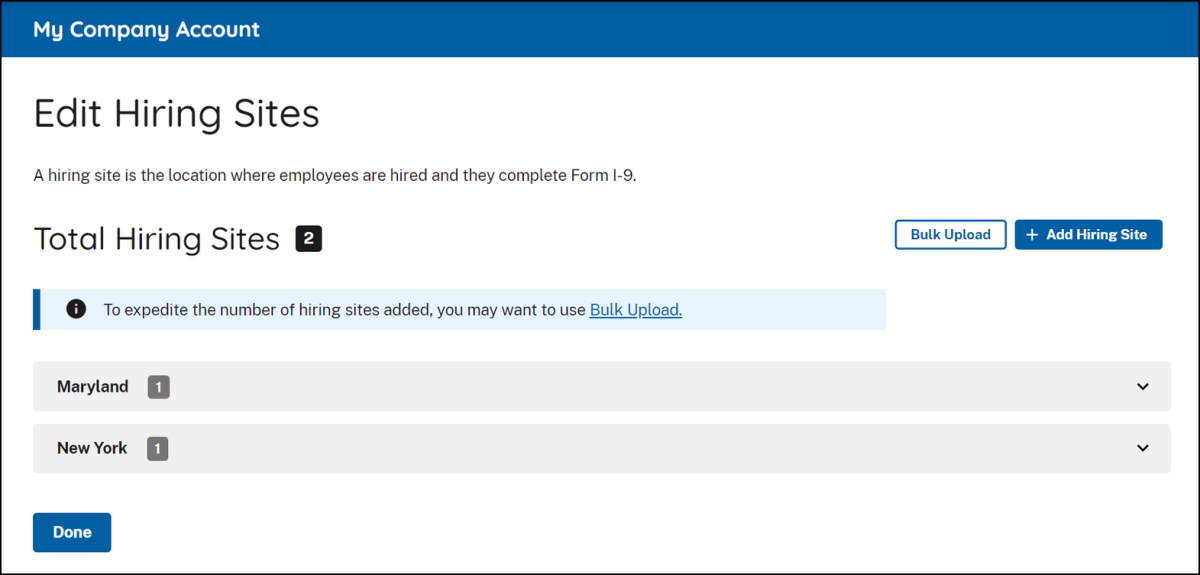
OR
- Select Bulk Upload to add multiple hiring sites by uploading a file. The bulk upload function allows you to add multiple hiring sites by uploading a file. To use the bulk upload function, you must create a comma separated value (.csv) file with the hiring site addresses.
- If you need to create a .csv file, click Download CSV Template to open a pre-formatted .csv file. Add the hiring site addresses to the .csv file and save the document.
- You also can drag the .csv file or click ‘choose from folder’ to locate the file and click Bulk Upload Hiring Sites.
- To help you prepare a spreadsheet to bulk upload large amounts of hiring sites data into E-Verify, click View CSV Guidelines.
- If you encounter errors, click, Export Errors from the highlighted error banner displayed under Total Hiring Sites.
- Correct exported errors, save the file, and click Bulk Upload to upload the document again.
- Click Bulk Upload Hiring Sites to complete the bulk upload process for hiring sites.
7.3.5 View Terms and Conditions
Program Administrators may view the Terms and Conditions between E-Verify and the employer. To view the Terms and Conditions, follow the steps outlined in the View Terms and Conditions - Process Overview.
View Terms and Conditions - Process Overview
- From Company Account, select Company Profile.
- From the Company Access and Terms and Conditions, click View Current Terms and Conditions to view your Terms and Conditions.
- The Terms and Conditions that was electronically signed for that employer will appear in a new window. If the Terms and Conditions does not load, ensure that your pop-up blocker is disabled.
We automatically update the Terms and Conditions when you update your company information in E-Verify. If you need proof of your enrollment in E-Verify, you can print a copy of your company’s information page, which will reflect most changes and updates. You cannot change the original signatory information you used when you enrolled in E-Verify.
Employers should update their E-Verify account information to reflect any changes.
7.4 Terminate Company Participation
Employers may terminate their participation in E-Verify voluntarily. To terminate participation, a Program Administrator, Corporate Administrator, or an authorized employer representative must submit a termination request no later than 30 days in advance of the date the employer would like to close its account. Employers may request termination electronically through E-Verify (see Terminate Company Account – Process Overview) or by submitting a written termination notice by email to E-Verify@uscis.dhs.gov.
E-Verify Employer Agents should review the Supplemental Guide for E-Verify Employer Agents for more information on company account termination.
During the 30-day period, employers must resolve all open cases in E-Verify, and they must not use E-Verify to create new cases. Employers are required to close all open E-Verify cases, even after the request to terminate the E-Verify account is made.
Once an account is terminated, employers will no longer have access to their account and associated records. To preserve the records from an E-Verify account, see Section 5.0 to create and retain a user audit report before the account is terminated. E-Verify case information and documentation must be retained for your employees for the same length of time as their Forms I-9.
To request termination of employer participation in E-Verify, perform the steps outlined in Terminate Company Account – Process Overview.
Terminate Company Participation - Process Overview
- From Company Account, select Close Company Account.
- Select the primary reason for requesting account termination from the drop-down menu.
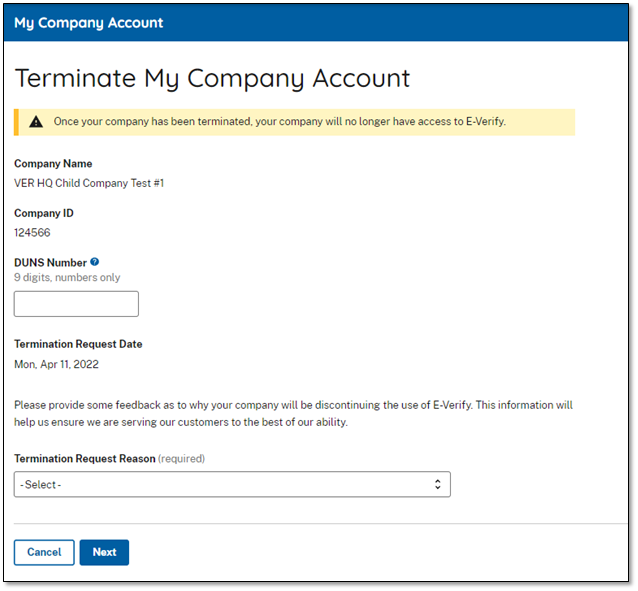
- From In some cases, you may be asked to further explain the reason for your termination.
- Click Next.
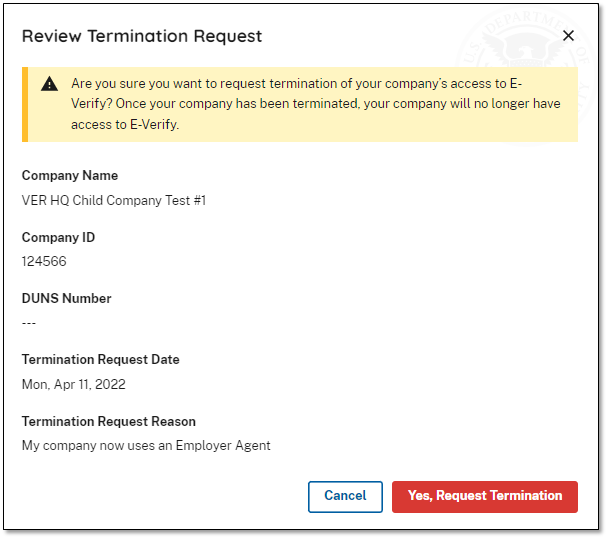
- Review termination request and click Cancel or Yes, Request Termination.
- You will receive an email confirming that your account is terminated in 30 days.
- A message will appear informing you that E-Verify will be notified of your request to terminate participation in the program.
Employers with more than one E-Verify employer account must make separate requests to terminate each employer account it wants terminated in order for them to all be closed.
Employers who submitted a termination request by mistake should contact the E-Verify Contact Center at 888-464-4218 for assistance.
8.0 Resource And Contact Information
The E-Verify public website is the primary resource for all E-Verify information, but do not hesitate to contact us via phone or email. For easy access to online resources, USCIS suggests that employers bookmark or save the websites as favorites for easy access to them in the future.
E-Verify Resources
E-Verify Public Website: www.E-Verify.gov
- General information about E-Verify
- Program information and statistics
- E-Verify user manuals
- E-Verify quick reference guides
- E-Verify Questions and Answers
- Information about employee rights and employer obligations
E-Verify Enrollment Application: https://everify.uscis.gov/enroll
- Website for initial employer enrollment
E-Verify Access for Employers and Corporate Administrators: https://everify.uscis.gov/emp
- User access to E-Verify
E-Verify Access for E-Verify Employer Agents: https://everify.uscis.gov/esp
- User access to E-Verify
E-Verify Contact Information
The E-Verify Contact Center is available to assist you with using E-Verify, password resets, cases and technical support. We can also answer your questions about E-Verify policies and procedures, Form I-9 and employment eligibility. We are available Monday through Friday, from 8:00 a.m. to 8:00 p.m. Eastern time, except when the federal government is closed. For users with hearing and speech impairment, TTY phone is available from 8:00 a.m. to 8:00 p.m. Eastern time.
Para Agentes del Empleador de E-Verify
For Clients
Para Empleados
U.S. Department of Justice, Civil Rights Division, Immigrant and Employee Rights Section (IER)
IER is available to answer your questions about immigration-related employment discrimination, including discrimination based on citizenship status, immigration status or national origin in the Form I-9 and E-Verify processes. IER can provide immediate assistance by phone through its hotlines Monday through Friday, from 9:00 a.m. to 5:00 p.m. Eastern time, except when the federal government is closed. Calls can be anonymous and language interpretation services are available.
Para Empleadores
Sitio web: http://www.justice.gov/ier
Para Empleados
Equal Employment Opportunity Commission (EEOC)
EEOC is available to answer your questions about employment discrimination, including discrimination based on race, color, religion, sex (including pregnancy), national origin, age (40 or older), disability, or genetic information.
For Employers and Employees
Appendix A: Acronyms
| Acronym | Definition |
|---|---|
| DHS | U.S. Department of Homeland Security |
| DOS | U.S. Department of State |
| EEOC | U.S. Equal Employment Opportunity Commission |
| FAR | Federal Acquisition Regulation |
| IER | U.S. Department of Justice, Civil Rights Division, Immigrant and Employee Rights Section |
| IIRIRA | Illegal Immigration Reform and Immigrant Responsibility Act of 1996 |
| INA | Immigration and Nationality Act of 1952 |
| IRCA | Immigration Reform and Control Act of 1986 |
| MOU | Memorandum of Understanding |
| NAICS | North American Industry Classification System |
| Portable Document Format | |
| SEVIS | Student and Exchange Visitor Information System |
| SEVIS ID number | Student and Exchange Visitor Information System (SEVIS) identification number |
| SSA | Social Security Administration |
| SSN | Social Security number |
| TNC | Tentative Nonconfirmation |
| USCIS | U.S. Citizenship and Immigration Services |
Appendix B: Glossary
A
El administrador corporativo tiene acceso sólo para administrar múltiples cuentas de empleador y no para crear y administrar casos de E-Verify. Los nuevos administradores corporativos deben asistir a una sesión de capacitación gratuita, regularmente programada en el web antes de que sus cuentas sean activadas.
Este tipo de usuario crea cuentas de usuario en E-Verify. Este usuario puede ver informes, crear casos, actualizar información de cuenta y desbloquear cuentas de usuario.
Una persona o empresa que crea casos de E-Verify a nombre de los empleadores, anteriormente conocido como agente designado.
Este es un resultado de caso recibido en E-Verify cuando la información que se ingresa de un empleado coincide con los registros de la Administración del Seguro Social (SSA) o del Departamento de Seguridad Nacional de Estados Unidos (DHS). Este resultado indica que la elegibilidad de empleo ha sido verificada.
El Aviso contra la Discriminación es publicado por la Sección de Derechos del Inmigrante y el Empleado sobre Prácticas Injustas en el de Empleo del Departamento de Justicia de Estados Unidos, (IER, por sus siglas en inglés) y proporciona información a los empleados acerca de la discriminación en el lugar de trabajo. El Memorándum de Entendimiento (MOU, por sus siglas en inglés) de E-Verify requiere que los empleadores participantes muestren claramente las versiones en inglés y español del aviso. Los empleadores también pueden desplegar los afiches en otros idiomas provistos por DHS. Este aviso está disponible en la sección "Recursos Esenciales" de E-Verify. Para preguntas sobre la discriminación durante el proceso de verificación de elegibilidad de empleo, los empleadores pueden contactar a la IER al 1-800-255-8155 o 1-800-237-2515 (TTY) o visitar http://www.justice.gov/ier.
El Aviso de Participación en E-Verify informa a los empleados actuales y potenciales que una empresa está participando en el Programa E-Verify. El Memorándum de Entendimiento (MOU) requiere que los empleadores participantes muestren las versiones en inglés y español del aviso en un lugar destacado que sea claramente visible para los empleados actuales y potenciales.
C
Esta respuesta aparece si la Administración del Seguro Social (SSA, por sus siglas en inglés) o el Departamento de Seguridad Nacional (DHS, por sus siglas en inglés) de Estados Unidos necesitan más de 10 días laborales del gobierno federal para resolver un caso. El empleador no puede despedir o tomar acciones adversas contra un empleado debido a la TLC mientras la SSA o DHS están revisando el caso del empleado.
Esta respuesta aparece si el usuario abandona un caso después de que aparece la pantalla “Verificar Información” o la pantalla de “Comparación de Foto”. El usuario deberá continuar el caso o cerrarlo.
Paso en el proceso de verificación, cuando se ha proporcionado un resultado final o el usuario ya no necesita continuar la verificación y el caso está listo para ser cerrado.
Este resultado de caso significa que la SSA o DHS necesitan que el caso se cierre y el empleador debe crear y presentar otro caso. Este resultado puede producirse cuando el pasaporte estadounidense, tarjeta de pasaporte o licencia de conducir del empleado contiene información incorrecta.
Una persona o empresa que contrata a un agente del empleador de E-Verify para crear casos en su nombre.
Durante el caso de verificación, los empleadores comparan las fotos de ciertos documentos proporcionados por los empleados al completar el Formulario I-9 con la foto que aparece en E-Verify. La comparación por foto solo se realiza cuando un empleado proporciona un Pasaporte Estadounidense, una Tarjeta de Pasaporte, Tarjeta de Residente Permanente (Formulario I-551) o un Documento de Autorización de Empleo (Formulario I-766) como su documento de identificación del Formulario I-9.
La Confirmación de la Fecha de Referido proporciona al empleado la fecha en la que debe ponerse en contacto con la SSA o DHS para resolver una No Confirmación Tentativa (TNC). Los empleados tienen ocho días laborales del gobierno federal a partir de la fecha de referido para visitar la SSA o contactar a DHS.
D
La foto en el documento del empleado no coincide con la foto proporcionada por E-Verify. La foto transmitida por E-Verify debe ser la misma (idéntica) foto que aparece en el documento emitido por el Departamento de Seguridad Nacional de Estados Unidos (DHS) o el Departamento de Estado (DOS) de un empleado. Si el empleador determina que las fotos no coinciden, se produce un resultado del caso "No Confirmación Tentativa (TNC) de DHS" y se le debe brindar al empleado la oportunidad de resolver la discrepancia.
Un término general utilizado para describir la tarjeta que USCIS expide mediante el Formulario I-766, Tarjeta de Autorización de Empleo, a extranjeros que están autorizados a trabajar en Estados Unidos. La tarjeta contiene una fotografía de la persona y en ocasiones incluye las huellas dactilares. Un extranjero que tiene un EAD, usualmente tiene permiso de trabajo en un mercado abierto, aunque hay excepciones.
Los documentos que prueban la autorización de empleo e identidad bajo la Ley de Inmigración y Nacionalidad (INA, por sus siglas en inglés) están detallados en las instrucciones del Formulario I-9 y en el Manual para Empleadores (M-274) que se encuentra en http://www.uscis.gov/i-9-central/handbook-employers-m-274. Los empleados tienen el derecho a elegir qué documento o combinación de documentos presentar. Cualquier documento de la Lista B presentado a un empleador que participe en E-Verify debe contener una fotografía.
E
E-Verify es un programa basado en el internet en el que se verifica la elegibilidad de empleo de empleados recién contratados y los empleados existentes asignados a un contrato federal cubierto, después de que se haya completado el Formulario I-9. Esto implica verificaciones separadas (si es necesario) de los registros mantenidos por la Administración del Seguro Social (SSA) y el Departamento de Seguridad Nacional de Estados Unidos (DHS).
Un extranjero es cualquier persona que no es ciudadano o nacional de los Estados Unidos. “Nacional extranjero” es sinónimo de esto y se usa fuera de los estatutos al referirse a no ciudadanos de EE.UU.
F
La fecha de contratación es el primer día de trabajo del empleado. Por favor vea “Primer Día de Trabajo del Empleado” para más información.
El formulario que los empleadores están requeridos a completar con un empleado cuando lo contratan para realizar trabajo o servicios a cambio de un salario u otra remuneración. Este requisito aplica a todos los empleados contratados después del 6 de noviembre de 1986.
I
La identificación de usuario es una identificación asignada con letras y números que identifica al usuario de un sistema de computadora o red. Todos los usuarios que crean casos en E-Verify deben tener su propia identificación de usuario. La identificación de usuario debe tener ocho caracteres que pueden ser letras, números o una combinación de ambos. Una identificación de usuario no distingue entre mayúsculas y minúsculas.
El UEI es un identificador alfanumérico de 12 dígitos proporcionado por SAM.gov a todas las entidades que se registran para hacer negocios con el gobierno federal. Obtenga más información sobre la UEI.
Una respuesta recibida cuando el empleado no contactó al Departamento de Seguridad Nacional de Estados Unidos (DHS) para resolver su caso y han pasado 10 días laborales del gobierno federal desde la fecha de referimiento. El resultado "Incomparecencia a DHS" se considera una No Confirmación Final.
L
Ley del Congreso que, junto con otras leyes de inmigración, tratados y convenios de Estados Unidos, está relacionada con la inmigración, admisión temporal, naturalización y remoción de extranjeros.
Una ley aprobada por el Congreso creada con el fin de controlar y disuadir la inmigración ilegal hacia los Estados Unidos. Sus principales disposiciones estipulan la legalización de extranjeros indocumentados que han estado presentes ilegalmente desde 1982, la legalización de algunos trabajadores agrícolas, sancionar a los empleadores que a sabiendas contraten trabajadores indocumentados e incrementar la seguridad en las fronteras estadounidenses.
M
Proporciona instrucciones detalladas sobre cómo completar y retener el Formulario I-9.
Un documento legal que describe un acuerdo bilateral o multilateral entre las partes. Constituye un contrato legalmente vinculante cuando se ejecuta correctamente (es decir, firmado) por todas las partes. Los empleadores que participan en E-Verify deben firmar el MOU de E-Verify entre el empleador, el Departamento de Seguridad Nacional de Estados Unidos (DHS) y la Administración del Seguro Social (SSA).
N
Personas nacidas en Samoa Americana. Antiguos ciudadanos del antiguo Territorio en Fideicomiso de las Islas del Pacífico que renunciaron a su ciudadanía estadounidense adquirida en virtud de la sección 301 de la Ley Pública 94-241 (estableciendo la Mancomunidad de las Islas Marianas del Norte) por medio de una declaración ante un tribunal apropiado estableciendo que preferían ser nacionales no ciudadanos en lugar de ciudadanos estadounidenses, así como ciertos hijos de nacionales no ciudadanos nacidos en el extranjero. Generalmente, los nacionales no ciudadanos son samoanos estadounidenses.
Un resultado de caso provisto por E-Verify, que significa que la información que el empleado ingresó en E-Verify se comparó con los registros del gobierno y no pudo ser verificada. Esto no significa necesariamente que el empleado no está autorizado a trabajar, o que la información proporcionada es incorrecta. El empleado debe contactar o visitar la Administración del Seguro Social (SSA) o el Departamento de Seguridad Nacional de Estados Unidos (DHS) para resolver la discrepancia y continuar en el empleo.
La Notificación de Acción Posterior que el empleador debe proporcionar a un empleado que recibió un resultado de caso de No Confirmación Tentativa (TNC, por sus siglas en inglés) de E-Verify. Los empleados que decidan tomar acción sobre la TNC deben contactar o visitar la agencia apropiada dentro de 8 días laborales del Gobierno Federal con la notificación, para iniciar la resolución del caso de E-Verify.
El número I-94 es un número de 11 dígitos que se encuentra en el Registro de Entrada/Salida (Formulario I-94 o Formulario I-94A).
El número de identificación de la empresa en E-Verify tiene de cuatro a seis dígitos y está ubicado en la primera página del Memorándum de Entendimiento (MOU), directamente debajo del logotipo de E-Verify. Los administradores del programa también pueden obtener el número de identificación de la empresa de la página “Información de la Empresa” en E-Verify bajo “Editar Perfil de la Empresa”.
El número I-94 es un número de 11 dígitos que se encuentra en el Registro de Entrada/Salida (Formulario I-94 o Formulario I-94A).
Un número de nueve dígitos desplegado en la parte frontal de las Tarjetas de Residente Permanente (Formulario I-551) emitidas después del 10 de mayo de 2010, que es el mismo que el Número de Extranjero (Número A). El Número A también se puede encontrar en la parte posterior de estas Tarjetas de Residente Permanente (Formulario I-551).
Un número único asignado a cada caso de E-Verify que se crea cuando un empleador realiza una verificación inicial. Los empleadores que participan en E-Verify están obligados a registrar el número de verificación de caso en el Formulario I-9 del empleado, o a imprimir la imagen que aparece en la pantalla y que muestra el número de verificación del caso y adjuntarlo al Formulario I-9 del empleado.
P
Cualquier documento de viaje emitido por una autoridad competente que muestre el origen, identidad y nacionalidad del portador, que sea válido para la entrada de la persona a un país extranjero.
La práctica prohibida de crear un caso en E-Verify antes de que se haya aceptado una oferta de trabajo y que el Formulario I-9 esté completo.
Una persona en su empresa a la que se puede contactar sobre asuntos de E-Verify. Esta persona puede ser o no uno de los dos tipos de usuario.
R
La Ley Pública 104-208 promulgada el 30 de septiembre de 1996 requirió que el Servicio de Inmigración y Naturalización condujera tres tipos de programas piloto de verificación de autorización de empleo. El "Programa Piloto Básico" fue uno de los tres programas y es el único programa todavía en existencia. El "Programa Piloto Básico" se conoce hoy como E-Verify.
Un documento emitido a no ciudadanos cuando son admitidos a los Estados Unidos. Algunos de estos formularios están muestran un sello a fin de indicar el estatus de trabajo autorizado. El Formulario I-94 o I-94A contiene un número de admisión de 11 dígitos que puede utilizarse como parte del caso inicial de E-Verify si el empleado no ciudadano no tiene un Número de Registro de Extranjero.
Un no ciudadano a quien se le ha otorgado legalmente el privilegio de residir y trabajar permanentemente en los Estados Unidos.
Un no ciudadano a quien se le ha otorgado legalmente el privilegio de residir y trabajar permanentemente en los Estados Unidos.
Los resultados mostrados en E-Verify una vez que la información de un empleado ha sido presentada como parte de un caso de verificación. Los resultados iniciales de casos incluyen "Autorizado para el Empleo", "No Confirmación Tentativa (TNC)" y "Verificación de DHS en Proceso".
S
Un sitio de contratación es la ubicación donde se contratan los empleados y se completa el Formulario I-9. También puede ser la ubicación de verificación si se crean casos en E-Verify en la misma ubicación
T
Emitida por el antiguo Servicio de Inmigración y Naturalización después de diciembre de 1997 y ahora emitida por el Servicio de Ciudadanía e Inmigración de Estados Unidos, esta tarjeta es la versión actual que se les otorga a los residentes permanentes. El documento es válido por 10 años. En la versión actual de la Tarjeta de Extranjero de Residente Permanente (Formulario I-551), el nombre del documento fue cambiado de “Tarjeta de Residente Extranjero” a “Tarjeta de Residente Permanente”.
Tipo de documento(s) presentado(s) por un empleado para verificar la identidad y la elegibilidad de empleo.
U
Este tipo de usuario crea casos, ve informes y puede actualizar su perfil de usuario.
Table of Changes for E-Verify User Manual
2018 Changes
|
Section (New) |
Previous Text (Rev. 05/2017) |
New Text (Rev. 04/2018) |
|---|---|---|
|
Entire Manual |
contest |
Take action to resolve |
|
Entire Manual |
Not contest |
Do not take action to resolve |
|
Entire Manual |
modify |
update |
|
Entire Manual |
E-Verify Customer Support |
E-Verify Contact Center |
|
Entire Manual |
(e.g.) |
(for example) |
|
1.1 BACKGROUND AND OVERVIEW |
E-Verify is an internet-based system that implements the requirements of IIRIRA by allowing any U.S. employer to electronically verify the employment eligibility of its newly hired employees. |
E-Verify is an internet-based system that implements the requirements of IIRIRA by allowing any U.S. employer to electronically confirm the employment eligibility of its newly hired employees. |
|
1.2 BASIC WEBSITE NAVIGATION |
Area 3 displays Case Alerts for cases requiring action. Case alerts inform employers when an action is required. For more information on case alerts, see Section 4.2. |
Area 3 displays Case Alerts that inform employers when an action is required. For more information on case alerts, see Section 4.2. |
|
ENROLLMENT VS. REGISTRATION OVERVIEW WHO-REGISTRATION |
Program administrators register new users in E-Verify who are then able to create cases. |
Program administrators register new users to create E-Verify cases. |
|
ENROLLMENT VS. REGISTRATION OVERVIEW HOW-REGISTRATION |
Program administrators may register general users and additional program administrators at any time after completing the E-Verify tutorial and passing the knowledge test. For more information on adding new users, see Section 7.1. |
After completing the E-Verify tutorial and passing the knowledge test, program administrators may register general users and additional program administrators. For more information on adding new users, see Section 7.1. |
|
ENROLLMENT VS. REGISTRATION OVERVIEW HOW-REGISTRATION |
To participate in E-Verify, employers must enroll online via any internet-capable computer using Internet Explorer version 9 and above (recommended version 11 and above), Google Chrome version 38 and above (recommended version 44 and above), Mozilla version 34 and above (recommended version 38.1 and above), Opera version 25 and above (recommended version 30 and above) and Safari version 7 and above (recommended version 8 or above). REMINDER
|
To participate in E-Verify, employers must enroll online. You can find information about the system requirements on the E-Verify website under Enrolling in E-Verify. |
|
ENROLLMENT VS. REGISTRATION OVERVIEW HOW-REGISTRATION |
Participating employers use E-Verify through an access method that is determined during the enrollment process. Access methods are types of E-Verify accounts that offer different features for specific types of organizations. The four access methods include: employer, E-Verify employer agent, corporate administrator and web services. The access methods are explained in the Access Method Overview. For more information, visit the The Enrollment Process page at www.E-Verify.gov. |
When employers enroll in E-Verify, they choose an access method. Access methods are types of E-Verify accounts that determine who creates and manages the employer’s E-Verify cases. The four access methods include: employer, E-Verify employer agent, corporate administrator, and web services. The access methods are explained in the Access Method Overview. For more information, visit the Enrolling in E-Verify section at www.E-Verify.gov |
|
ACCESS METHOD OVERVIEW Employer |
Employer plans to use E-Verify to verify its employees. Most E-Verify participants, regardless of their business size or structure, are enrolled under the employer access method. This access method allows an employer to create cases in E-Verify for its newly hired employees and/or employees assigned to a covered federal contract |
Employer plans to use E-Verify to verify its employees. In this access method employers will create and manage their own cases directly in E-Verify. Most E-Verify participants, regardless of their business size or structure, are enrolled under the employer access method. |
|
E-Verify Employer Agent Access |
Employer agent plans to use E-Verify on behalf of its clients to verify their clients’ employees. The E-Verify employer agent access method allows an individual or company to act on behalf of other employers to create cases in E-Verify for other employers’ newly hired employees and/or employees assigned to a covered federal contract. The E-Verify employer agent may also create cases for their own employees. |
Employer agent plans to use E-Verify on behalf of its clients to verify their clients’ employees. The E-Verify employer agent access method allows an individual or company to act on behalf of other employers to create and manage the E-Verify cases of the other employers. The E-Verify employer agent may also create cases for their own employees. |
|
Web Services Access for Employers -or- Web Services Access for E‑Verify Employer Agents |
Employer plans to develop its own software to access E-Verify. The web services access method requires an employer to develop software that interfaces with E-Verify to create cases. The employer’s software will extract data from its existing system or an electronic Form I-9 and transmit the information to E-Verify. Those that choose this option receive a web services Interface Control Document (ICD) which contains the information used to develop and test the software interface. Both employers and E‑Verify employer agents are eligible to use this access method. |
Employer plans to develop its own software to access E-Verify. The web services access method requires an employer to develop software that interfaces with E-Verify to create and manage cases. The employer’s software should extract data from its existing system or an electronic Form I-9 and transmit the information to E-Verify. Employers who choose this option receive a web services Interface Control Agreement (ICA) which contains the information used to develop and test the software interface. Both employers and E‑Verify employer agents can use this access method. |
|
Overview of User Roles |
Enrolled employers can provide their users with access to E-Verify by assigning them a user role. Permissions and functions in E-Verify granted to the user depend upon the user role. There are two types of users: general users and program administrators. Review the permissions of each user role in the User Role Overview below. General users and program administrators must successfully complete the online E‑Verify tutorial before they can create or manage cases. For more information on the specific functions of each user role, see Section 6.1. USER ROLE OVERVIEW USER ROLE PERMISSIONS Program Administrator (at least one required) Every E-Verify account must have at least one program administrator. The program administrator is responsible for following all E‑Verify program rules and staying informed of changes to E‑Verify policies and procedures. The program administrator role includes functions of a general user. Permissions include: Registering new users Creating user accounts for other program administrators and general users Creating and managing cases Viewing reports Updating profile information for other program administrators and general users Unlocking user accounts Closing company and user accounts General User (optional) Employers can have as many or no general users as they desire. The general user is responsible for following all E‑Verify program rules and staying informed of changes to E‑Verify policies and procedures. Permissions include: Creating and managing own cases Viewing reports Updating own user profile |
|
|
1.4 RULES AND RESPONSIBILITIES OVERVIEW Employers who participate in E-Verify must: |
|
|
|
1.4 RULES AND RESPONSIBILITIES OVERVIEW Employers who participate in E-Verify must: |
|
|
|
1.4 RULES AND RESPONSIBILITIES OVERVIEW Employers who participate in E-Verify must: |
|
|
|
1.4 RULES AND RESPONSIBILITIES OVERVIEW Employers who participate in E-Verify must: |
|
|
|
1.4 RULES AND RESPONSIBILITIES OVERVIEW Employers who participate in E-Verify must: |
|
|
|
1.4 RULES AND RESPONSIBILITIES OVERVIEW Employers who participate in E-Verify must: |
|
|
|
1.4 RULES AND RESPONSIBILITIES OVERVIEW Employers who participate in E-Verify must: |
|
|
|
1.4 RULES AND RESPONSIBILITIES OVERVIEW Employers who participate in E-Verify must: |
|
|
|
2.0 INITIAL VERIFICATION |
When E-Verify checks the employee’s information with records available to SSA and/or DHS, a case result is provided. Case result statuses can be initial, interim or final. Proper use of E-Verify requires users to close all cases when they receive a final case results. |
When E-Verify checks the employee’s information with records available to SSA and/or DHS, a case result is provided. Case result statuses can be initial, interim or final. Proper use of E-Verify requires users to close all cases when they receive a final case result of Final Nonconfirmation or Close Case and Resubmit. Cases resulting in Employment Authorized are automatically closed by the system. |
|
2.1 FORM I-9 AND E-VERIFY |
Employers are required to timely and properly complete and retain Form I-9 for each employee they hire. The hire date means the first day of employment in exchange for wages or other remuneration. These Form I-9 requirements also apply to E-Verify employers. With the goal of ensuring a legal workforce, employers enrolled in E‑Verify have chosen to take the additional step of electronically confirming that information their employees provide match government records. |
Employers are required to timely and properly complete and retain Form I-9 for each employee they hire. The first day of employment means the first day an employee works in exchange for wages or other remuneration. These Form I-9 requirements also apply to E-Verify employers. With the goal of ensuring a legal workforce, employers enrolled in E‑Verify have chosen to take the additional step of electronically confirming that information their employees provide match government records. |
|
2.1 FORM I-9 AND E-VERIFY |
Newly hired employees must complete Section 1 of Form I-9 in its entirety on the first day of work for pay. They may complete Section 1 before this date, but only after acceptance of an offer of employment. Under general Form I-9 practice, employees can voluntarily provide their Social Security numbers (SSNs) on Form I-9. However, because SSNs are required for employers to create E-Verify cases, all newly hired employees, including seasonal, temporary and rehired employees, must provide their SSN. |
Newly hired employees must complete Section 1 of Form I-9 in its entirety on the first day of employment. They may complete Section 1 before this date, but only after acceptance of an offer of employment. Under general Form I-9 practice, employees can voluntarily provide their Social Security numbers (SSNs) on Form I-9. However, because SSNs are required for employers to create E-Verify cases, all employees whose employment eligibility will be verified in E-Verify must provide their SSNs. |
|
2.1 FORM I-9 AND E-VERIFY |
Employers must complete Section 2 of Form I-9 in its entirety within three days of the employee’s date of hire. To complete Section 2, examine documents presented by the employee that establish his or her identity and employment authorization. Do not specify which documents from the “List of Acceptable Documents” on Form I-9 |
Employers must complete Section 2 of Form I-9 in its entirety within three days of the employee’s date of hire. To complete Section 2, physically examine documents presented by the employee that establish his or her identity and employment authorization. Do not specify which documents from the “Lists of Acceptable Documents” on Form I-9 |
|
2.1.2 REHIRES |
2.1.2 REHIRES Employers must use E-Verify for rehired employees. However, E-Verify has special rules for rehired employees who previously provided a U.S. passport, a U.S. passport card, a Permanent Resident Card, an Alien Registration Receipt Card (Form I-551), a driver’s License or a state ID card for Form I-9 and the document is now expired. In these situations, employers have the options below:
REMINDER
|
Employers have the option of treating all rehired employees as new hires by completing a new Form I-9 and creating a case in E-Verify. However, employers also have the option of completing Section 3 for all rehires and only completing a new Form I-9 and creating an E-Verify case upon rehiring employees for whom no previous E-Verify cases were created. If you rehire a former employee within three years of the initial execution of the previous Form I-9, but did not create an E-Verify case, or if you created a case and did not receive a result of employment authorized, have the employee complete a new Form I-9 and create a case in E-Verify. If you rehire a former employee within three years of the date of the initial execution of the previous Form I-9, created a case from that Form I-9, and received a result of employment authorized, you may be able to rely on the information from the employee’s previous Form I-9. Follow the steps outlined below when rehiring an employee who previously had a case created in E-Verify and received an employment authorized result. If the previously created E-Verify case received a result of employment authorized and the Form I-9 has: Then: No expired documents Write the employee’s rehire date in Section 3 of the existing Form I-9. Do not create a new case in E-Verify. or Complete a new Form I-9 for the employee and create a new E-Verify case for the employee. An expired: • U.S. passport or • U.S. passport card or • Permanent Resident Card or • Alien Registration Receipt Card (Form I-551) • List B document Write the employee’s rehire date in Section 3 of the existing Form I-9. Do not create a case in E-Verify. or Complete a new Form I-9 for the employee and create a new E-Verify case for the employee. An expired List A or List C document that triggers reverification Write the employee’s rehire date and the updated employment authorization document information in Section 3 of the existing Form I-9. Do not create a case in E-Verify. or Complete a new Form I-9 for the employee and create a new E-Verify case for the employee. See the Handbook for Employers M-274, Section 5.2 Reverifying or Updating Employment Authorization for Rehired Employees for more information on rehires. REMINDER
|
|
2.1.2 REHIRES |
2.3 ERROR:UNEXPIRED DOCUMENT REQUIRED |
2.1.3 Unexpired Document Required |
|
2.1.3 Unexpired Document Required |
Employees must present unexpired documents for Form I-9 verification (see exception below). If the document entered into E-Verify is expired, E-Verify will reject the document information and not create a case. The employee will need to present acceptable unexpired document(s) and employers will need to update Form I-9 before they can create a case in E-Verify. Just because the employee presented an expired document does not mean that the employee is not authorized to work. If the employee provides unexpired documentation that is used to create another case, it is possible for E-Verify to confirm the employment eligibility of this employee. EXCEPTIONS: In limited situations, employers may accept a document that appears expired on its face for Form I-9 verification. Some foreign nationals who file a renewal application for an Employment Authorization Document (EAD) under certain eligibility categories may receive automatic extensions of their EAD. The extension begins on the date the EAD expires and continues for 180 days unless the application is denied. The employee’s EAD in combination with the Form I-797C, Notice of Action, showing the renewal application was timely filed and showing the same qualifying eligibility category as that on the previous EAD may extend the validity of the EAD for 180 days. Such document combinations are considered to be an unexpired EAD under List A. The receipt number on the Form I-797C should be entered as the document number when the case is created in E-Verify. NOTE: Not all EADs receive an auto-extension; only certain EADs issued with specific eligibility category codes qualify. See the Handbook for Employers: Guidance for Completing Form I-9 (M-274) or visit www.uscis.gov/I-9central for more information about which EAD category codes qualify for the auto-extension. When a Temporary Protected Status (TPS) designation for a particular country is authorized, DHS sometimes automatically extends the expiration date of the EAD issued to affected TPS beneficiaries via a notice published in the Federal Register. In this situation, the published notice will state the date to which the EAD has been extended. When such a document is presented for Form I-9 verification, the expiration date is the extended date that appears in the Federal Register notice. DHS also sometimes extends two-year Permanent Resident Cards (Form I-551) via Form I-797. The Permanent Resident Card with Form I-797 noting the extension can be presented as a List C document for Form I-9. In all other instances, the document presented with Form I-9 must be unexpired at the time the employee is hired. ERROR: UNEXPIRED DOCUMENT REQUIRED – PROCESS OVERVIEW
IMPORTANT: Generally, documents presented for Form I-9 must be unexpired. If an employee presents an expired document for Form I-9 purposes, check to make sure the document’s expiration date has not been extended (see exceptions above). If the document’s validity has not been extended, ask the employee for an unexpired document from the List of Acceptable Documents before creating a case in E-Verify |
Employees must present unexpired documents for Form I-9 verification (see exception below) and for the employer to create an E-Verify case. If an expired document is entered into E-Verify, it generates an error message and you will not be allowed to continue creating the case. The employee will need to present acceptable unexpired document(s) and employers will need to correct Form I-9 before they can create an E-Verify case. EXCEPTIONS: Just because the employee presented an expired document does not mean he or she is not authorized to work. If the employee provides unexpired documentation that is used to create another case, it may still be possible for E-Verify to confirm their employment eligibility. In limited situations, employers may accept a document that appears expired on its face for Form I-9 verification. Foreign nationals in certain eligibility categories who timely file a renewal application for an Employment Authorization Document (EAD) may receive an automatic extension of their EAD. The extension begins on the date the EAD expires and continues for up to 180 days unless the application is denied. The employee’s EAD may be combined with the Form I-797C, Notice of Action, showing both the renewal application was timely filed and the same qualifying eligibility category as that on the expired EAD, to demonstrate the extended validity of the EAD for 180 days. In the case of an EAD in category A12 or C19, Form I-797C can show either A12 or C19 and they do not have to match. This document combination is considered to be an unexpired EAD under List A. The receipt number on the Form I-797C should be entered as the document number when the case is created in E-Verify. NOTE: Not all EADs can receive an auto-extension; only EADs issued under specific eligibility category codes qualify. See Section 4.2 Automatic Extensions of Employment Authorization Documents (EADs) in Certain Circumstances in the Handbook for Employers (M-274) or visit www.uscis.gov/I-9central for more information about which EAD category codes qualify for the auto-extension. When a Temporary Protected Status (TPS) designation for a particular country is authorized, DHS may automatically extend the expiration date of the EAD issued to those TPS beneficiaries via a notice published in the Federal Register. In this situation, the published notice will state the date to which the EAD has been extended. If the notice is presented for Form I-9 completion, record the date the EAD has been automatically extended to as the expiration date. NOTE: The employee does not have to provide proof that they are a national of a country designated for TPS. DHS also sometimes extends two-year Permanent Resident Cards (Form I-551) via Form I-797. The Permanent Resident Card with Form I-797 noting the extension can be presented as a List C document for Form I-9. Additionally, a Permanent Resident Card with a USCIS - issued sticker extending its validity is a List A document. |
|
2.2 Create a Case |
Do not create a case for an employee hired before the effective date of the employer’s MOU. |
Do not create a case for an employee whose first day of employment is before the effective date of the employer’s MOU. |
|
HOW TO CREATE A CASE – PROCESS OVERVIEW |
From the E-Verify Welcome page find Cases and click: New Case |
From the E-Verify Welcome page, click the drop-down arrow next to Cases and select New Case. |
|
HOW TO CREATE A CASE – PROCESS OVERVIEW |
Enter the employee’s Form I-9 information. A red asterisk (*) in E‑Verify indicates a required field. Using information from Section 1 of Form I-9, enter all required information into each field. When the employee provides an email address on Form I-9, you must enter it into E‑Verify because E-Verify may send the employee email notifications with information about his or her E-Verify case. Click Continue. |
Enter the employee’s information from Section 1 of Form I-9. If you do not enter required information, E-Verify generates a field error message and you must enter the required information to continue with the case. When entering more than one last name into the Other Last Names Used field, press the Tab or Enter key after each last name is added. NOTE: If the employee provided an email address on Form I-9, you must enter it into E‑Verify. E-Verify may send the employee email notifications with information about his or her E‑Verify case. If the employee did not provide an email address on Form I-9, click the box next to No email address provided. Click Continue. |
|
HOW TO CREATE A CASE – PROCESS OVERVIEW |
From Section 1 of the employee’s Form I-9, choose the appropriate option. · A citizen of the United States · A noncitizen national of the United States · A lawful permanent resident · An alien authorized to work Click Continue. |
From Section 1 of the employee’s Form I-9, choose the appropriate option for Citizenship Status. · A citizen of the United States · A noncitizen national of the United States · A lawful permanent resident · An alien authorized to work Click Continue. |
|
HOW TO CREATE A CASE – PROCESS OVERVIEW |
Indicate which documents were provided in Section 2 of the employee’s Form I‑9. Make the appropriate selection and click Continue. If you select List B and C documents, E-Verify prompts you to select both documents presented by the employee in Section 2 of Form I-9. Click Continue. Important: If you select driver’s license or ID card, E-Verify will prompt you to select the document name and state. Make the appropriate selection and click Continue. IMPORTANT: If you select An alien authorized to work, you may also be required to indicate that you are entering either the Alien Number, Form I-94 number or foreign passport number from the employee’s Form I-9. Click Continue. Employer Case ID is an optional field for users who wish to assign an internal tracking code to a case. |
Click List A Document or List B & C Document, using information provided in Section 2 of the employee’s Form I-9. Then select the document or combination of documents provided in Section 2. Important: If you select driver’s license, E-Verify will prompt you to select the state. Enter the requested information and click Continue. |
|
HOW TO CREATE A CASE – PROCESS OVERVIEW |
Using information from Section 1 and 2 of Form I-9, enter all required information into each field. For more information on the Hire Date, see Section 2.2.1. Click Continue. |
Type the employee’s first day of employment recorded in Section 2 of Form I-9 into the Employee’s First Day of Employment field. Alternatively, you may click Today, 1 Day Ago, or 2 Days Ago and the corresponding date automatically populates in the Employee’s First Day of Employment field. If you select Other, the system requires you to manually enter the employee’s first day of employment. If the case is being created 3 or more days past the employee’s first day of employment, you must provide a reason for the delay. Select one of the following reasons from the drop-down menu: · Awaiting Social Security Number · Technical Problems · Audit Revealed that New Hire Was Not Run · Other · Federal Contractor with E-Verify Clause verifying an existing employee If Other is selected, E-Verify requires you to type the reason in the Reason for Delay text box. NOTE: If you enter a date more than 90 business days beyond the current date in the Employee’s First Day of Employment field, E-Verify displays an error message informing this date must be between 11/07/1986 and 90 business days in the future. Provide Visa Number when applicable. Employee ID is an optional field for users who wish to assign an internal tracking code to a case. If desired, enter a unique identifier assigned to this case. |
|
HOW TO CREATE A CASE – PROCESS OVERVIEW |
Each screen provides additional information simply by clicking any help text symbol. |
For additional information on each screen, click any help text symbol. |
| HOW TO CREATE A CASE - PROCESS OVERVIEW |
REMINDER
|
REMINDER
|
|
2.2.1 |
HIRE DATE |
EMPLOYEE’S FIRST DAY OF EMPLOYMENT |
| 2.2.1 |
The hire date is the first day of employment in exchange for wages or other remuneration (or “work for pay”). On Form I-9, it is referred to as the employee’s first day of employment. For the hire date in E-Verify, enter the employee’s first day of employment date from the Certification in Section 2 of the employee’s Form I-9, circled below |
The employee’s first day of employment is the date the employee begins working in exchange for wages or other remuneration. The employee’s first day of employment is recorded in Section 2 of Form I-9. |
| 2.2.1 |
If Form I-9 is completed after the employee accepts the offer of employment, but before the actual start of work for pay, it is possible that the hire date recorded on Form I-9 will change after the employer created the case in E-Verify. If this happens, no additional action is required in E-Verify as the hire date cannot be changed once the case has been created. However, employers should correct the date originally indicated as the employee’s first day of employment in the certification block in Section 2 on the employee’s Form I-9 if the employee’s hire date changes. Consult the Handbook for Employers: Guidance for Completing Form I-9 (M-274) or visit www.uscis.gov/i-9central for more information. Employees hired on or before November 6, 1986, are not subject to Form I-9. Therefore, employers may not create E-Verify cases for these employees based on this employment. Individuals hired for employment in the Commonwealth of the Northern Mariana Islands (CNMI) on or before November 27, 2009, are also not subject to Form I-9 and their employers may not create cases in E-Verify for them based on this employment. |
If Form I-9 is completed after the employee accepts the offer of employment, but before the actual start of work for pay or other remuneration, it is possible that the first day of employment recorded on Form I-9 could change after the employer created the case in E-Verify. If this happens, no additional action is required in E‑Verify as the first day of employment cannot be changed once the case has been submitted. If the employee’s first day of employment changes, employers should correct the date originally indicated as the employee’s first day of employment in the certification block in Section 2 on the employee’s Form I-9. Consult the Handbook for Employers (M-274) or visit www.uscis.gov/i-9central for more information. Employees whose first day of employment was on or before November 6, 1986, are not subject to Form I-9. Therefore, employers may not create E-Verify cases for these employees based on this employment. Individuals hired for employment in the Commonwealth of the Northern Mariana Islands (CNMI) on or before November 27, 2009, are not subject to Form I-9 and their employers may not create cases in E-Verify for them based on this employment. |
|
2.2.2 E-Verify Photo Matching |
If an employee presented one of the first four List A documents for Form I-9 verification, photo matching will prompt the E-Verify user to compare the employee’s photo document with a photo displayed during creation of the E-Verify case. This helps ensure that the document the employee provided matches records available to DHS. The four List A documents that will trigger photo matching are the U.S. passport, passport card, Permanent Resident Card (Form I-551) and Employment Authorization Document (Form I-766). When the employee presents one of these documents, employers must copy the document and retain it with Form I-9. If the employee’s Form I-9 information matches records available to DHS, E-Verify displays the employee’s photo from the document presented. |
E-Verify photo matching will prompt the E-Verify user to compare the employee’s photo document with a photo displayed during creation of the E‑Verify case. This helps ensure that the document the employee provided matches records available to DHS. The four List A documents that will trigger photo matching are the U.S. passport, passport card, Permanent Resident Card (Form I-551) and Employment Authorization Document (Form I-766). When the employee presents one of these documents, employers must copy the front and back of the document (or in the case of a U.S. passport, copy the Passport ID page and the Passport Barcode page) and retain the copies with Form I-9. If the employee’s Form I-9 information matches records available to DHS, E-Verify displays the employee’s photo from the document presented. |
|
PHOTO MATCHING-PROCESS OVERVIEW |
No – the photo on the employee’s actual document or a copy does not match the photo displayed in E‑Verify. NOTE: If No Photo on this Document appears, select Yes.
NOTE: If you do not make a selection and click Continue, the case will receive a status of Photo Matching Required. To search for a case, see Section 4.2 Case Alerts. IMPORTANT: Compare the photo displayed in E-Verify with the employee’s Form I-9 photo document, not to the actual employee. |
o Yes, this photo matches – The photo on the employee’s actual document or a copy matches the photo displayed by E-Verify. Clothing, hair style, facing direction and appearance on the card should be identical to the photo displayed by E‑Verify. o No, this photo does not match – The photo on the employee’s actual document or a copy does not match the photo displayed in E‑Verify. o No photo displayed No photo was displayed for the E-Verify user to compare with the employee’s document provided. This option should be selected when E‑Verify either displays no photo or it displays an image of something other than a photo of a person, such as an image of a document. NOTE: If you do not make a selection and click Continue to Case Results, the case will receive a status of Case Incomplete. See Section 4.2 Case Alerts and View/Search Cases for guidance on how to search for and view existing cases in E-Verify.
NOTE: For most documents presented, E-Verify requests an image of both the front and back. If you are entering a U.S. passport or passport card, E-Verify will request an image of the Passport ID page and the Passport Barcode page.
|
|
PHOTO MATCHING-PROCESS OVERVIEW |
SSA OR DHS TENTATIVE NONCONFIRMATION (MISMATCH), Section 3.3 |
TENTATIVE NONCONFIRMATION (MISMATCH), Section 3.3 |
|
2.2.3 |
2.2.3 CHECK INFORMATION |
2.2.3 REVIEW CASE AND ARE YOU SURE? ALERT |
|
REVIEW CASE-ARE YOU SURE? ALERT |
If the information entered does not immediately match SSA and/or DHS records, the Check Information screen appears so the user can confirm that the information was entered correctly. The user may either confirm that the information matches Form I-9 or change the information in certain fields if the information was entered incorrectly. Follow the steps in the Check Information – Process Overview. |
Users are prompted to review and confirm that the information entered is correct and may edit case details before submitting the case. If the information entered does not immediately match records available to SSA and/or DHS, the Review Case – Are You Sure? screen appears so the user can confirm that the information entered matches the Form I-9. Users may either confirm that the information matches Form I-9 or change the information in the prompted fields if the information was entered incorrectly. Follow the steps in the Review Case – Process Overview. |
|
2.2.3 |
CHECK INFORMATION-PROCESS OVERVIEW |
REVIEW CASE - PROCESS OVERVIEW |
|
2.2.3 REVIEW CASE - PROCESS OVERVIEW |
NOTE: If you do not click Continue or Close Case, the case will receive a status of Case Incomplete. To search for a case, see Section 4.2 Case Alerts. |
NOTE: If you need more time to verify the information is correct, you may click Save & Exit to exit this case. You can locate the case later under View/Search Cases.
If you do not select an option, a message will appear instructing you to select an option before you can continue. If you need more time to verify the information is correct, you may click Save & Exit to exit this case. You can locate the case later under View/Search Cases. If you do not click Continue to Case Results or Save & Exit, the case will receive a status of Case Incomplete. See Section 4.2 Case Alerts and View/Search Cases for guidance on how to search for and view existing cases in E-Verify. |
|
2.3 |
2.5 DUPLICATE CASE ALERT |
2.3 Duplicate Cases Found Alert |
|
2.3 Duplicate Cases Found Alert |
A duplicate case alert appears for a case that contains the same Social Security number of a previous case entered for the same employer account. A duplicate case alert can occur for several reasons. Receiving a duplicate case alert does not necessarily mean that you should not proceed with the new case and close it. There may be instances when the employer must create a new case for the same employee, such as in the case of a rehire or if the previous case contains incorrect information. Review the situation and decide whether to continue with the case. Follow the steps in the Duplicate Case Alert – Process Overview. |
A duplicate cases found alert appears for a case that contains the same information found in one or more cases created within the last 30 days under the same employer account. Receiving a duplicate cases found alert does not necessarily mean that you should not proceed with the new case you are creating. There may be valid reasons for an employer to create a new case for the same employee, such as if the previous case contains incorrect information. However, all cases must be closed in order for the cases to be considered complete. Review the situation and decide whether to continue with the present case and close any open duplicate cases that may have been created in error. Follow the steps in the Duplicate Cases Found Alert – Process Overview. |
|
DUPLICATE CASES FOUND ALERT – PROCESS OVERVIEW |
|
NOTE: Program administrators and general users can update and close all cases previously created under the same employer account, regardless of who created the case.
|
|
3.0 CASE RESULTS CASE RESULTS OVERVIEW |
Employment Authorized The employee’s information matched records available to SSA and/or DHS. E-Verify Needs More Time This case was referred to DHS for further verification. SSA or DHS Tentative Nonconfirmation (MISMATCH) Information did not match records available to SSA and/or DHS. Additional action is required. SSA or DHS Case in Continuance The employee has visited an SSA field office or contacted DHS, but more time is needed to determine a final case result. SSA or DHS Final Nonconfirmation E-Verify cannot confirm an employee’s employment eligibility after the employee visited SSA or contacted DHS. DHS No Show The employee did not contact DHS within eight federal government working days. |
Employment Authorized The employee’s information matched records available to SSA and/or DHS. E-Verify Needs More Time This case was referred to DHS for further verification. Tentative Nonconfirmation (MISMATCH) Information did not match records available to SSA and/or DHS. Additional action is required. Case in Continuance The employee has visited an SSA field office or contacted DHS, but more time is needed to determine a final case result. Close Case and Resubmit SSA or DHS requires that you close the case and create a new case for this employee. This result may be issued when the employee’s U.S. passport, passport card, or driver’s license information is incorrect. Final Nonconfirmation E-Verify cannot confirm the employee’s employment eligibility after the employee visited SSA or contacted DHS. |
|
3.1 Employment Authorized |
An initial case result of Employment Authorized is the most common and simple case result in E-Verify. Employment Authorized means that the information entered into E-Verify matched records available to SSA and/or DHS and that E‑Verify confirmed the employment eligibility of the employee whose information was entered. However, a case that is Employment Authorized is still considered incomplete until it is closed. Follow the steps outlined in the Employment Authorized - Process Overview. |
Most E-Verify cases receive a case result of Employment Authorized. Employment Authorized means that the information entered into E-Verify matched records available to SSA and/or DHS confirming employment eligibility of the employee whose information was entered. E-Verify automatically closes cases resulting in Employment Authorized. You can locate the closed case and view case details in View/Search Cases. See Section 4.2 Case Alerts and View/Search cases for guidance on how to search for and view existing cases in E-Verify. At this stage, you should record the case number on this employee’s Form I-9 or print out the Case Details page and attach it to the Form I-9. NOTE: Automatic closure only applies to employers directly accessing E-Verify to create cases. If you are using web service software to create cases, you must manually close all cases, including cases resulting in employment authorized. |
|
EMPLOYMENT AUTHORIZED – PROCESS OVERVIEW |
A case result of Employment Authorized requires the important step of closing the case. Employers must close each case; this does not happen automatically. Closing the case removes it from the active cases list or the Open Cases to be Closed list. To close each case, follow the steps outlined in Section 4.1 Close Case. |
|
|
EMPLOYMENT AUTHORIZED SUMMARY |
EMPLOYMENT AUTHORIZED SUMMARY EMPLOYER ACTION · Enter Form I-9 information into E-Verify · Receive Employment Authorized case result · Ensure that the information displayed in E-Verify matches the employee’s Form I-9 · Close case EMPLOYEE ACTION · None |
|
|
3.1.1 EMPLOYMENT AUTHORIZED- Request Name Review |
In some cases E-Verify issues a case result of Employment Authorized, but the name returned in E-Verify does not match exactly the name on Form I-9. This happens when the information matches, but there are name variations in DHS records. In this case, request a review of the employee’s name so E-Verify can issue a final case result. To request a name review, follow the steps outlined in the Request Name Review - Process Overview. IMPORTANT: Do not use this functionality in a discriminatory manner (e.g., based on an individual’s race, national origin or ethnicity). REQUEST NAME REVIEW-PROCESS OVERVIEW
A case sent to DHS for name review will be updated with one of the following results: EMPLOYMENT AUTHORIZED, Section 3.1 SSA and DHS TENTATIVE NONCONFIRMATION (MISMATCH), Section 3.3 Each case result requires different actions or steps to continue or close the case. These actions are outlined in the case result sections throughout this manual. REQUEST NAME REVIEW SUMMARY EMPLOYER ACTION · Determine if a name review is required (if not required, close case) · Click Continue · Input reason for name review request in Comments field · Click Continue · Follow steps outlined in E-Verify Needs More Time EMPLOYEE ACTION · None |
|
|
3.2 |
3.2 E-Verify Needs More Time |
3.2 E-Verify Needs More Time |
|
3.2 E-Verify Needs More Time |
A case result of E-Verify Needs More Time means that the information did not match records available to DHS. The case is automatically referred to DHS for further verification. DHS will respond to most of these cases within 24 hours, although some responses may take up to three federal government working days. No action is required by either the employer or employee at this time, but employers can check E-Verify daily for a response. See E-Verify Needs More– Process Overview. |
A case result of E-Verify Needs More Time means that DHS cannot verify the data and needs more time. The case is automatically referred for further verification. DHS will respond to most of these cases within 24 hours, although some responses may take up to 3 federal government working days. No action is required by either you or the employee at this time, but you can check E-Verify daily for a response. See E-Verify Needs More Time – Process Overview. |
|
3.2 E-Verify Needs More Time |
E-VERIFY NEEDS MORE TIME – PROCESS OVERVIEW
Follow the next step based on the case result provided. |
E-Verify Needs More Time– PROCESS OVERVIEW
Follow the next step based on the case result provided. |
|
3.2 E-Verify Needs More |
After the three federal government working days, a E-Verify Needs More case result will provide one of the following case results: EMPLOYMENT AUTHORIZED, Section 3.1 SSA or DHS TENTATIVE NONCONFIRMATION (MISMATCH), Section 3.3 SSA or DHS CASE IN CONTINUANCE, Section 3.4 |
After the 3 federal government working days, an E-Verify Needs More Time case result will provide one of the following case results: EMPLOYMENT AUTHORIZED, Section 3.1 TENTATIVE NONCONFIRMATION (MISMATCH), Section 3.3 CASE IN CONTINUANCE, Section 3.4 |
|
3.2 E-Verify Needs More |
E-Verify Needs More Summary EMPLOYER ACTION · Check E-Verify for case result updates · Follow next steps based on case result provided EMPLOYEE ACTION · None |
E-VERIFY NEEDS MORE TIME SUMMARY EMPLOYER ACTION · Check E-Verify for case result updates · Follow next steps based on case result provided · An employer may not take adverse action against an employee because of a E-Verify Needs More Time result EMPLOYEE ACTION · None |
|
3.3 |
3.3 SSA or DHS Tentative Nonconfirmation (MISMATCH) |
3.3 Tentative Nonconfirmation (MISMATCH) |
|
3.3 Tentative Nonconfirmation (Mismatch) |
An SSA Mismatch means that the information entered into E-Verify does not match SSA records. A DHS mismatch means that the information entered into E-Verify does not match records available to DHS. E‑Verify identifies the agency associated with the mismatch when the mismatch result is provided. Reasons a case may get an SSA Mismatch case result include the following: |
A mismatch means that the information entered into E-Verify does not match records available to SSA and/or DHS. It is possible for an employee to receive a dual mismatch, which means the case received a mismatch result from both agencies at the same time because information entered into E-Verify does not match records available to both SSA and DHS. E‑Verify identifies the agency or agencies associated with the mismatch in the mismatch Further Action Notice. A mismatch for an information mismatch against SSA records may result because of the following reasons: |
|
3.3 Tentative Nonconfirmation (MISMATCH) |
A case can result in a DHS Mismatch because the employee’s: |
A case can result in a mismatch with DHS because the employee’s: |
|
3.3 Tentative Nonconfirmation (Mismatch) |
If the employee chooses not to contest the mismatch, the employer may terminate employment with no civil or criminal liability as noted in “Responsibilities of the Employer,” Article II, Section A paragraph 8(a) of the MOU. |
If the employee chooses not to take action to resolve the mismatch, the employer may terminate employment with no civil or criminal liability as noted in “Responsibilities of the Employer,” Article II, Section A paragraph 13 of the MOU. |
|
3.3.1 |
3.3.1 Notify Employee of SSA or DHS Mismatch |
3.3.1 Notify Employee of Mismatch |
|
3.3.1 Notify Employee of Mismatch |
The employee must be notified of the SSA or DHS Mismatch result as soon as possible by following the steps in Notify Employee of SSA or DHS mismatch – Process Overview. |
The employee must be notified of the mismatch result as soon as possible by following the steps in Notify Employee of Mismatch – Process Overview. |
|
3.3.1 Notify Employee of Mismatch |
Receive SSA or DHS Mismatch case result. Click Continue. Select either English or Spanish and print the SSA or DHS MISMATCH Further Action Notice. Confirm that all information listed at the top of the SSA or DHS Mismatch Further Action Notice is correct. If information is incorrect, close the case and create a new case for the employee. When you close the original case, select the case closure statement, The case is being closed because the data entered is incorrect. If the information is correct, review the SSA or DHS Mismatch Further Action Notice with the employee in private and follow the instructions on page 1 of the SSA or DHS Mismatch Further Action Notice. If the employee cannot read, you must read the SSA or DHS Mismatch Further Action Notice to the employee. If the employee does not speak English as his or her primary language and has a limited ability to read or understand the English language, provide the employee with a translated version of the Further Action Notice in the appropriate language, which is available in View Essential Resources. IMPORTANT: You may provide the SSA or DHS Mismatch Further Action Notice to the employee in person, by fax, email, overnight or next-day delivery service, as long as you take proper precautions to ensure the employee’s information is protected. Indicate that the employee has been notified by selecting the box Confirm Employee Notification. Confirm whether the employee decided to contest the SSA or DHS Mismatch by following the steps in the Confirm Employee Decision – Process Overview. |
NOTIFY EMPLOYEE OF MISMATCH – PROCESS OVERVIEW Download and print the Further Action Notice. NOTE: The Further Action Notice prints in English by default, but may also be printed Spanish. · To print in English, click Download Further Action Notice. · To print in Spanish, click the down arrow next to English and select Spanish, then click Download Further Action Notice. Review the Further Action Notice with the employee in private and instruct the employee to confirm that the information listed at the top is correct. If the employee cannot read, you must read the Further Action Notice to the employee. If the employee does not speak English as his or her primary language and has a limited ability to read or understand the English language, provide the employee with a translated version of the Further Action Notice in the appropriate language, which is available in View Essential Resources. IMPORTANT: You may provide the Further Action Notice to the employee in person, by fax, email or overnight or next-day delivery service, as long as you take proper precautions to ensure the employee’s information is protected. Instruct the employee to indicate whether he or she will take action to resolve the Mismatch, then have the employee sign and date the Further Action Notice printed in English Provide the employee a copy of the signed Further Action Notice in English (and a translated version, if appropriate). Attach the original signed Further Action Notice to the employee’s Form I 9. |
| 3.3.1 Notify Employee of Mismatch |
NOTIFY EMPLOYEE OF SSA MISMATCH SUMMARY EMPLOYER ACTION · Privately notify employee of the SSA or DHS Mismatch · Print, review, sign and date the SSA or DHS Mismatch Further Action Notice EMPLOYEE ACTION · Confirm that the information on the SSA or DHS Mismatch Further Action Notice is correct |
NOTIFY EMPLOYEE OF MISMATCH SUMMARY EMPLOYER ACTION · Download and print the Further Action Notice and confirm that the information listed at the top is correct · Privately notify employee of the mismatch · Have employee review and confirm that his or her information listed at the top is correct · Instruct the employee to indicate his or her decision to take action or not and to sign and date the Further Action Notice · Provide the employee with a copy of the signed Further Action Notice in English (and a translated version, if appropriate) · Keep the original signed Further Action Notice on file with Form I-9 EMPLOYEE ACTION · Confirm that the information on the Further Action Notice is correct · Decide whether to take action to resolve the mismatch or not and indicate choice on the Further Action Notice · Acknowledge the mismatch case result by signing and dating Further Action Notice |
|
3.3.2 |
3.3.2 Confirm Employee Decision |
3.3.2 Confirm Employee Decision and refer Case |
|
3.3.2 Confirm Employee Decision and refer Case |
After being notified of the SSA or DHS mismatch and choosing whether to contest the case result, the employee acknowledges his or her decision on the SSA or DHS Mismatch Further Action Notice. Employees who choose to contest an SSA Mismatch are referred to the SSA. Follow the steps outlined in the Confirm Employee Decision – Process Overview. |
After you notify the employee of the mismatch and he or she decides whether to take action to resolve the case result, the employee should acknowledge his or her decision on the Further Action Notice. Employees who choose to take action on a mismatch are referred to SSA and/or DHS. If a dual mismatch is received, the employee will be referred to both SSA and DHS. Follow the steps outlined in the Confirm Employee Decision and Refer Case – Process Overview. An employee who chooses to take action to resolve an SSA Mismatch must visit an SSA field office within 8 federal government working days to begin resolving the mismatch. An employee who chooses to take action to resolve a DHS Mismatch must call DHS within 8 federal government working days to begin resolving the mismatch. An employee who chooses to take action to resolve a dual mismatch is only given 8 federal government work days to visit SSA and call DHS to begin resolving both mismatches. Federal government working days are Monday through Friday (except for federal holidays). Give the employee the Referral Date Confirmation from E-Verify. The Referral Date Confirmation provides the date by which the employee must visit SSA and/or call DHS. The employee should bring the mismatch Further Action Notice when he or she visits a SSA field office. If the photos do not match during E-Verify photo matching, a photo mismatch may result. A photo mismatch requires the employer to take an additional step to refer the case, but follows the same requirements of any mismatch. If the employee chooses to take action on the photo mismatch, the employer must refer the employee to DHS and provide a copy of the Form I-9 photo document to E‑Verify. |
| 3.3.2 |
Confirm employee decision– Process Overview |
Confirm employee decision and refer Case – Process Overview |
|
Confirm employee decision and REFER Case – Process Overview |
NOTE: If you indicate that the employee will take action to resolve the mismatch, the employee’s has 8 federal government working days from when you click Continue to visit SSA and/or call DHS. IF EMPLOYEE WILL TAKE ACTION TO RESOLVE MISMATCH:
o To download/print in English, click Download Referral Date Confirmation. o To download/print in Spanish, click the down-arrow next to English and select Spanish, then click Download Referral Date Confirmation.
For some mismatch cases, E-Verify prompts you to submit a copy of the employee’s photo document to DHS. Follow the steps below if prompted.
Note: If the employee cannot read, you must read the Referral Date Confirmation to the employee. Provide employees who do not speak English as their primary language, or have a limited ability to read or understand the English language, with a translated version of this confirmation in the appropriate language. Additional languages are available in Other Resources under Resources/View Essential Resources in E-Verify. IMPORTANT: Close the caseonlyafter E-Verify provides a final case result or if you no longer need to continue to confirm the employment eligibility of the employee. If you determine information in the case is incorrect and the case should be closed, select the option indicating the employee will not take action. The case will receive a Final Nonconfirmation result and you will be allowed to select an option indicating the case information was entered incorrectly. IF EMPLOYEE WILL NOT TAKE ACTION TO RESOLVE THE MISMATCH:
NOTE: If you click Continue to close the case, E-Verify displays an updated case status of Final Nonconfirmation.
NOTE: See Section 4.1 Close Case – Process Overview for additional guidance on closing a case that received a Final Nonconfirmation result. |
|
|
Confirm employee decision and REFER Case – Process Overview |
SSA or DHS has 10 federal government working days from the date the case was referred to update the case result in E‑Verify. Check E-Verify periodically for an update in the case result. A case referred to SSA or DHS is updated with one the following results: EMPLOYMENT AUTHORIZED, Section 3.1 E-VERIFY NEEDS MORE TIME, Section 3.2 CASE IN CONTINUANCE, Section 3.4 FINAL NONCONFIRMATION, Section 3.5 CLOSE CASE AND RESUBMIT, Section 3.6 Each case result requires different actions or steps to continue or close the case. These actions are outlined in the case result sections throughout this manual. |
|
|
Confirm employee decision and REFER Case – Process Overview |
CONFIRM EMPLOYEE DECISION SUMMARY EMPLOYER ACTION · Instruct the employee to indicate his or her decision to contest or not contest and sign and date the SSA Mismatch Further Action Notice, then sign and date as the employer · Provide to the employee a copy of the signed SSA Mismatch Further Action Notice in English (and a translated version, if appropriate) · Keep the original signed SSA Mismatch Further Action Notice on file with Form I-9 · Take the next action based on the employee’s decision to contest or not contest the SSA or DHS Mismatch EMPLOYEE ACTION · Decide to contest or not contest and indicate choice on the SSA or DHS Mismatch Further Action Notice · Acknowledge the SSA or DHS Mismatch case result by signing and dating SSA or DHS Mismatch Further Action Notice · Take next action based on decision to contest or not to contest |
CONFIRM EMPLOYEE DECISION AND REFER CASE SUMMARY EMPLOYER ACTION · Take next steps in E-Verify based on the employee’s decision to take action or not to resolve the mismatch · If referred, print the Referral Date Confirmation, provide it to the employee and attach a copy to the employee’s Form I-9 · If not referred, close the case. · Check E-Verify for case result updates and follow steps based on case result provided EMPLOYEE ACTION · Take next steps based on decision to take action or not to resolve · If referred, visit a SSA field office and/or contact DHS within 8 federal government working days and present the Further Action Notice and applicable original documents listed on the Further Action Notice · Follow SSA or DHS instructions for next steps |
|
3.3.3 Refer Employee to SSA or DHS |
An employee who chooses to contest an SSA Mismatch must visit an SSA field office within eight federal government working days to begin resolving the mismatch. An employee who chooses to contest a DHS Mismatch must call DHS within eight federal government working days to begin resolving the mismatch. Give the employee the Referral Date Confirmation from E-Verify. The Referral Date Confirmation provides the date by which the employee must visit SSA or call DHS. The employee should bring the SSA Mismatch Further Action Notice when he or she visits an SSA field office. Federal government working days are Monday through Friday (except for federal holidays). If the employer fails to match photos during E-Verify photo matching, a photo mismatch may result. A photo mismatch requires the employer to take an additional step to refer the case but follows the same requirements of any mismatch. If the employee chooses to contest the photo mismatch, the employer must refer the employee to DHS and send a copy of the Form I-9 photo document to E‑Verify. Follow the steps outlined in the Refer Employee to SSA – Process Overview to complete the mismatch process. REFER EMPLOYEE TO SSA OR DHS – PROCESS OVERVIEW If the employee chooses to contest the SSA or DHS mismatch, click Refer Case. NOTE: The employee’s obligation to visit an SSA field office or call DHS within eight federal government working days begins when you click Refer Case. For some DHS Mismatch cases, E-Verify prompts you to submit a copy of the employee’s photo document to DHS. Follow the steps below to complete this step when prompted. First, make sure you have a copy of the employee’s Form I-9 photo document. You may submit an electronic copy or send a paper copy by selecting one of the following: • Scan and attach a copy of Employee’s Photo Document OR • Mail a copy of Employee’s Photo Document If you chose to mail a paper copy, send it through express mail to the address below: U.S. Department of Homeland Security (USCIS) 10 Fountain Plaza, 3rd Floor Attn: Status Verification Unit – Photo Matching Buffalo, NY 14202 DHS will not pay for any shipping costs. Participants are free to choose an express shipping carrier at their own expense. If the employee chooses not to contest, click Close Case and follow steps in Section 4.1 Close Case. Select the Referral Date Confirmation in either English or Spanish and click Print Confirmation. Provide the Referral Date Confirmation to the employee. If the employee cannot read, you must read the Referral Date Confirmation to the employee. If the employee does not speak English as his or her primary language and has a limited ability to read or understand the English language, provide the employee with a translated version of this confirmation in the appropriate language, which is available in View Essential Resources under Resources in E-Verify. Attach a copy of the Referral Date Confirmation to the employee’s Form I-9. Check E-Verify for case updates and follow steps based on next case result. IMPORTANT: Close the case only when E-Verify provides a final case result or if you no longer need to continue to verify the employment eligibility of the employee. SSA or DHS has 10 federal government working days to update the case result in E‑Verify. Check E-Verify periodically for an update in the case result. A case referred to SSA or DHS is updated with one the following results: EMPLOYMENT AUTHORIZED, Section 3.1 E-VERIFY NEEDS MORE, Section 3.2 SSA or DHS CASE IN CONTINUANCE, Section 3.4 SSA or DHS FINAL NONCONFIRMATION, Section 3.5 Each case result requires different actions or steps to continue or close the case. These actions are outlined in the case result sections throughout this manual. REFER EMPLOYEE TO SSA or DHS SUMMARY EMPLOYER ACTION · Print the Referral Date Confirmation, provide it to the employee and attach a copy to the employee’s Form I-9 · Check E-Verify for case result updates and follow steps based on case result provided EMPLOYEE ACTION · Visit an SSA field office or contact DHS within eight federal government working days and present the SSA Mismatch Further Action Notice and applicable original documents listed on Page 2 of the SSA Mismatch Further Action Notice · SSA or DHS instructs employee of next steps |
|
|
REVIEW AND UPDATE EMPLOYEE DATA |
3.3.4 REVIEW AND UPDATE EMPLOYEE DATA If SSA finds a discrepancy in the information it received in the E-Verify referral, E Verify will issue a prompt for the employer to review and update the employee’s information. A Review and Update Employee Data case result occurs for reasons including typographical errors and/or incorrect information provided on Form I-9. This requires the employer to review Form I-9 with the employee make any necessary corrections on Form I-9, and update the information in the E-Verify case. IMPORTANT: You may only update a case once. Ensure that the changes are correct before updating the case. A case that is resubmitted to SSA will have one of the following case results: EMPLOYMENT AUTHORIZED, Section 3.1 E-VERIFY NEEDS MORE, Section 3.2 SSA or DHS TENTATIVE NONCONFIRMATION (MISMATCH), Section 3.3 SSA or DHS FINAL NONCONFIRMATION, Section 3.5 REVIEW AND UPDATE EMPLOYEE DATA SUMMARY EMPLOYER ACTION · Review the information on Form I-9 and E-Verify with the employee for accuracy and make any necessary changes on Form I-9 · Access the employee’s case · If necessary, update the employee’s information in the fields provided · Click Continue · Follow steps based on case result provided EMPLOYEE ACTION · Ensure that the information provided in Section 1 of Form I-9 is accurate and make any necessary corrections |
|
|
3.4 |
3.4 SSA or DHS Case in Continuance |
3.4 Case in Continuance |
|
Case in Continuance |
A SSA or DHS Case in Continuance status indicates that the employee has visited an SSA field office and/or contacted DHS, but more time is needed to determine a final case result. |
A Case in Continuance status indicates that the employee has visited an SSA field office and/or contacted DHS, but more time is needed to determine a final case result. |
|
Case in Continuance |
Once SSA or DHS has updated E-Verify, the case will have one of the following results: EMPLOYMENT AUTHORIZED, Section 3.1 E-VERIFY NEEDS MORE, Section 3.2 REVIEW AND UPDATE EMPLOYEE DATA, Section 3.3.4 SSA or DHS FINAL NONCONFIRMATION, Section 3.5 |
Once SSA or DHS has updated E-Verify, the case will have one of the following results: EMPLOYMENT AUTHORIZED, Section 3.1 E-VERIFY NEEDS MORE TIME, Section 3.2 CLOSE CASE AND RESUBMIT, Section 3.5 FINAL NONCONFIRMATION, Section 3.6 |
|
CLOSE CASE AND RESUBMIT |
2.4 Close Case and Resubmit If the expiration date entered for the employee’s U.S. passport, passport card or driver’s license is incorrect, E-Verify prompts an Error: Close Case and Resubmit case result and processing of the case cannot continue. Because document information for a case that has already been submitted cannot be changed, the case must be closed and a new case created with correct information. The employer should select the closure statement option,The case is being closed because the data entered is incorrect, and close this case. Now, the employer can create a new case for this employee using the correct document expiration date. IMPORTANT: E‑Verify can confirm the employment eligibility of this employee once the new case is created and the correct document expiration date has been entered. |
3.5 CLOSE CASE AND RESUBMIT Your employee’s case may receive a Close Case and Resubmit case result if SSA and/or DHS are unable to process the case and confirm employment eligibility. The employer should close the case in E-Verify and create a new case. When the user clicks Close and Create a New Case, the case is automatically closed and E-Verify opens a new case for the user to begin entering the employee’s information from Form I-9. CLOSE CASE AND RESUBMIT SUMMARY EMPLOYER ACTION · Receive Close Case and Resubmit Case Result · Click Close and Create a New Case button. · Create new case EMPLOYEE ACTION · None |
|
Case in Continuance |
SSA or DHS Final Nonconfirmation |
3.6 Final Nonconfirmation |
|
Final Nonconfirmation |
An SSA or DHS Final Nonconfirmation case result is received when E-Verify cannot verify an employee’s employment eligibility after an employee has visited a SSA field office or contacted DHS during the mismatch referral process. Employers must close the case once a case result of SSA or DHS Final Nonconfirmation has been provided. The employer may terminate employment based on a case result of SSA or DHS Final Nonconfirmation with no civil or criminal liability as noted in “Responsibilities of the Employer,” Article II, Section A, paragraph 8(a) of the MOU. |
A case receives a Final Nonconfirmation case result when E-Verify cannot confirm an employee’s employment eligibility after: · The employee has visited a SSA field office and/or contacted DHS during the mismatch referral process, OR · The employee failed to visit SSA and/or call DHS within 8 federal government working days. Employers must close the case once a case receives a Final Nonconfirmation result. The employer may terminate employment based on a case result of Final Nonconfirmation with no civil or criminal liability as noted in “Responsibilities of the Employer,” Article II, Section A, paragraph 13 of the MOU. |
|
Final Nonconfirmation |
SSA/DHS FINAL NONCONFIRMATION SUMMARY EMPLOYER ACTION · Receive SSA or DHS Final Nonconfirmation case result · Close case EMPLOYEE ACTION · None |
FINAL NONCONFIRMATION SUMMARY EMPLOYER ACTION · Receive Final Nonconfirmation case result · Close case EMPLOYEE ACTION · None |
|
3.6 DHS No Show |
3.6 DHS No Show A DHS No Show case result indicates that the employee did not contact DHS within eight federal government working days and is considered a Final Nonconfirmation. Employers must close E-Verify cases when they receive a Final Nonconfirmation. Employers may terminate employment based on a case result of DHS No Show with no civil or criminal liability as noted in “Responsibilities of the Employer,” Article II, Section A, paragraph 8(a) in the MOU. DHS NO SHOW SUMMARY EMPLOYER ACTION · Receive DHS No Show case result · Close case EMPLOYEE ACTION · None |
|
|
4.1 Close Case |
To properly complete the E-Verify process, employers must close every case they create. To assist employers in making the correct choice and to reduce the number of options, E-Verify requires employers to state whether the employee is still employed. To close a case, employers follow the steps outlined in the Close Case – Process Overview. Click Close Case. Next, indicate whether the employee is still employed. Select Yes or No and click Continue. Your response to the question “Is (employee’s name) currently employed with this company?” will determine which case closure statement options will appear on the next screen. Next, select the most appropriate statement and click Continue. Next, select the most appropriate statement and click Continue. Record the E-Verify case number on the employee’s Form I-9, or print the case details and file it with the employee’s Form I-9. This completes the E-Verify verification process. |
To properly complete the E-Verify process, employers must close every case they create, except for cases that result in Employment Authorized, which E-Verify will automatically close. Follow the steps outlined in the Close Case – Process Overview.
IF THE CASE RESULT IS EMPLOYMENT AUTHORIZED:
IF THE CASE RESULT IS FINAL NONCONFIRMATION: Click Close Case. Select the statement indicating whether or not you will continue to employ this individual. If you select the option indicating you will continue to employee this individual, you must provide the reason why. Type the reason in the text box provided. If you select the option indicating that neither of the above applies and you are closing this case for a different reason, you must select the reason you are closing the case. If Other is selected as the reason, you must type the reason in the text box provided.
IF THE CASE RESULT IS CLOSE CASE AND RESUBMIT: Click Close and Create New Case This case will be automatically closed and E-Verify will open a new case so you can enter the employee’s information from Form I-9 and create a new case. This completes the E-Verify verification process for the first case. |
|
4.1 Close Case |
Every case created in E-Verify must be closed. To close a case, select one of the case closure statements. E-Verify will present only the statements that are relevant to each case because not all of the case closure statements apply to every situation. |
Every case created in E-Verify must be closed. Some E-Verify case results require employers to provide additional information. When prompted, select the most appropriate statement displayed and type additional information when requested. E-Verify only presents statements that are relevant to each case because not all of the case closure reasons apply to every situation. |
|
4.1 Close Case |
NOTE – CLOSE CASE When answering the question, “Is the employee currently employed with this company?” it is important to consider the following: If the employee did not take action to resolve a mismatch or received a Final Nonconfirmation or DHS No Show, the employer must decide whether to allow the employee to continue working. If: · Employee’s employment is continued, select Yes. · Employee’s employment is to be terminated, select No. If the employee has accepted a job offer, but has not yet started work and received a mismatch which the employee decided not to contest, or received a Final Nonconfirmation, decide whether to allow the employee to start work. If the employer decides to: · Allow the employee to start work as planned, select Yes. · Rescind the employee’s employment offer, select No. |
|
|
4.1.1 Case Closure Statements |
E-Verify has verified that the employee is eligible to work in the United States and the employee continues to work for the employer.
E-Verify could not verify that this employee is authorized to work in the United States. The employee contested the Tentative Nonconfirmation (mismatch), but was unable to resolve it and a Final Nonconfirmation was issued in E-Verify. The employer chooses to allow the employee to continue to work.
E-Verify could not verify that this employee is authorized to work in the United States. The employee contested the Tentative Nonconfirmation (Mismatch), but did not take action to resolve it and a ‘DHS No Show’ result was issued in E-Verify. The employer chooses to allow the employee to continue to work.
E-Verify could not verify that this employee is authorized to work in the United States. The employee chose not to contest the Tentative Nonconfirmation (Mismatch). The employer chooses to allow the employee to continue to work.
E-Verify could not verify that this employee is authorized to work in the United States. The employee had contested the Tentative Nonconfirmation (Mismatch), but was unable to resolve it. The employer terminated the employee after the Final Nonconfirmation result.
E-Verify could not verify that this employee is authorized to work in the United States. The employee contested the Tentative Nonconfirmation (Mismatch), but did not take action to resolve it and a ‘DHS No Show’ result was issued in E-Verify. The employer terminated the employee after receiving the ‘DHS No Show’ result.
E-Verify could not verify that this employee is authorized to work in the United States. The employee chose not to contest the Tentative Nonconfirmation (Mismatch). The employer terminated the employee after the employee chose not to take action to resolve the mismatch.
The employee chose to stop working for the employer.
The employer terminated the employee for reasons unrelated to E-Verify.
This case is being closed because of technical issues with E-Verify. E-Verify was unable to process this case due to a technical issue. The employer is closing this case and needs to create a new case.
An E-Verify case with the same data was already created for this employee. This is a duplicate case. NOTE: If a case is closed because another case with the same data already exists, it does not void the case or change the case result. The case will still display the last case result even though it has been closed.
The data entered for this employee was not correct. NOTE: If a case is closed because the data entered is incorrect, it does not void the case or change the case result. The case will still display the last case result even though it has been closed.
The document presented by the employee for verification was expired. The employer is closing the case and needs to create a new case with an unexpired document.
The Department of Homeland Security (DHS) or Social Security Administration (SSA) instructed the employer to create a new case for this employee because E‑Verify was unavailable, or for another reason.
The employee is not available because they are no longer working for this employer for reasons unrelated to E-Verify. The Tentative Nonconfirmation (Mismatch) process could not be completed. The case is being closed because DHS or SSA instructed this employer to close the case. The employer was directed by DHS or SSA to close this case. |
|
|
4.1.1 Case Closure Statements |
CLOSE CASE SUMMARY EMPLOYER ACTION · Click Close Case · Indicate whether the employee is still employed · Select the appropriate case closure statement · Record E-Verify Case Number on Form I-9 or print screen and file it with Form I-9 · The E-Verify process is now completed EMPLOYEE ACTION · None |
|
|
4.2 |
4.2 Case Alerts |
4.2 Case Alerts AND VIEW/SEARCH CASES |
|
Case Alerts AND VIEW/SEARCH CASES |
The E-Verify home page indicates the number of cases that require attention by a number in a red circle on the alert. Each case alert can be accessed by clicking on the alert. Cases can also be accessed through View Cases and Search Cases from the navigation menu in E-Verify. Follow the steps outlined in the Case Alerts - Process Overview to use the case alerts feature. |
The E-Verify home page indicates the number of cases that require attention by a number in a red circle on the alert. Cases needing attention can be accessed by clicking on the alert or through View Cases and Search Cases from the navigation menu in E-Verify. Follow the steps outlined in the Case Alerts and View/Search Cases - Process Overview to use the case alerts feature. |
|
4.2 |
CASE ALERTS PROCESS OVERVIEW |
CASE ALERTS AND VIEW/SEARCH CASES – PROCESS OVERVIEW |
|
CASE ALERTS AND VIEW/SEARCH CASES – PROCESS OVERVIEW |
· E-Verify user homepage display with no case alerts. · Click on the alert requiring your attention to access your case alert(s). Case alerts can also be accessed: · From Cases, select Search Cases. · Determine your search criteria and click Search. |
CASE ALERTS CAN ALSO BE ACCESSED:
o Last Name o First Name o E-Verify Case Number o Alien Number o Social Security Number o I-94 Number o Passport Number
NOTE: If there are more cases than the screen can display, you will see blue arrows on the bottom right side of the screen. Click the right pointing arrow to page through all cases with the criteria you specified. Click the left pointing arrow to page back to the beginning of the list.
|
|
4.2.1 Open cases to be closed |
Any case created in E-Verify and assigned a E-Verify case number must be closed. The Open Cases to be Closed case alert provides quick access to all cases that need to be closed. Features of this tab include: Sort cases by: status, last name, first name, case number or hire date A quick link to each case by clicking on the case number |
Any E-Verify case assigned a E-Verify case number must be closed. The Open Cases to be Closed case alert provides quick access to all cases that must be closed. |
|
4.2.3 Work Authorization Documents Expiring |
The alert will appear in E-Verify 90 days prior to expiration and can be dismissed by the user. Also, the alert only appears the first time the document expires—subsequent expiration dates will not activate this case alert. |
This alert will only appear if the document the employee presented for the original E‑Verify case was either an Employment Authorization Document (Form I-766) or an Arrival-Departure Record (Form I-94). The alert will appear in E-Verify 90 days prior to expiration. Also, the alert only appears when the Form I-766 or Form I-94 used for the E-Verify case expires—subsequent expiration dates will not activate another case alert. Note: If you have employees who are Temporary Protected Status (TPS) beneficiaries who provided a TPS-related EAD when they first started working for you, you will receive a ‘‘Work Authorization Documents Expiring’’ case alert when the autoextension period for this EAD is about to expire. This alert indicates that at the end of the autoextension period, employment authorization must be reverified in Section 3 of Form I-9. Employers should not use E-Verify for reverification. |
|
Reports – Overview |
Corporate Overview of Pilot Usage This report displays the number of cases created by the employer within a federal government fiscal year, which begins Oct. 1 and ends Sept. 30 of the following calendar year. If the employer has not created any cases during the fiscal year, a report will appear with a total of zero. The report is available to corporate administrators and program administrators, but not general users. |
Corporate Overview of Pilot Usage This report displays the number of cases created by the employer within a federal government fiscal year, which begins Oct. 1 and ends Sept. 30 of the following calendar year. If the employer has not created any cases during the fiscal year, a report will appear with a total of zero. The report is available to corporate administrators and program administrators. |
|
Reports – Overview |
Historic Records Report This report provides case data about each resolved case that is 10 years or older. The case data includes basic company and case identifiers and case resolution information. The case data does not include sensitive employee information such as Social Security number or document number. This report is available to users for 3 months in the fall of each year. |
Historic Records Report This report provides case data about each resolved case that is 10 years or older. The case data includes basic company and case identifiers and case resolution information. The case data does not include sensitive employee information such as Social Security number or document number. This report is available to corporate administrators and program administrators for 3 months in the fall of each year. |
|
Reports – Overview |
Quick Audit Report This report provides case data about each case that matches the user-entered search criteria in the .csv file format. The case data includes basic company and case identifiers and case resolution information. The case data does not include sensitive employee information such as SSNs or document numbers. This report was designed to satisfy the requirement of employers to report their E Verify activity to federal, state, or local government entities. Users should note that this report may contain up to 5,000 rows and is populated with the city and state that is associated with their account. |
Quick Audit Report This report provides case data about each case that matches the user-entered search criteria in the .csv file format. The case data includes basic company and case identifiers and case resolution information. The case data does not include sensitive employee information such as SSNs or document numbers. This report was designed to satisfy the requirement of employers to report their E Verify activity to federal, state, or local government entities. Users should note that this report may contain up to 5,000 rows and is populated with the city and state that is associated with their account. This report is available to corporate administrators and program administrators. |
|
Reports – Overview |
User Roles |
Overview of user roles |
|
6.1 Overview of User Roles |
Permissions and functions in E-Verify granted to the user differ for each user role. There are two user roles: program administrator and general user. Every employer account must have at least one program administrator who provides support for the general user and manages the company profile. Employers can choose to have general users who will only be able to create and manage their own cases. General users and program administrators must successfully complete the online E‑Verify tutorial before they can create or manage cases. The User Role Functions Overview provides an explanation of the functions of each user role. |
Enrolled employers can assign their users with different permissions and functions, depending upon the user’s role. There are two types of users: program administrators and general users. Program administrators provide support for the general user and manage the company profile. Employers are required to have at least one program administrator, and can have as many program administrators as they choose. General users are only able to create and manage cases. Employers are not required to have general users, but can have as many general users as they choose. General users and program administrators must successfully complete the online E‑Verify tutorial before they can create or manage cases. Review the permissions of each user role in the User Role Overview below. |
|
USER ROLE OVERVIEW |
USER ROLE FUNCTIONS - OVERVIEW Program Administrator (at least one required) Add Users Unlock Users Update Cases View Cases Create Cases General User (optional) Update Cases View Cases Create Cases |
Program Administrator (at least one required) Every E-Verify account must have at least one program administrator. The program administrator is responsible for following all E Verify program rules and staying informed of changes to E Verify policies and procedures. The program administrator role includes functions of a general user. Permissions include: · Registering new users · Creating user accounts for other program administrators and general users · Creating and managing cases · Viewing reports · Updating profile information for other program administrators general users, and themselves · Unlocking user accounts · Closing company and user accounts General User (optional) Employers can have as many or no general users as they desire. The general user is responsible for following all E Verify program rules and staying informed of changes to E Verify policies and procedures. Permissions include: · Creating and managing cases · Viewing reports · Updating their own user profile |
|
6.2 User ID and Password Creation |
After creating a new password, E-Verify will prompt the user to confirm or update his or her email address and phone number. |
After creating a new password, E-Verify will prompt users to confirm their email address and telephone number, and provide updates, if necessary. |
|
7.3 Edit company profile |
Program administrators must maintain accurate company information in the company profile. The company profile should be updated whenever there is a change in any information contained in the company profile. |
|
|
7.3.1 Company Information Fields COMPANY INFORMATION OVERVIEW |
Total Hiring Sites Locations where your company’s employees are hired. Typically, a hiring site is where an employee completes Form I-9. |
|
|
7.3.2 Update Points of Contact |
Every employer must have at least one person assigned as a point of contact for E Verify issues. Program administrators added during account enrollment are automatically assigned as points of contact. To update the point of contact, see the Update Points of Contact – Process Overview. |
Every employer must have at least one person assigned as a point of contact for E‑Verify issues. Program administrators added during account enrollment are automatically assigned as points of contact. Employers should keep their point of contact information up-to-date. E-Verify will rely on this information if it ever needs to contact the employer. To update the point of contact information when it changes, see the Update Points of Contact – Process Overview. |
|
7.3.4 |
7.3.4 ADD NEW HIRING SITE(S) |
7.3.4 Update Hiring Site(s) |
|
Update Hiring Site(s) |
REMINDER If the employer has more than one E-Verify employer account and wishes that all accounts be terminated, the employer must make separate requests to terminate each employer account in order for them to all be closed. |
REMINDER Employers with more than one E-Verify employer account must make separate requests to terminate each employer account it wants terminated in order for them to all be closed. |
|
Appendix B: Glossary |
Alien (Noncitizen) An individual who is not a citizen or national of the United States |
Alien (Noncitizen) An individual who is not a citizen or national of the United States. “Foreign national” is a synonym and used outside of statutes when referring to noncitizens of the U.S. |
|
Appendix B: Glossary |
Case in Continuance This response is given if the SocialSecurity Administration (SSA) or the U.S. Department of Homeland Security (DHS) needs more than 10 federal government workdays to resolve a case. The employee continues to work until a final case status is provided in E-Verify from SSA or DHS. |
Case in Continuance This response is given if the Social Security Administration (SSA) or the U.S. Department of Homeland Security (DHS) needs more than 10 federal government working days to provide a final case result. The employer may not terminate or take adverse action against an employee because of the mismatch while SSA or DHS is reviewing the employee’s case. |
|
Appendix B: Glossary |
Close Case and Resubmit This case result means SSA or DHS needs the case to be closed and the employer should create and submit another case. This result may be issued when the employee’s U.S. Passport, Passport Card, or Driver’s License information is incorrect. |
|
|
Appendix B: Glossary |
Employment Authorization Document (Form I-766) A document issued to noncitizens that are authorized to work in the United States. The most recent version of the Employment Authorization Document (Form I-766) has been issued since January 1997 |
Employment Authorization Document (Form I-766) A document issued to noncitizens who are authorized to work in the United States. |
|
Appendix B: Glossary |
Final Nonconfirmation If an employee’s employment eligibility cannot be verified based on the information submitted to E-Verify, or the employee failed to visit SSA and/or call DHS within 8 federal government workdays after referral, the employer will receive a Final Nonconfirmation case result in E-Verify. An employer receiving a Final Nonconfirmation response may terminate the employee and will not be civilly or criminally liable for the termination, as long as the action was taken in good faith reliance on the information provided through E‑Verify as noted in in “Responsibilities of the Employer,” Article II, Section A paragraph 13 of the MOU. |
|
|
Appendix B: Glossary |
Further Action Notice The Further Action Notice must be provided to an employee who received a tentative nonconfirmation (mismatch) case result. The notice explains the mismatch and possible next steps and also provides the employee with instructions for contacting SSA or DHS to resolve the mismatch that caused the mismatch |
Further Action Notice A notice generated from E-Verify that the employer must give to an employee whose E-Verify case receives a Tentative Nonconfirmation (Mismatch). Employees who decide to take action to resolve the mismatch must contact or visit the appropriate agency within 8 Federal Government working days with this notice to initiate resolution of the E‑Verify case. |
|
Appendix B: Glossary |
Handbook for Employers: Instructions for Completing Form I-9 (M-274) Provides detailed instructions on how to complete and retain Form I-9. |
Handbook for Employers (M-274) Provides detailed instructions on how to complete and retain Form I-9, Employment Eligibility Verification. |
|
Appendix B: Glossary |
Hire Date Hire Date is also known as the employee’s first day of employment. Please see Employee’s First Day of Employment for more information. |
|
|
Appendix B: Glossary |
Interim Case Status Certain initial E-Verify results that require additional action before E-Verify can provide a final case result. Interim case results include Tentative Nonconfirmation (Mismatch), E-Verify Needs More Time, and Case in Continuance. |
|
|
Appendix B: Glossary |
Request Name Review In some cases E-Verify returns a case result of ‘Employment Authorized,’ but the name shown as authorized does not match exactly the name you entered into E-Verify from the employee’s Form I-9. This can happen because of name variations in U.S. Department of Homeland Security (DHS) records. If the names do not match, the case must be sent to DHS for review. Taking this step ensures that the record associated with the ‘Employment Authorized’ case result belongs to the employee whose information was entered into E-Verify. |
|
|
Appendix B: Glossary |
Review and Update Employee Data In some instances, a case status of ‘Review and Update Employee Data’ may occur. This means that the Social Security Administration (SSA) found a discrepancy in the information it received in the E-Verify referral. This may occur because of typographical errors and/or incorrect information on Form I-9. The Form I-9 will need to be reviewed with the employee, the information corrected as applicable and then the case may be resubmitted. |
2022 Changes
| Section | Old Term (Rev. 04/2022) | New Term (Rev. 05/2022) |
|---|---|---|
| Throughout | Tentative Nonconfirmation | Tentative Nonconfirmation (Mismatch) |
| Throughout | TNC | Mismatch |
| Throughout | Case Verification Number | E-Verify Case Number |
| Throughout | Contest | Take Action to Resolve |
| Section | Old Term (Rev. 04/2018) | New Term (Rev. 12/2022) |
|---|---|---|
| 7.3.3 Update Hiring Site(s) |
7.3.3 Update Hiring Site(s) A hiring site is the location where employees are hired and they complete Form I-9. Program administrators can modify the number of hiring sites that participate in E-Verify in each state. A participating hiring site means that an employer will create an E-Verify case for every newly hired employee who is hired and completes a Form I-9 at that site. The Company Hiring Sites page shows the states where the employer has hiring sites and the number of hiring sites for each state. Program administrators have the option to add hiring sites for a new state, edit the number of hiring sites in a state where the employer currently has participating hiring sites, or delete a state from the hiring site list. To add a new state where the employer will have participating hiring sites, see the Add New State Hiring Site - Process Overview. |
7.3.3 Hiring Site(s) The Edit Hiring Sites page shows the states where the employer has hiring sites and the number of hiring sites for each state. Program administrators can add hiring sites for a new state, edit the number of hiring sites in a state where the employer currently has participating hiring sites, delete a state from the hiring site list, or use bulk upload to add multiple hiring sites. To add a new state where the employer will have participating hiring sites, edit, or delete hiring sites and use bulk upload see the Update Hiring Site(s) – Process Overview. |
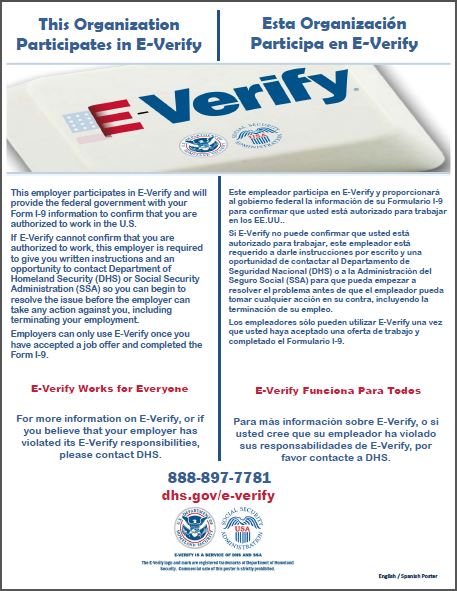
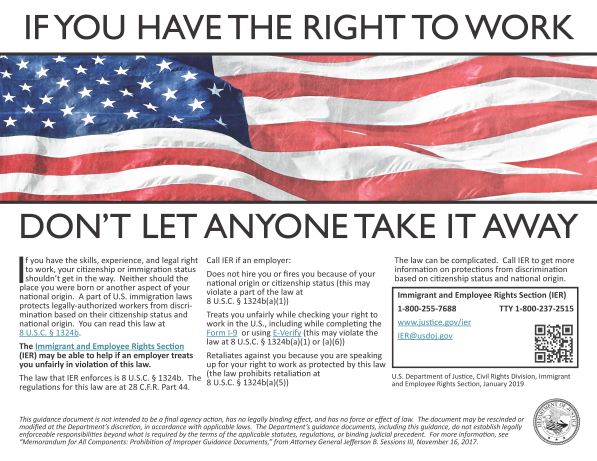
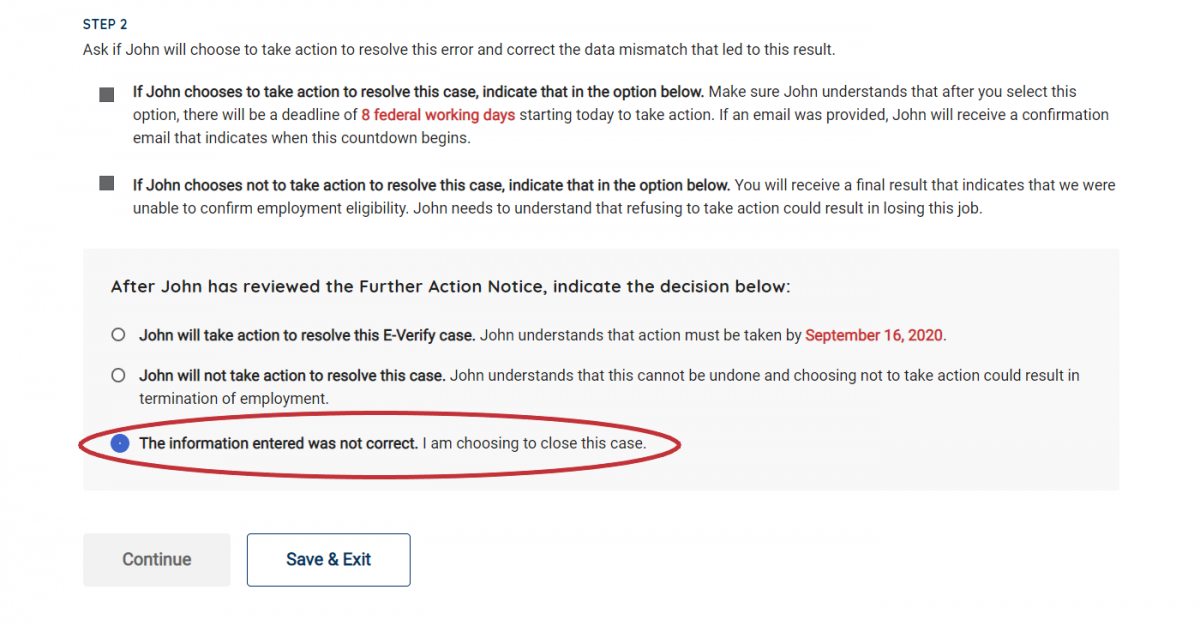
 Follow
  Specify or request which
 Complete