When you enroll your company, you need to share some basic information and agree to follow the rules of E-Verify. You will enroll your company just once and, after you do, you can register yourself and others to use E-Verify. See the Enrollment Process – Overview below along with the explanation of each step in the process.
Enrollment Process Overview
- Enter your email to receive a link to set up your account
- Determine your account access
- Select your Employer category
- Enter your company information
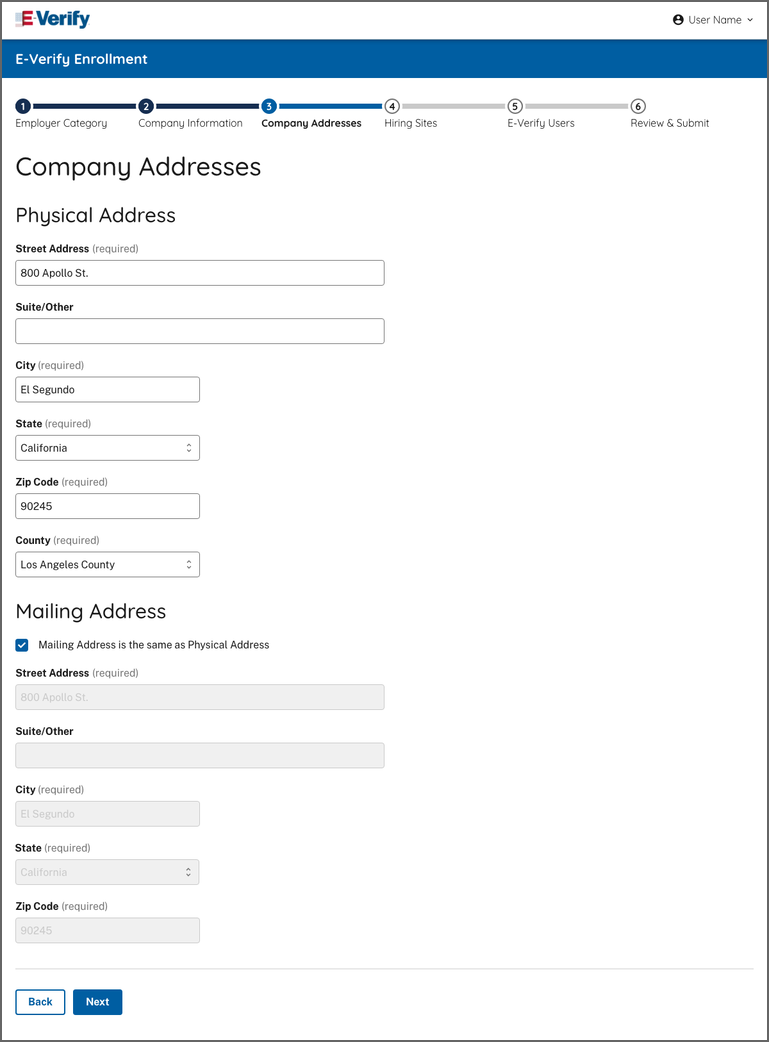
- Enter your company addresses
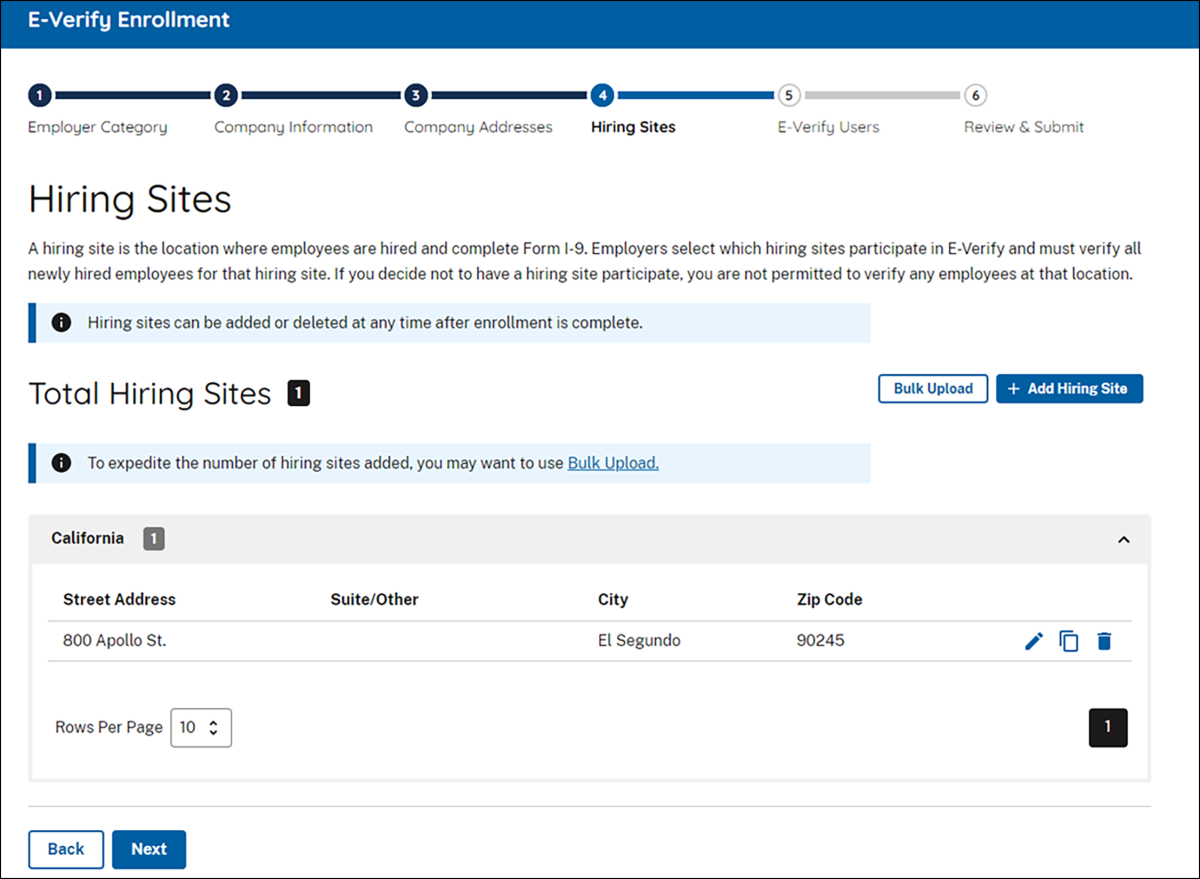
- Provide hiring site information
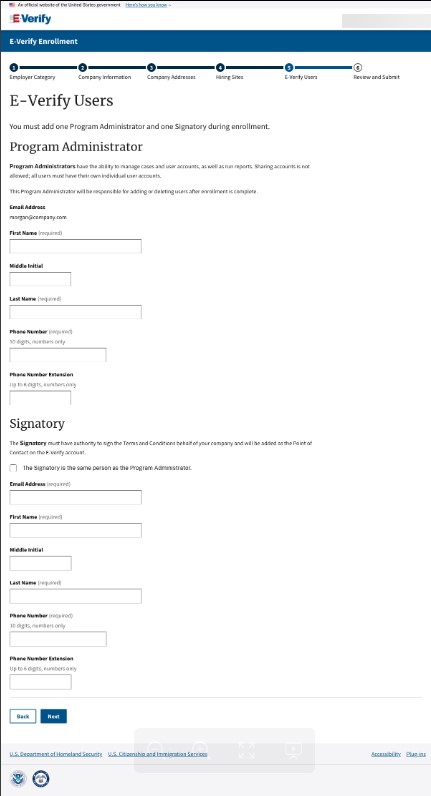
- Add a Program Administrator and the Signatory
- Review the information you entered
- Review and Agree to the Terms and Conditions
- Submit enrollment
- Save or print your electronically signed E-Verify Terms and Conditions of the Memorandum of Understanding and E-Verify+ Terms of Service
Enrollment Steps
Visit Enrollment Website and Accept Terms.
From the E-Verify website select Enroll Now. You must read and agree to the terms explained before you may continue.
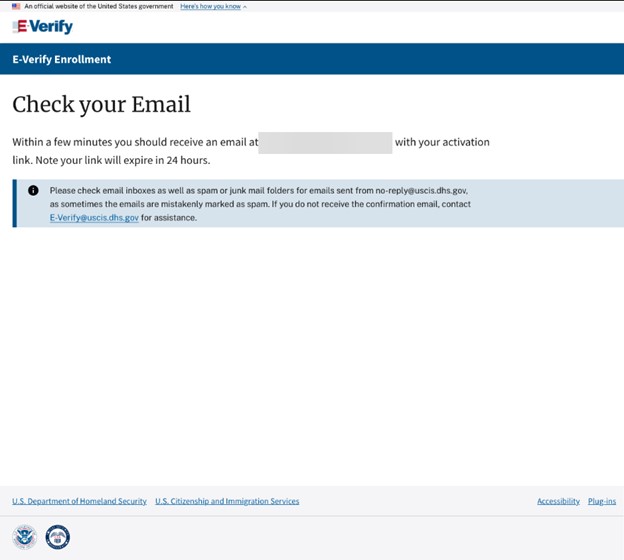
Create a New Company Account.
Submit your email address to receive an activation link to create a new company account.

Check your email for your activation link. Click the one-time use link to begin enrollment. You must complete your company’s E-Verify enrollment in a single session.
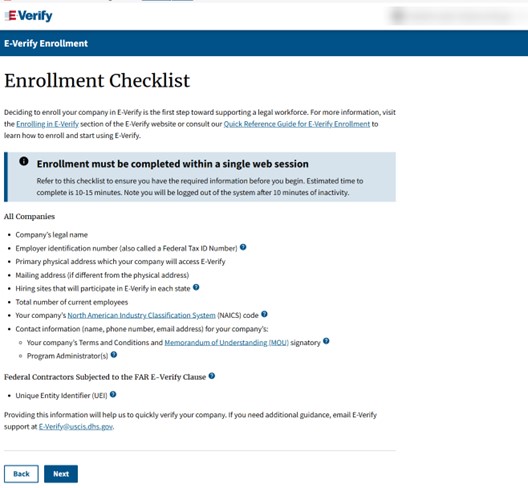
Review Enrollment Checklist.
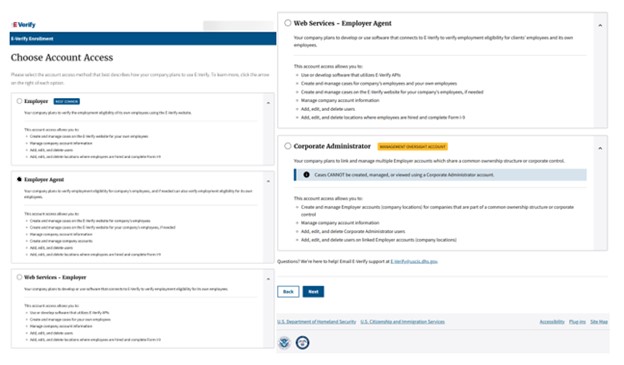
Choose Account Access.
An access method provides companies with different functions within E-Verify. The four access methods are Employer, E-Verify Employer Agent, Corporate Administrator, and Web services. *E-Verify+ is currently available to the Employer access method only.
E-Verify will guide you through four questions to help determine which access method is right for your company. Read the questions carefully because errors can delay us from approving your company's enrollment. Each access method includes an explanation and a question for you to answer. You'll need to answer all four questions in order to continue.
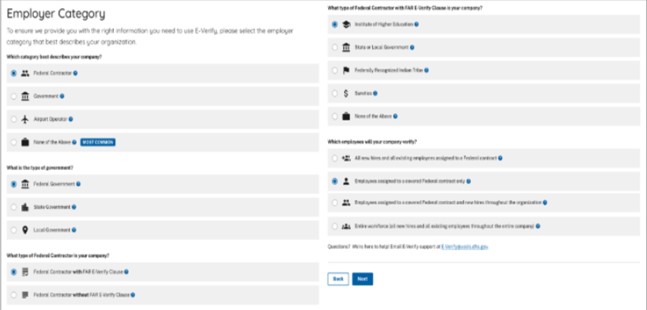
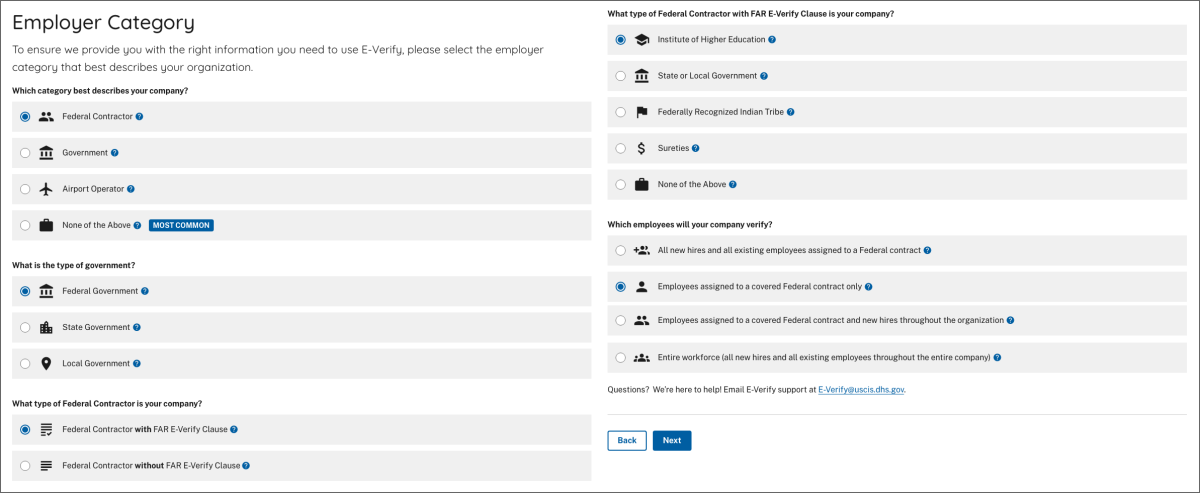
Choose Employer Category.
Certain types of organizations have unique E-Verify requirements, so it is important for us to know if your company is a federal contractor with or without the Federal Acquisition Regulation (FAR) E-Verify clause or a federal, state or local government organization. If you select one of those categories, you may be asked additional questions related to that category. If none of these categories applies to your company, you should select 'None of these categories apply.'
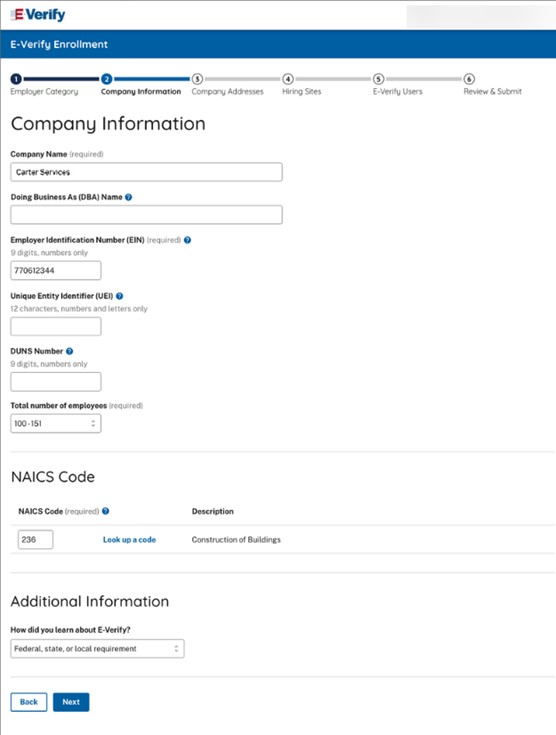
Enter Company Information.
Enter your company details, including your company's name, parent organization, physical verification location, mailing address, employer identification number and total number of employees. If you are enrolling your company in E-Verify employer access and you would like to link this account to an existing Corporate Administrator account, you may do so. Enter the first three digits of your company's NAICS code if you know it. If you do not know your company's NAICS code, you can leave the NAICS code field blank and click Look Up a Code.
- Provide Company Addresses.
Enter Company Information
Enter your company details, including your company's name, parent organization, physical verification location, mailing address, employer identification number and total number of employees. If you are enrolling your company in E-Verify employer access and you would like to link this account to an existing corporate administrator account, you may do so. Enter the first three digits of your company's NAICS code if you know it. If you do not know your company's NAICS code, you can leave the NAICS code field blank and click "Look Up a Code."
- Add Hiring Site Location Information and Bulk Upload.
The hiring site location is the physical address for each hiring site participating in E-Verify.- Select + Add Hiring Site and enter the street address, city, state, and zip code and click Add Hiring Site to add your hiring sites one at a time.
- Select the icons to add, edit, or delete a hiring site that will participate in E-Verify for each state.
OR - Select Bulk Upload to add multiple hiring sites by uploading a file.
To use the bulk upload function, you must create a comma separated value (.csv) file with the hiring site addresses.- If you need to create a .csv file, click Download CSV Template to open a pre-formatted .csv file. Add the hiring site addresses to the .csv file and save the document.
- You also can drag the .csv file or click ‘choose from folder’ to locate the file and click Bulk Upload Hiring Sites.
Add the Signatory and a Program Administrator.
You must add one Program Administrator and one Signatory. The Program Administrator will be a user on the account with access to manage other users and cases. Enter the contact information of the person who will sign the Terms and Conditions on behalf of your company as the Signatory. This may be the same person or different people. Each of these roles are outlined on the screen. If your Program Administrator is also the signatory, you may select the check box stating The Signatory is the same person as the Program Administrator instead of completing the information twice.
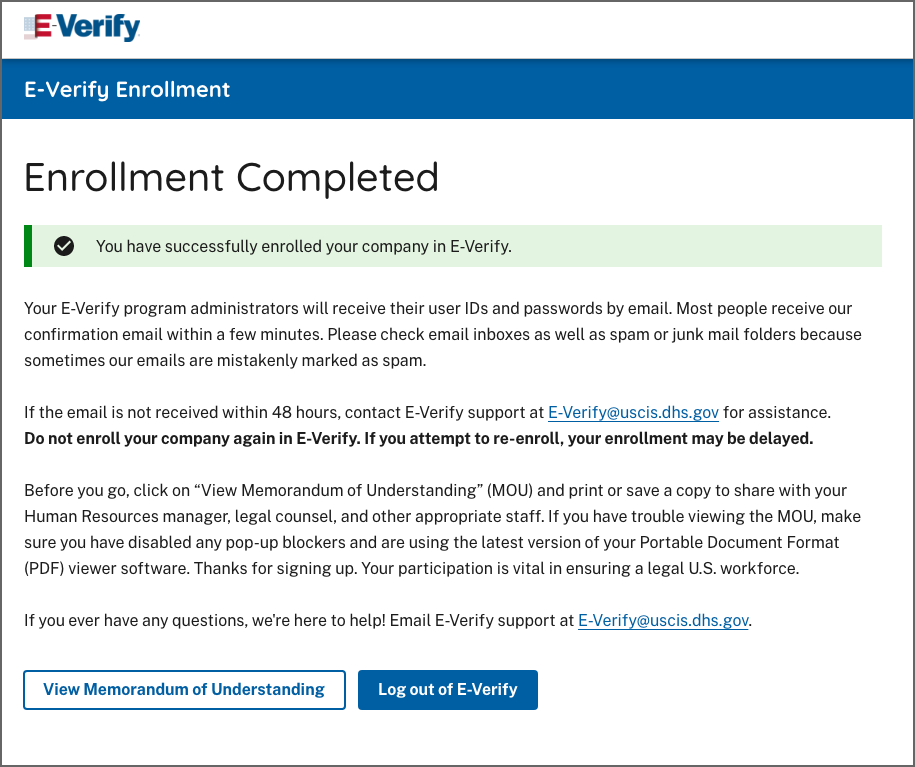
Review and Submit Enrollment.
The enrollment confirmation page confirms that we have received your enrollment information. Before you go, be sure to print a copy of the E-Verify Terms and Conditions of the Memorandum of Understanding, E-Verify+ Terms of Service you electronically signed. We recommend you share it with your human resources manager, legal counsel and other appropriate staff.